Tinybird
This connector materializes Estuary collections as Kafka-compatible messages that a Tinybird Kafka consumer can read. Tinybird is a data platform for user-facing analytics.
Prerequisites
To use this connector, you'll need:
- At least one Estuary collection
- A Tinybird account
Variants
This connector is a variant of the default Dekaf connector. For other integration options, see the main Dekaf page.
Setup
Provide an auth token when setting up the Dekaf connector. This can be a password of your choosing and will be used to authenticate consumers to your Kafka topics.
Once the connector is created, note the full materialization name, such as YOUR-ORG/YOUR-PREFIX/YOUR-MATERIALIZATION. You will use this as the username.
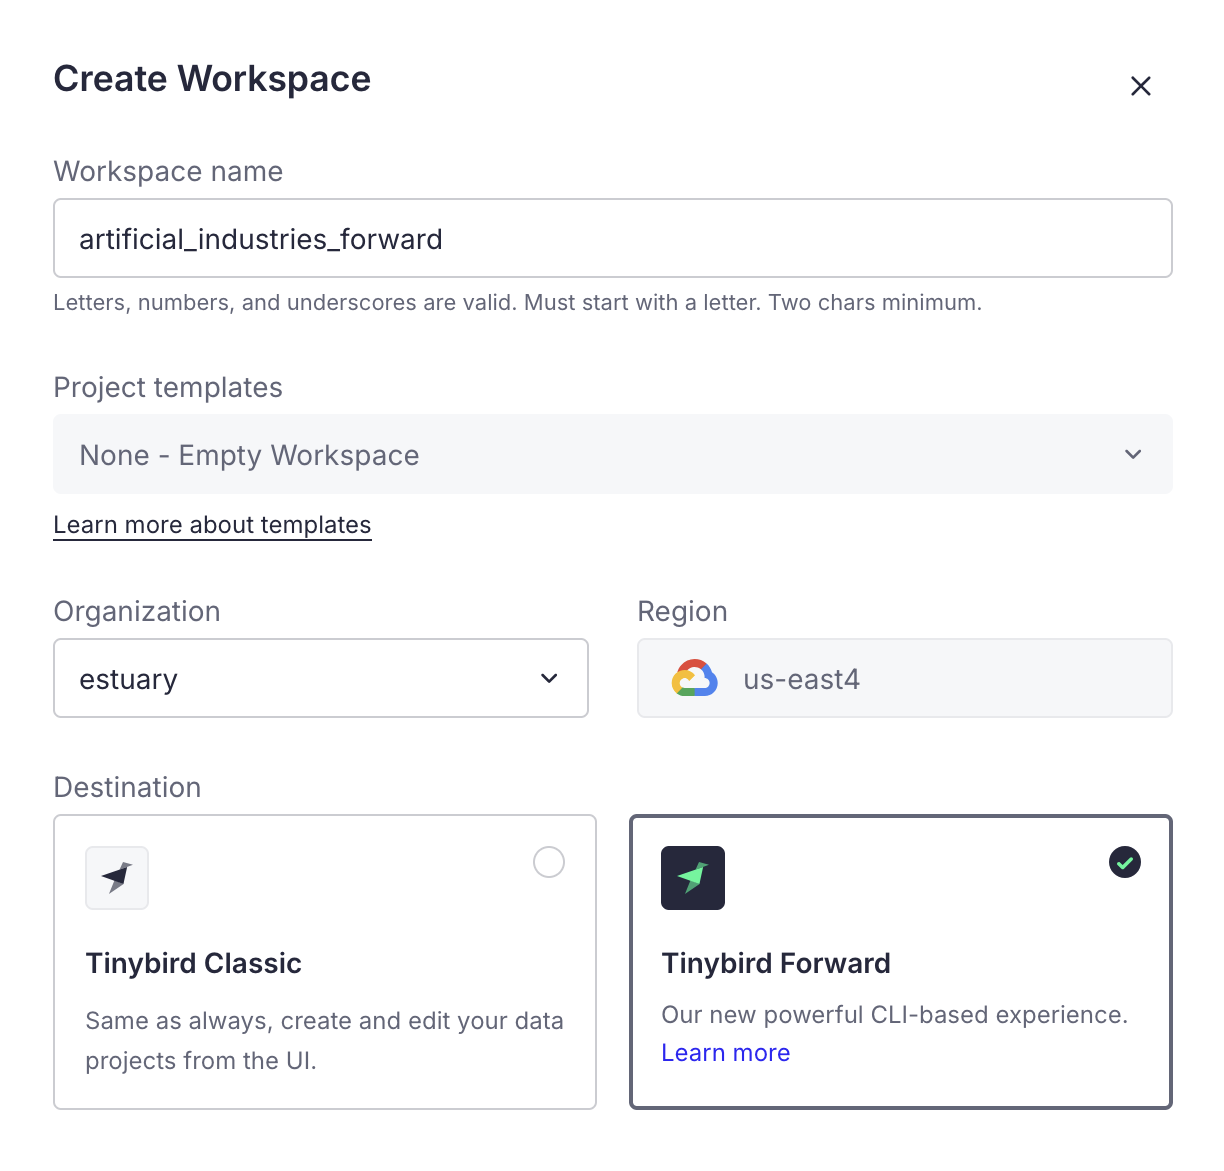
Connecting Estuary to Tinybird
When you create a new workspace in Tinybird, you may be able to choose between Tinybird Classic and Tinybird Forward. Classic is based on UI configuration while Forward is based on CLI configuration, so each type of workspace requires different setup steps.
Forward workspaces
In a Tinybird Forward workspace, you will need to develop your project locally first before deploying it to Tinybird. Follow Tinybird's Quickstart prompts to get started with the CLI up through creating your project.
Locally, you should have a directory structure with folders for all of your resources, such as connections and datasources.
In the connections directory, modify the stub file or create a new .connection file. Add your Dekaf connection details here, following the structure below.
Note that while the example uses plain text for clarity, you can use tb secret to manage secrets within your config.
TYPE kafka
KAFKA_BOOTSTRAP_SERVERS "dekaf.estuary-data.com"
KAFKA_SECURITY_PROTOCOL SASL_SSL
KAFKA_SASL_MECHANISM PLAIN
KAFKA_KEY "YOUR-ORG/YOUR-PREFIX/YOUR-MATERIALIZATION"
KAFKA_SECRET "YOUR-DEKAF-AUTH-TOKEN"
KAFKA_SCHEMA_REGISTRY_URL "https://YOUR-ORG/YOUR-PREFIX/YOUR-MATERIALIZATION:YOUR-DEKAF-AUTH-TOKEN@dekaf.estuary-data.com"
While Tinybird doesn't require a schema registry URL by default, the Avro message format that Dekaf uses does require it.
Include the schema registry username and password (same as the Tinybird KAFKA_KEY and KAFKA_SECRET) within the address in the format: https://username:password@dekaf.estuary-data.com.
You will then need to create an associated .datasource file in the datasources directory. The exact format will depend on your desired schema and how you want to handle deletions.
A simple example is provided below; see Tinybird's docs for more options and advanced configuration.
SCHEMA >
   `__value` String `json:#.__value`,
   `_meta_op` String `json:$._meta.op`

ENGINE "MergeTree"
ENGINE_PARTITION_KEY "toYYYYMM(__timestamp)"
ENGINE_SORTING_KEY "__timestamp"

KAFKA_CONNECTION_NAME "YOUR_TB_CONNECTION_FILENAME"
KAFKA_TOPIC "YOUR_ESTUARY_TABLE_NAME"
KAFKA_GROUP_ID "KAFKA_GROUP_ID"
KAFKA_KEY_FORMAT "avro"
KAFKA_VALUE_FORMAT "avro"
KAFKA_STORE_RAW_VALUE "True"
KAFKA_AUTO_OFFSET_RESET "earliest"
Note that your topic name needs to match exactly what is set as a topic name in the binding resource config.
Build and deploy your Tinybird project using:
tb build
tb --cloud deploy
You will then be able to view your Dekaf data in your Tinybird workspace.
Classic workspaces
In a Tinybird Classic workspace, create a new Data Source using the Kafka Connector.
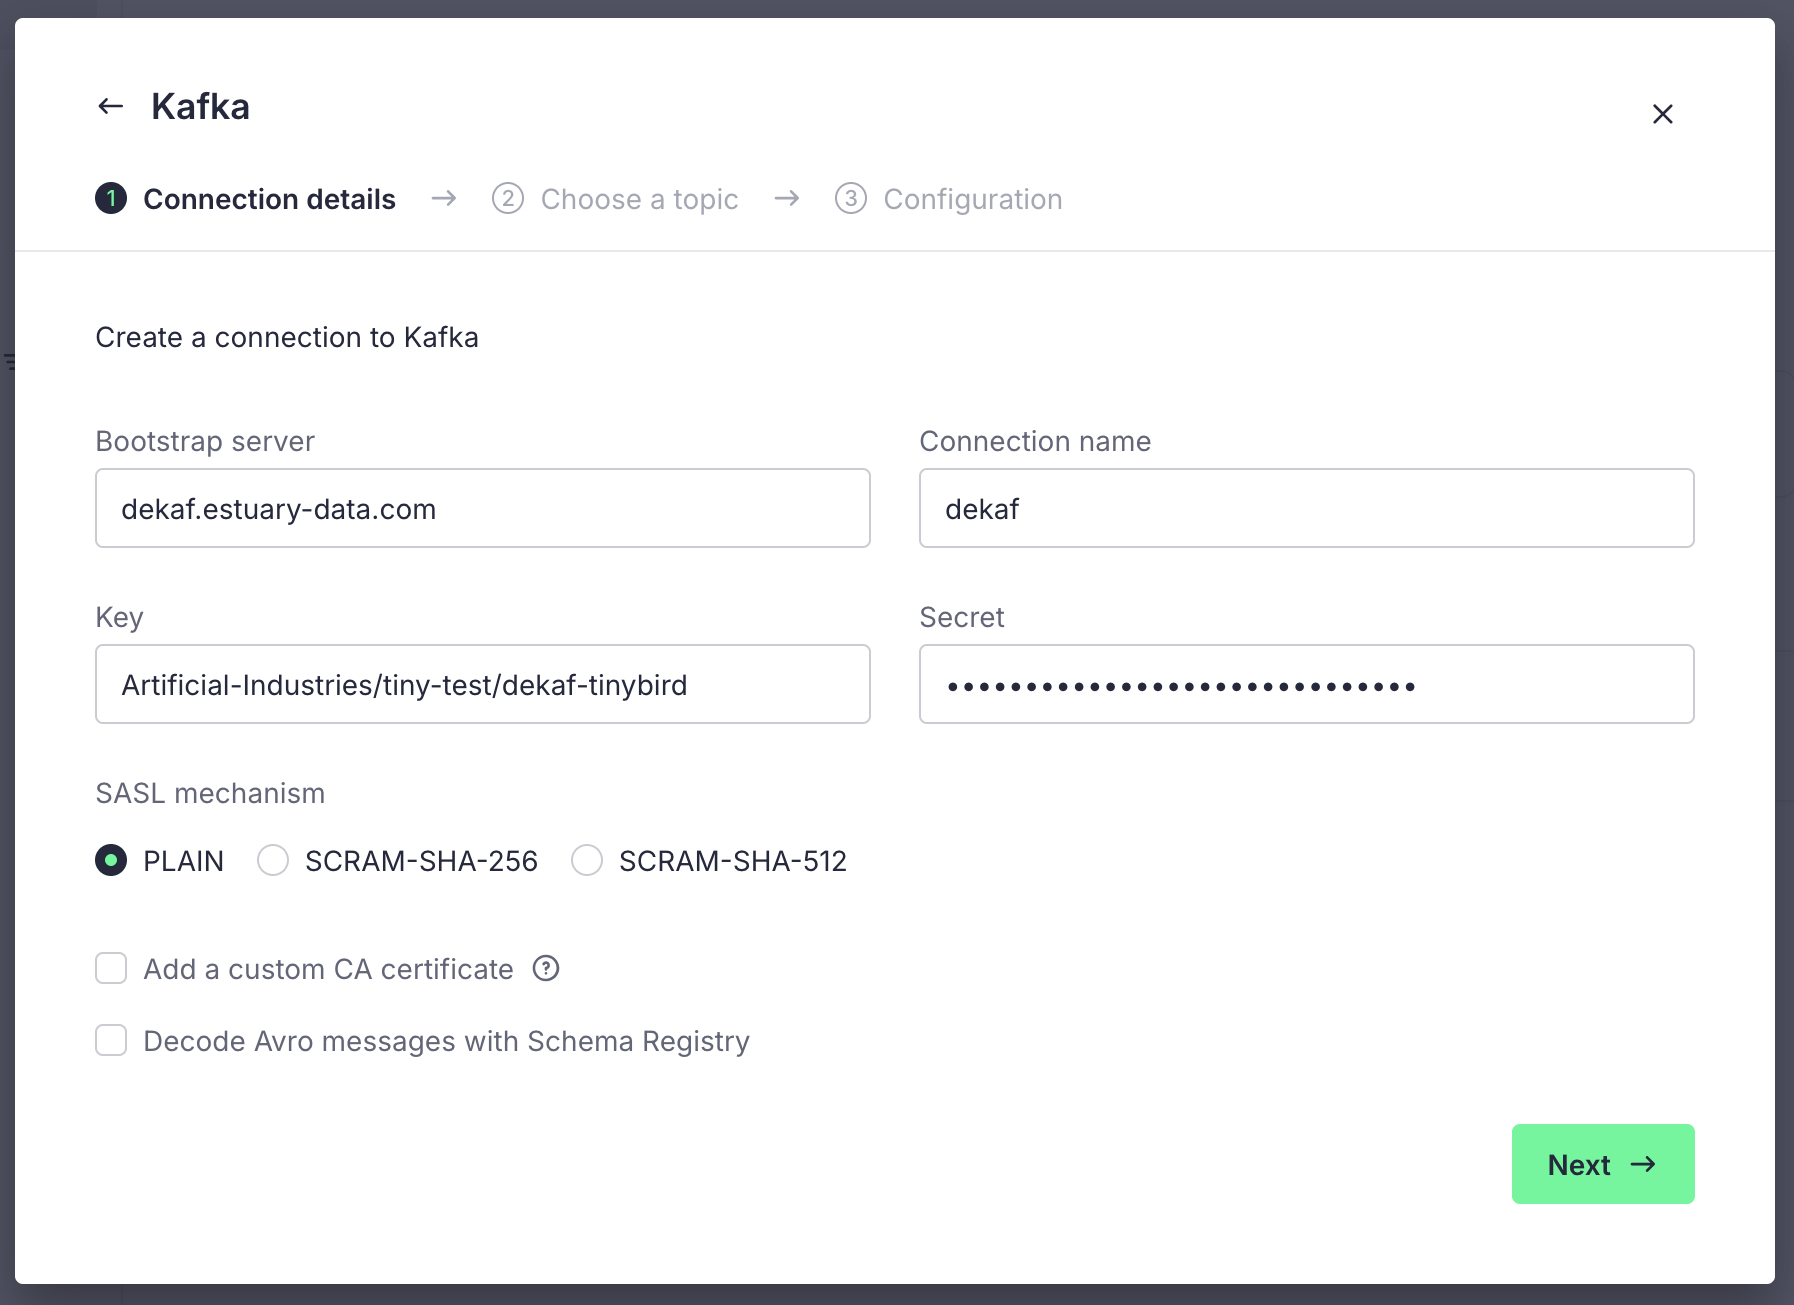
To configure the connection details, use the following settings.
- Bootstrap servers:
dekaf.estuary-data.com - SASL Mechanism:
PLAIN - SASL Username: Your materialization's full name, such as
YOUR-ORG/YOUR-PREFIX/YOUR-MATERIALIZATION - SASL Password: Your materialization's auth token
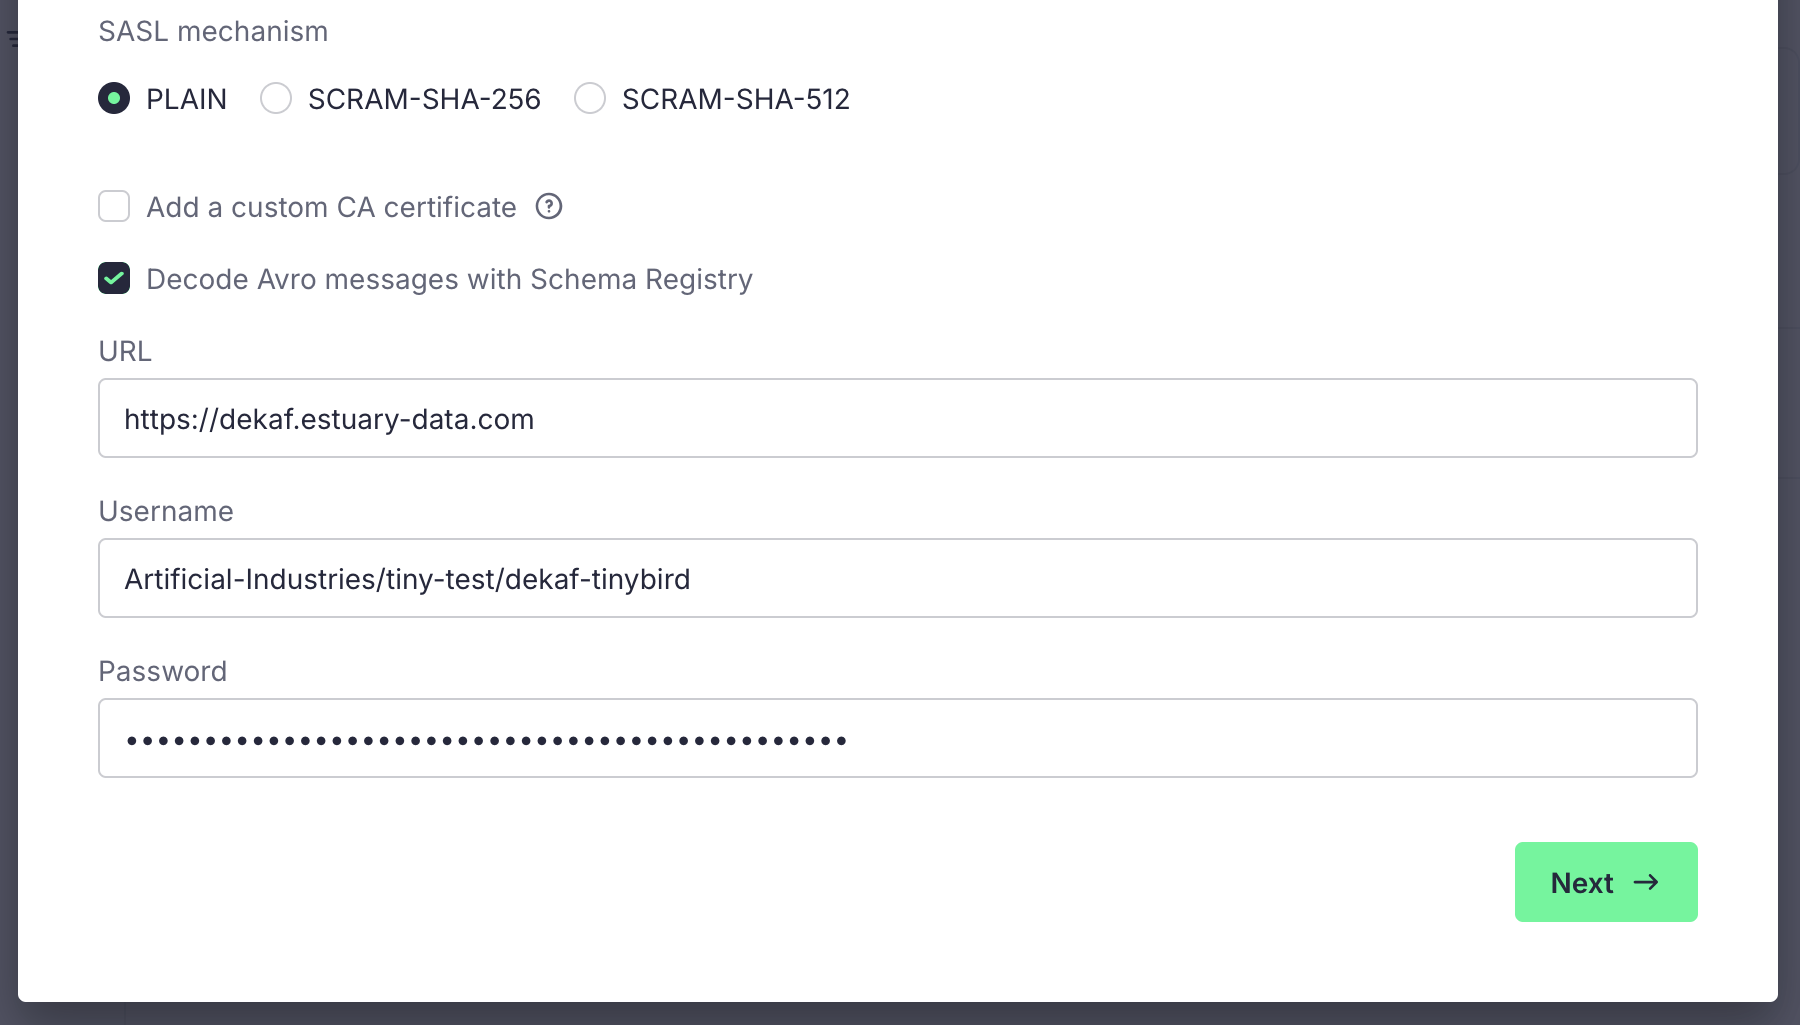
Tick the "Decode Avro messages with Schema Registry" box, and use the following settings:
- URL:
https://dekaf.estuary-data.com - Username: The same as your SASL username
- Password: The same as your SASL password
Click Next and you will see a list of topics. These topics are the collections you added to your materialization. Select the collection you want to ingest into Tinybird, and click Next.
Configure your consumer group as needed.
Finally, you will see a preview of the Data Source schema. Feel free to make any modifications as required, then click Create Data Source.
This will complete the connection with Tinybird, and new data from the Estuary collection will arrive in your Tinybird Data Source in real-time.
Configuration
To use this connector, begin with data in one or more Estuary collections. Use the below properties to configure a Dekaf materialization, which will direct one or more of your Estuary collections to your desired topics.
Properties
Endpoint
| Property | Title | Description | Type | Required/Default |
|---|---|---|---|---|
/token | Auth Token | The password that Kafka consumers can use to authenticate to this task. | string | Required |
/strict_topic_names | Strict Topic Names | Whether or not to expose topic names in a strictly Kafka-compliant format. | boolean | false |
/deletions | Deletion Mode | Can choose between kafka or cdc deletion modes. | string | kafka |
Bindings
| Property | Title | Description | Type | Required/Default |
|---|---|---|---|---|
/topic_name | Topic Name | Kafka topic name that Dekaf will publish under. | string | Required |
Sample
materializations:
  ${PREFIX}/${mat_name}:
    endpoint:
      dekaf:
        config:
          token: <auth-token>
          strict_topic_names: false
          deletions: kafka
        variant: tinybird
    bindings:
      - resource:
          topic_name: ${COLLECTION_NAME}
        source: ${PREFIX}/${COLLECTION_NAME}
Configuring support for deletions
Many Estuary connectors capture a stream of change data which can include deletions, represented by the _meta/op field. By default, the schema that Tinybird infers from your data won't include support for these deletions documents. The reason for this is that we frequently don't include the entire document that got deleted, and instead simply include its key. This will violate non-null constraints that get inferred at dataflow creation time.
Enabling deletions will require using the connector's CDC deletion mode.
To enable this setting in the UI, expand the Deletion Mode option in your materialization's Endpoint Config. Choose cdc from the dropdown menu.
This is expressed in the schema as the deletions setting:
endpoint:
  dekaf:
    config:
      deletions: cdc
This will change the default behavior of emitting deletions as Kafka null-value'd records to emitting the full deletion document. Documents will also contain a special /_is_deleted field which is helpful for configuring hard deletes.
Soft deletes
Soft deletes occur when a document is marked as deleted but is not physically removed from the destination. Instead, it is flagged for deletion with a specific metadata field.
If a row is deleted, the value of its _meta/op field will be set to d, distinguishing it from created (c) or updated (u) rows.
Hard deletes
Instead of exposing deletion events for you to handle on your own, hard deletes cause deleted documents (identified by their unique key) to be deleted from the Tinybird dataflow entirely.
For this, you will want to make sure your Tinybird data source uses the ReplacingMergeTree engine option. You can find out more about Tinybird's table engines here.
Ensure the cdc deletion mode is enabled for your materialization. Then, you can extract the /_is_deleted field, and configure the ReplacingMergeTree engine's ENGINE_IS_DELETED flag to use it:
SCHEMA >
    `__value` String `json:#.__value`,
    `_is_deleted` UInt8 `json:$._is_deleted`,
    `_meta_op` String `json:$._meta.op`
ENGINE "ReplacingMergeTree"
ENGINE_SORTING_KEY "__key"
ENGINE_VER "__offset"
ENGINE_IS_DELETED "_is_deleted"
Now, the last piece to the puzzle is to add the FINAL keyword to any Tinybird query targeting this datasource. For example, if you create a pipe that looks like this:
Node 1
SELECT * FROM your_datasource FINAL
Node 2
SELECT * FROM your_top_node WHERE _meta_op = 'd'
You should find no rows returned, indicating that the deleted rows were correctly filtered out.