Apache Iceberg
This connector materializes Estuary collections into Iceberg tables. It orchestrates Spark jobs running on your configured compute system to merge updates into materialized tables as new data is available in the source collections.
Prerequisites
To use this connector, you'll need:
- An Iceberg catalog that implements the Apache Iceberg REST Catalog API
- An AWS EMR Serverless Application with the Spark runtime
- An S3 bucket for staging data files to be merged into tables
- A dedicated IAM role for executing jobs on the EMR Serverless Application
- An AWS IAM user or role for submitting jobs to the EMR Serverless Application
See below for detailed descriptions of how these should be set up.
Iceberg Catalog
Using AWS Glue as an Iceberg Catalog
AWS Glue Catalogs are supported by way of the AWS Glue Iceberg REST endpoint.
Note the following connector configuration details when using AWS Glue as the catalog:
- The Base URL for the catalog should be
https://glue.<region>.amazonaws.com/iceberg, where<region>is the AWS region of the catalog- Example:
https://glue.us-east-2.amazonaws.com/icebergfor a Glue catalog inus-east-2
- Example:
- The Warehouse is your AWS Account ID, without hyphens
- Example: If your AWS Account ID is
0123-4567-8901, the Warehouse is012345678901
- Example: If your AWS Account ID is
- Base Location is required. This is the base location of where table data
and metadata will be stored, by default under
/dataand/metadata, respectively. It must be an S3 path starting withs3://<bucket>. For other REST catalogs, this is an optional input - Use AWS SigV4 or AWS IAM for the Catalog Authentication option. Input the credentials for an AWS IAM user or role that has been granted sufficient permissions to read and write metadata to the catalog. See below for an example policy that includes the minimum required permissions to interact with the Glue catalog and bucket containing table metadata.
{
  "Version": "2012-10-17",
  "Statement": [
    {
      "Sid": "GlueIcebergCatalogAccess",
      "Effect": "Allow",
      "Action": [
        "glue:GetCatalog",
        "glue:GetDatabases",
        "glue:CreateTable",
        "glue:GetTables",
        "glue:CreateDatabase",
        "glue:UpdateTable",
        "glue:DeleteTable",
        "glue:GetTable"
      ],
      "Resource": [
        "arn:aws:glue:<region>:<aws-account-id>:*"
      ]
    },
    {
      "Sid": "TableBucketAccess",
      "Effect": "Allow",
      "Action": [
        "s3:PutObject",
        "s3:GetObject",
        "s3:ListBucket",
        "s3:DeleteObject"
      ],
      "Resource": [
        "arn:aws:s3:::<table-bucket>",
        "arn:aws:s3:::<table-bucket>/*"
      ]
    }
  ]
}
The AWS IAM user or role configured for the Catalog Authentication does not necessarily need to be the same as the one configured to access the AWS EMR Serverless Application, but it can be.
AWS Glue with Lake Formation
AWS Lake Formation provides an additional layer of permissions that apply after IAM policy permissions. If you are using AWS Lake Formation to manage access to your Glue catalog, additional setup is required to grant the necessary access.
The following instructions assume Lake Formation is enabled, and that the bucket location you are using to store Iceberg table data is a registered location in Lake Formation. Reference the AWS Lake Formation Developer Guide for comprehensive instructions for adding Lake Formation permissions. Specific permissions and sample AWS CLI commands for this connector are shown below, where applicable.
- Ensure that the registered location is not using the default service-linked
role (
AWSServiceRoleForLakeFormationDataAccess). You must create a custom role for registering the location. At a minimum, the role must have an inline policy granting access to the registered bucket, as well as a trust relationship with thelakeformation.amazonaws.comentity. An example inline bucket access policy and trust policy are below:
{
  "Version": "2012-10-17",
  "Statement": [
    {
      "Sid": "LakeFormationRegisteredLocationBucketAccessPolicy",
      "Effect": "Allow",
      "Action": [
        "s3:PutObject",
        "s3:GetObject",
        "s3:ListBucket",
        "s3:DeleteObject"
      ],
      "Resource": [
        "arn:aws:s3:::<table-bucket>",
        "arn:aws:s3:::<table-bucket>/*"
      ]
    }
  ]
}
{
    "Version": "2012-10-17",
    "Statement": [
        {
            "Sid": "LakeFormationRegisteredLocationTrustPolicy",
            "Effect": "Allow",
            "Principal": {
                "Service": "lakeformation.amazonaws.com"
            },
            "Action": "sts:AssumeRole"
        }
    ]
}
- Give the
lakeformation:GetDataAccesspermission to the configured catalog user, for example by attaching a policy to the user like this:
{
  "Version": "2012-10-17",
  "Statement": [
    {
      "Effect": "Allow",
      "Action": "lakeformation:GetDataAccess",
      "Resource": "*"
    }
  ]
}
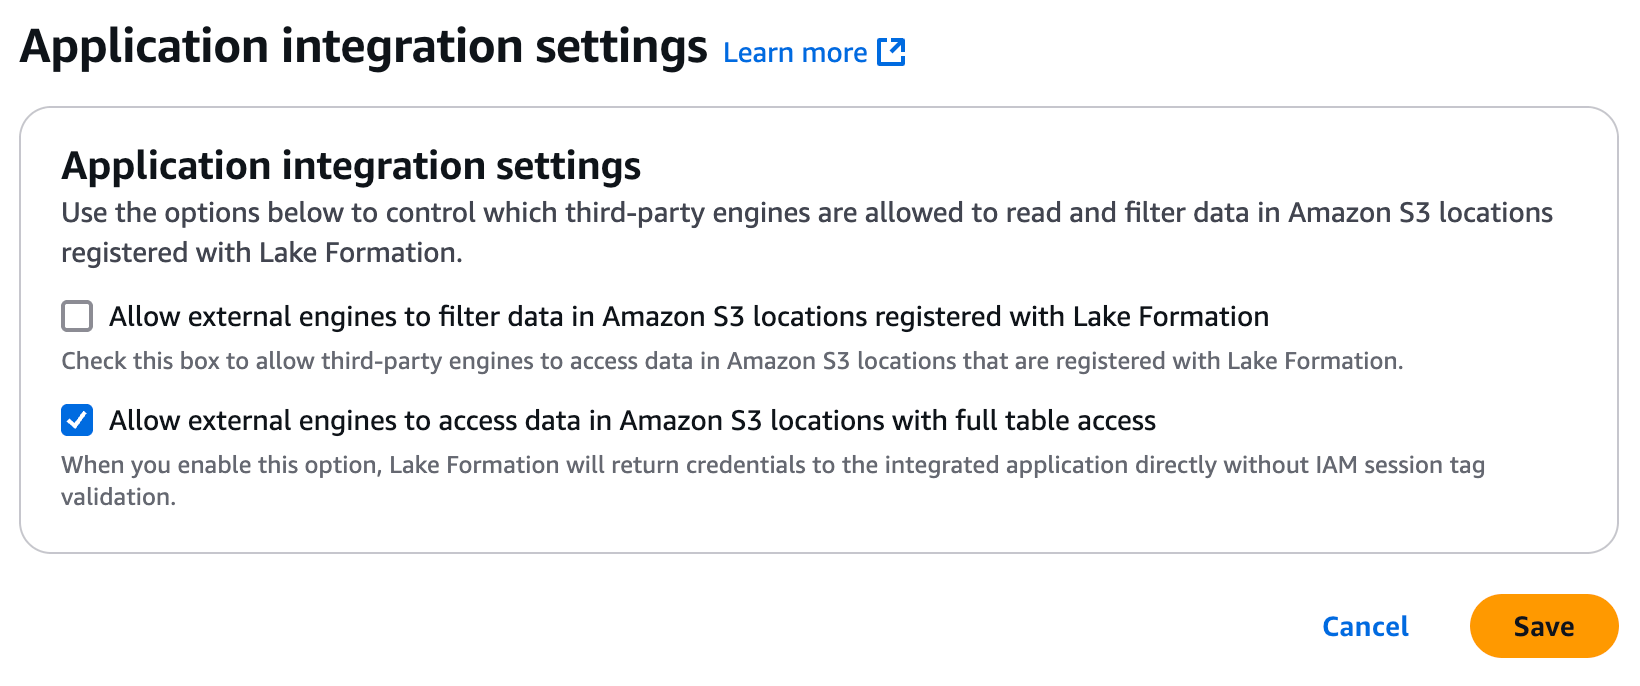
-
In the Lake Formation console, under Administration -> Application integration settings, ensure Allow external engines to access data in Amazon S3 locations with full table access is enabled by checking the box for it.
-
Grant
DATA_LOCATION_ACCESSto the registered location for the catalog user:
aws lakeformation grant-permissions \
  --principal DataLakePrincipalIdentifier=<catalog-user-arn> \
  --permissions "DATA_LOCATION_ACCESS" \
  --resource '{"DataLocation":{"CatalogId":"<aws-account-id>","ResourceArn":"<registered-bucket-arn>"}}'
- Grant
CREATE_DATABASEon the catalog for the catalog user:
aws lakeformation grant-permissions \
  --principal DataLakePrincipalIdentifier=<catalog-user-arn> \
  --permissions "CREATE_DATABASE" \
  --resource '{ "Catalog": {"Id": "<aws-account-id>"} }'
- Grant
ALLaccess to tables within any pre-existing databases that will contain materialized tables to the catalog user. Databases the connector creates will automatically have the necessary permissions for the catalog user. Run this command for each pre-existing database that matches a namespace of a binding configured in the materialization:
aws lakeformation grant-permissions \
  --principal DataLakePrincipalIdentifier=<catalog-user-arn> \
  --permissions "ALL" \
  --resource '{ "Table": {"DatabaseName":"<database-name>", "TableWildcard":{}}}'
- Grant
ALLaccess to all databases that will contain materialized tables to the EMR Execution Role. You may need to do this step after the connector has automatically created the databases for the role to have the required access. Run this command for each database:
aws lakeformation grant-permissions \
  --principal DataLakePrincipalIdentifier=<emr-execution-role-arn> \
  --permissions "ALL" \
  --resource '{ "Table": {"DatabaseName":"<database-name>", "TableWildcard":{}}}'
If you have enabled a source capture for your materialization and a new binding is added with a new namespace, you will need the repeat step 7 to grant access to that database to the EMR execution role.
S3 Table Buckets
You can materialize to S3 table buckets using the AWS Glue Iceberg Rest Endpoint if your S3 tables are integrated with the Glue data catalog, or directly using the S3 Tables Iceberg REST Endpoint.
If you plan to query your S3 table buckets using AWS analytics services such as Amazon Athena, all table column names must be lowercase. You should enable the advanced option "Lowercase Column Names" in the materialization configuration if your source collection has fields with capital letters in their names to ensure all columns are created as lowercase.
To configure the materialization to connect directly to the S3 Tables Iceberg REST Endpoint:
- The Base URL for the catalog should be
https://s3tables.<region>.amazonaws.com/iceberg, where<region>is the AWS region of the bucket. - The Warehouse is the table bucket ARN, in the form of
arn:aws:s3tables:<region>:<accountID>:bucket/<bucketname>. - Use AWS SigV4 or AWS IAM for the Catalog Authentication option. Input the AWS Access Key ID and AWS Secret Access Key for an AWS IAM user that has been granted sufficient permissions to read and write to the bucket.
- Your EMR Execution Role must also have been granted sufficient permissions to read and write to the bucket. See below for an example policy with the necessary permission for both the AWS IAM user or role and the execution role.
{
    "Version": "2012-10-17",
    "Statement": [
        {
            "Sid": "S3TablesAccess",
            "Effect": "Allow",
            "Action": [
                "s3tables:GetTableBucket",
                "s3tables:ListNamespaces",
                "s3tables:CreateNamespace",
                "s3tables:ListTables",
                "s3tables:CreateTable",
                "s3tables:PutTableData",
                "s3tables:GetTableData",
                "s3tables:UpdateTableMetadataLocation",
                "s3tables:GetTableMetadataLocation",
                "s3tables:DeleteTable"
            ],
            "Resource": [
                "arn:aws:s3tables:<region>:<aws-account-id>:bucket/<bucket>",
                "arn:aws:s3tables:<region>:<aws-account-id>:bucket/<bucket>/*"
            ]
        }
    ]
}
Using Other REST Catalogs
Configuration for REST catalogs other than AWS Glue will depend on the specific catalog. These catalogs should use OAuth 2.0 Client Credentials for the Catalog Authentication configuration.
Currently only REST catalogs that use Amazon S3 for external cloud storage are supported. Support for catalogs backed by GCP or Azure is planned.
Example: Snowflake Open Catalog
Snowflake Open Catalog is a managed Iceberg REST catalog service. Refer to the docs for detailed information on how to set it up. These are the high-level steps that must be completed:
- Create external cloud storage for the catalog. This is where table data and metadata files are stored
- Create the catalog and permissions for Snowflake Open Catalog to access your cloud storage
- Create a Role for the catalog, and grant it these permissions:
- CATALOG_MANAGE_CONTENT
- CATALOG_MANAGE_METADATA
- CATALOG_READ_PROPERTIES
- CATALOG_WRITE_PROPERTIES
- NAMESPACE_CREATE
- NAMESPACE_FULL_METADATA
- NAMESPACE_LIST
- NAMESPACE_READ_PROPERTIES
- NAMESPACE_WRITE_PROPERTIES
- TABLE_CREATE
- TABLE_DROP
- TABLE_FULL_METADATA
- TABLE_LIST
- TABLE_READ_DATA
- TABLE_READ_PROPERTIES
- TABLE_WRITE_DATA
- TABLE_WRITE_PROPERTIES
- Create a Service Connection and Principal Role. When creating the
service connection, the input for Query Engine can be left blank, or set
to anything you want. Copy the Client ID and Client Secret when they
are shown to you. You will need this credential when setting up the
materialization's Catalog Credential, as
<client id>:<client secret> - Grant the Role you created in the catalog to the Principal Role you just created
Now you can configure the materialization:
- The Base URL should be
https://<open_catalog_account_identifier>.snowflakecomputing.com/polaris/api/catalog - For Warehouse, use the name of the Snowflake Open Catalog.
- Enter any Namespace you desire. It will be created if it does not already exist
- Base Location can be left blank to use the default base location you specified when creating the Snowflake Open Catalog
- For Catalog Authentication, select OAuth 2.0 Client Credentials:
- Use the default
v1/oauth/tokensforOAuth 2.0 Server URI - Input the Catalog Credential you copied when creating the Service Connection
- Set the Scope as
PRINCIPAL_ROLE:<your_principal>, where<your_principal>is the name of the Principal Role you created when creating the Service Connection
- Use the default
You can specify the <open_catalog_account_identifier> in the Base URL
above as <account name>.<cloud region>.<cloud provider>. See the
docs for
how to find your account name. The cloud region and cloud provider are for
the Snowflake Open Catalog, and are found in the same place as the account name.
For example, if your account name is ab12345 on us-east-2.aws, your Base
URL will be
https://ab12345.us-east-2.aws.snowflakecomputing.com/polaris/api/catalog.
AWS EMR Serverless Application Configuration
To use AWS EMR Serverless for compute, a few different AWS items must be set up to work together:
- The connector submits jobs to the AWS EMR Serverless Application and monitors their progress
- Catalog credentials are stored securely in AWS Systems Manager Parameter Store, managed by the connector, and read by EMR jobs to connect to the catalog
- Data to merge into tables is staged in an S3 bucket and read by EMR jobs
- EMR jobs are run using an IAM role with a specific Execution Role ARN
Create the AWS EMR Serverless Application
General documentation for creating a new AWS EMR Serverless Application is available here.
Note the following specific details when creating the application to use with this connector:
- Select Spark for the Type.
- Use emr-7.7.0 for the Release Version, and x86_64 for the Architecture
- For Application setup options, select Use custom settings. These options
can generally be configured as desired, with the specific notes below:
- Pre-initialized capacity is not required, but may help reduce latency for streaming updates
- In Additional configurations there is an option for Use AWS Glue Data Catalog as metastore. This is not required, even if you are using AWS Glue as your Iceberg catalog
- Make sure Automatically start application on job submission is enabled under Application behavior. Enabling Automatically stop after application is idle for is recommended to stop any pre-initialized capacity during periods of low data volume
- In Network connections, you must configure Virtual private cloud (VPC), Subnets, and Security groups to enable REST API calls to your Iceberg catalog. The subnets must have a route to an Internet Gateway, and the security group must allow outbound traffic. See the AWS docs for setting up VPC access for EMR Serverless applications
Configure Parameter Store
AWS Systems Manager Parameter Store requires minimal additional configuration. Catalog credentials are stored encrypted in parameter store by the connector, and retrieved by EMR Serverless jobs to connect to your catalog.
Parameter Store is only used with OAuth 2.0 Client Credentials. If you are
using AWS Glue as your catalog, the Systems Manager Prefix can be left
blank, since the EMR execution role will have permissions to read from the
catalog associated with it directly. The Systems Manager Prefix is a
hierarchical location where the connector will store encrypted credentials. For
example, you may input /estuary/ as the prefix - note the leading a trailing
slashes are required.
Create Staging Bucket
Data to merge into Iceberg tables is staged in an S3 bucket under the optional
Bucket Path prefix by the connector. Additional connector metadata is stored
in the staging bucket under the flow_metadata_v1 prefix. The staging bucket
must be in the same region as the EMR application.
Create IAM Role for EMR Execution
This role must have sufficient permissions to read credentials from Systems Manager (unless you are using Glue), and access data in the staging bucket. If you are using AWS Glue as the catalog, this role must also have permissions to access the catalog.
See the AWS docs for information on how to create the role.
You must include this Custom trust policy for the role type when creating the role in order for jobs submitted to the application to access other AWS services on behalf of the IAM user:
{
  "Version": "2012-10-17",
  "Statement": [
    {
      "Effect": "Allow",
      "Principal": {
        "Service": "emr-serverless.amazonaws.com"
      },
      "Action": "sts:AssumeRole"
    }
  ]
}
See below for an example policy with the required permissions to attach to the execution role if you are using a standard REST catalog:
{
  "Version": "2012-10-17",
  "Statement": [
    {
      "Sid": "StagingBucketAccess",
      "Effect": "Allow",
      "Action": [
        "s3:PutObject",
        "s3:GetObject",
        "s3:ListBucket",
        "s3:DeleteObject"
      ],
      "Resource": [
        "arn:aws:s3:::<staging-bucket>/<optional-bucket-path>",
        "arn:aws:s3:::<staging-bucket>/<optional-bucket-path>/*"
      ]
    },
    {
      "Sid": "ParameterStoreAccess",
      "Effect": "Allow",
      "Action": [
        "ssm:GetParameter"
      ],
      "Resource": "arn:aws:ssm:<region>:<aws-account-id>:parameter/<systems-manager-prefix>/*"
    }
  ]
}
If you are using a Glue catalog, Parameter Store access is not required, but access to the Glue catalog is, as well as access to the bucket where Glue stores the table files:
{
  "Version": "2012-10-17",
  "Statement": [
    {
      "Sid": "StagingBucketAccess",
      "Effect": "Allow",
      "Action": [
        "s3:PutObject",
        "s3:GetObject",
        "s3:ListBucket",
        "s3:DeleteObject"
      ],
      "Resource": [
        "arn:aws:s3:::<staging-bucket>/<optional-bucket-path>",
        "arn:aws:s3:::<staging-bucket>/<optional-bucket-path>/*"
      ]
    },
    {
      "Sid": "TableBucketAccess",
      "Effect": "Allow",
      "Action": [
        "s3:PutObject",
        "s3:GetObject",
        "s3:ListBucket",
        "s3:DeleteObject"
      ],
      "Resource": [
        "arn:aws:s3:::<table-bucket>",
        "arn:aws:s3:::<table-bucket>/*"
      ]
    },
    {
      "Sid": "GlueCatalogTableModification",
      "Effect": "Allow",
      "Action": [
        "glue:GetTable",
        "glue:UpdateTable"
      ],
      "Resource": [
        "arn:aws:glue:<region>:<aws-account-id>:*"
      ]
    }
  ]
}
Create IAM User for Compute Configuration
The credentials set in the AWS EMR Serverless configuration must be for an IAM user or role with permissions to manage jobs for the EMR Serverless Application and read and write data to the staging bucket. If you are using AWS Glue as the catalog, parameter store permissions are not required.
See below for an example policy with these permissions:
{
  "Version": "2012-10-17",
  "Statement": [
    {
      "Sid": "StagingBucketAccess",
      "Effect": "Allow",
      "Action": [
        "s3:PutObject",
        "s3:GetObject",
        "s3:ListBucket",
        "s3:DeleteObject"
      ],
      "Resource": [
        "arn:aws:s3:::<staging-bucket>/<optional-bucket-path>",
        "arn:aws:s3:::<staging-bucket>/<optional-bucket-path>/*"
      ]
    },
    {
      "Effect": "Allow",
      "Action": "iam:PassRole",
      "Resource": "<emr-execution-role-arn>",
      "Condition": {
        "StringEquals": {
          "iam:PassedToService": "emr-serverless.amazonaws.com"
        }
      }
    },
    {
      "Sid": "EMRServerlessActions",
      "Effect": "Allow",
      "Action": [
        "emr-serverless:ListApplications",
        "emr-serverless:GetApplication",
        "emr-serverless:StartApplication",
        "emr-serverless:StartJobRun",
        "emr-serverless:CancelJobRun",
        "emr-serverless:ListJobRuns",
        "emr-serverless:GetJobRun"
      ],
      "Resource": [
        "arn:aws:emr-serverless:<region>:<aws-account-id>:/applications/<emr-application-id>",
        "arn:aws:emr-serverless:<region>:<aws-account-id>:/applications/<emr-application-id>/jobruns/*"
      ]
    },
    {
      "Sid": "ParameterStoreAccess",
      "Effect": "Allow",
      "Action": [
        "ssm:PutParameter",
        "ssm:GetParameter"
      ],
      "Resource": "arn:aws:ssm:<region>:<aws-account-id>:parameter/<systems-manager-prefix>/*"
    }
  ]
}
Configuration
See below for a full list of configuration options.
Properties
Endpoint
| Property | Title | Description | Type | Required/Default |
|---|---|---|---|---|
/url | URL | Base URL for the catalog. | string | Required |
/warehouse | Warehouse | Warehouse to connect to. For AWS Glue, this is the account ID. | string | Required |
/namespace | Namespace | Namespace for bound collection tables (unless overridden within the binding resource configuration). | string | Required (Pattern: ^[^.]*$) |
/base_location | Base Location | Base location for catalog tables. Required if using AWS Glue. Example: s3://your_bucket/your_prefix/. | string | |
/hard_delete | Hard Delete | If enabled, items deleted in the source will also be deleted from the destination. Disabled by default (soft-delete). | boolean | |
/credentials | Catalog Authentication | Authentication method for the catalog. Supports OAuth 2.0 Client Credentials, AWS SigV4, or AWS IAM. | Credentials | Required |
/compute | Compute | Compute backend for processing. Supports AWS EMR Serverless. | object | Required |
/compute/region | Region | Region of the EMR application and staging bucket. | string | Required |
/compute/application_id | Application ID | ID of the EMR serverless application. | string | Required |
/compute/execution_role_arn | Execution Role ARN | ARN of the EMR serverless execution role used to run jobs. | string | Required |
/compute/bucket | Bucket | Bucket to store staged data files. | string | Required |
/compute/credentials | EMR Authentication | Authentication method for EMR. | EMR Credentials | Required |
/compute/bucket_path | Bucket Path | Optional prefix used to store staged data files. | string | |
/compute/systems_manager_prefix | System Manager Prefix | Prefix for parameters in Systems Manager as an absolute directory path (must start and end with /). | string | /estuary/ |
/advanced/lowercase_column_names | Lowercase Column Names | Create all columns with lowercase names. | boolean | |
/glue_optimizers | Glue Table Optimizers | Configure AWS Glue managed table optimizers for compaction. See configuration details. | object |
Credentials
Credentials specify the authentication method for the catalog. Use one of the following sets of options:
| Property | Title | Description | Type | Required/Default |
|---|---|---|---|---|
/auth_type | Auth Type | Authentication method for the catalog. | string | Required: OAuth 2.0 Client Credentials |
/oauth2_server_uri | OAuth 2.0 Server URI | OAuth 2.0 server URI for requesting access tokens. Usually 'v1/oauth/tokens'. | string | Required |
/credential | Catalog Credential | Credential for connecting to the REST catalog. Format: <client_id>:<client_secret> for OAuth, <token> for Bearer authentication. | string | Required |
/scope | Scope | Authorization scope for OAuth client credentials. Example: PRINCIPAL_ROLE:your_principal. | string |
| Property | Title | Description | Type | Required/Default |
|---|---|---|---|---|
/auth_type | Auth Type | Authentication method for the catalog. | string | Required: AWS SigV4 |
/aws_access_key_id | AWS Access Key ID | Access Key ID for AWS SigV4 authentication. | string | Required |
/aws_secret_access_key | AWS Secret Access Key | Secret Access Key for AWS SigV4 authentication. | string | Required |
| Property | Title | Description | Type | Required/Default |
|---|---|---|---|---|
/auth_type | Auth Type | Authentication method for the catalog. | string | Required: AWS IAM |
/aws_role_arn | AWS Role ARN | Role ARN for AWS IAM authentication. | string | Required |
/aws_region | AWS Region | AWS region for AWS SigV4 and IAM authentication. | string | Required |
EMR Credentials
EMR Credentials specify the authentication method for EMR and writing to the staging bucket. Use on of the following sets of options:
| Property | Title | Description | Type | Required/Default |
|---|---|---|---|---|
/auth_type | Auth Type | Authentication method for EMR and writing to the staging bucket. | string | Required: AWSAccessKey |
/aws_access_key_id | AWS Access Key ID | Access Key ID for authenticating with EMR and writing to the staging bucket. | string | Required |
/aws_secret_access_key | AWS Secret Access Key | Secret Access Key for authenticating with EMR and writing to the staging bucket. | string | Required |
| Property | Title | Description | Type | Required/Default |
|---|---|---|---|---|
/auth_type | Auth Type | Authentication method for EMR and writing to the staging bucket. | string | Required: UseCatalogAuth |
Glue Table Optimizers
| Property | Title | Description | Type | Required/Default |
|---|---|---|---|---|
/glue_optimizers/execution_role_arn | Execution Role ARN | IAM role ARN that Glue assumes to perform table optimization. The role must have permissions to read/write table data in S3 and access the Glue catalog. | string | |
/glue_optimizers/enable_compaction | Enable Compaction | Enable automatic compaction of small Iceberg data files to improve query performance. | boolean | false |
/glue_optimizers/enable_retention | Enable Snapshot Retention | Enable automatic removal of old Iceberg table snapshots to reduce storage costs. | boolean | false |
/glue_optimizers/snapshot_retention_days | Snapshot Retention Days | Number of days to retain Iceberg snapshots. Uses the Glue default of 5 if unset. | integer | 5 |
/glue_optimizers/number_of_snapshots_to_retain | Number of Snapshots to Retain | Minimum number of Iceberg snapshots to retain regardless of the retention period. Uses the Glue default of 1 if unset. | integer | 1 |
/glue_optimizers/enable_orphan_file_deletion | Enable Orphan File Deletion | Enable automatic deletion of files that are no longer referenced by any table snapshot. | boolean | false |
/glue_optimizers/orphan_file_retention_days | Orphan File Retention Days | Number of days to retain orphan files before deletion. Uses the Glue default of 3 if unset. | integer | 3 |
Bindings
| Property | Title | Description | Type | Required/Default |
|---|---|---|---|---|
/table | Table | Table name | string | Required |
/namespace | Alternative Namespace | Alternative namespace for this table | string | |
/additional_table_properties | Additional Table Properties | Additional Iceberg table properties to set when the table is created. These are set only at creation time and cannot be changed afterwards. Example: {'write.parquet.compression-codec': 'zstd'} | object |
Sample
materializations:
  ${PREFIX}/${mat_name}:
    endpoint:
      connector:
        image: ghcr.io/estuary/materialize-iceberg:v1
        config:
          url: https://glue.us-east-1.amazonaws.com/iceberg
          warehouse: <accountID>
          namespace: namespace
          base_location: s3://<bucket>
          credentials:
            auth_type: AWS IAM
            aws_role_arn: <iam-arn>
            aws_region: us-east-1
          compute:
            region: us-east-1
            application_id: <emr-app-id>
            execution_role_arn: <emr-arn>
            bucket: <bucket>
            credentials:
              auth_type: UseCatalogAuth
    bindings:
      - resource:
          table: ${COLLECTION_NAME}
        source: ${PREFIX}/${COLLECTION_NAME}
Sync Schedule
This connector supports configuring a schedule for sync frequency. You can read about how to configure this here.
Iceberg Column Types
Estuary collection fields are written to Iceberg table columns based on the data type of the field. Iceberg V2 primitive type columns are created for these Estuary collection fields:
| Collection Field Data Type | Iceberg Column Type |
|---|---|
| array | string |
| object | string |
| boolean | boolean |
| integer | long |
| number | double |
string with {contentEncoding: base64} | binary |
string with {format: date-time} | timestamptz (with microsecond precision) |
string with {format: date} | date |
string with {format: integer} | long |
string with {format: number} | double |
| string (all others) | string |
Estuary collection fields with {type: string, format: time} and {type: string, format: uuid} are
materialized as string columns rather than time and uuid columns for compatibility with
Apache Spark. Nested types are not currently
supported.
Table Maintenance
If you're using the AWS Glue catalog, you can configure Glue Table Optimizers to enable automatic maintenance on your tables, including data file compaction, snapshot retention, and orphan file deletion.
If you do not use Glue for your catalog or otherwise do not configure automatic optimization through the connector, you should conduct regular maintenance for your materialized tables to ensure optimal query performance.