Customize Materialized Fields
Estuary can auto-discover data resources and schemas, and implements a priority-based system that intelligently selects fields to materialize. However, you may wish to override these defaults to customize the final format of your materialized tables. For example, columns you require may be missing or may need specific names to work with downstream systems. Or you might wish to keep columns with sensitive data from materializing entirely.
This happens when the collection's JSON schema doesn't map to a table schema appropriate for your use case.
You can control the shape and appearance of materialized tables using a two-step process.
First, you modify the source collection schema. You can change column names by adding projections: JSON pointers that turn locations in a document's JSON structure into custom named fields.
Then, you add the fields stanza to the materialization specification, telling Estuary which fields to materialize.
You can manage both of these options through Estuary's dashboard or modify them directly in the resource specification file.
The following sections break down the process in more detail.
If you just need to add a field that isn't included by default and it's already present in the schema with a name you like, skip ahead to include desired fields in your materialization.
Capture desired fields and generate projections
Any field you eventually want to materialize must be included in the collection's schema. It's ok if the field is nested in the JSON structure; you'll flatten the structure with projections.
In this workflow, you'll edit a collection. This change can impact other downstream materializations and derivations. Use caution and be mindful of any edit's consequences before publishing.
Captured collections
If the collection you're using was captured directly, follow these steps.
-
Go to the Captures page of Estuary's web app and locate the capture that produced the collection.
-
Select your capture and click the Edit button.
-
Under Target Collections, choose the binding that corresponds to the collection. Then, click the Collection tab.
-
In the list of fields, look for the fields you want to materialize. If they're present and correctly named, you can skip to including them in the materialization.
Compare the field name and pointer. For nested pointers, you'll probably want to change the field name to omit slashes.
-
If you need to change your fields, you can edit the collection schema.
If your desired fields aren't present and your capture does not automatically keep schemas up to date, you can edit the schema directly:
-
Click Edit.
-
Add missing fields to the schema in the correct location based on the source data structure.
-
Click Close.
If you simply want to rename existing fields, you can provide alternate names for individual fields:
-
In the Schema table, click the Rename button for the field you wish to change.
-
In the Alternate Name modal, provide the field's New Name.
-
Click Apply.
If you would like to remove fields entirely or hash their values, you can redact them:
-
In the Schema table, click the Redact button for the field you wish to change.
-
In the Redact Field modal, select your desired redaction strategy.
-
Click Apply.
-
-
Repeat steps 3 through 5 with other collections, if necessary.
-
You can backfill affected collections to ensure historical data is populated with your new projections.
-
Click Save and Publish.
You can also add projections manually with flowctl.
Refer to the guide to editing with flowctl and
how to format projections.
Derived collections
If the collection you're using came from a derivation, follow these steps.
- Pull the derived collection's specification locally using
flowctl.
flowctl catalog pull-specs --name <yourOrg/full/collectionName>
-
Review the collection's schema to see if the fields of interest are included. If they're present, you can skip to including them in the materialization.
-
If your desired fields aren't present or are incorrectly named, add any missing fields to the schema in the correct location based on the source data structure.
-
Use schema inference to generate projections for the fields.
flowctl preview --infer-schema --source <full\path\to\flow.yaml> --collection <yourOrg/full/collectionName>
-
Review the updated schema. Manually change the names of projected fields. These names will be used by the materialization and shown in the endpoint system as column names or the equivalent.
Field selection for materializations
Now that all your fields are present in the collection schema as projections, you can choose which ones to include in the materialization.
Estuary automatically detects fields and uses a priority-based selection system to determine the fields to include or exclude in the materialization.
This means that, for each field, a stronger selection reason will override a weaker rejection reason, and vice versa. This helps ensure that critical fields get materialized.
Every included field will be mapped to a table column or equivalent in the endpoint system.
-
If you haven't created the materialization, begin the process. Pause once you've selected the collections to materialize.
If your materialization already exists, navigate to the edit materialization page.
-
In the Collection Selector, choose the collection whose output fields you want to change.
-
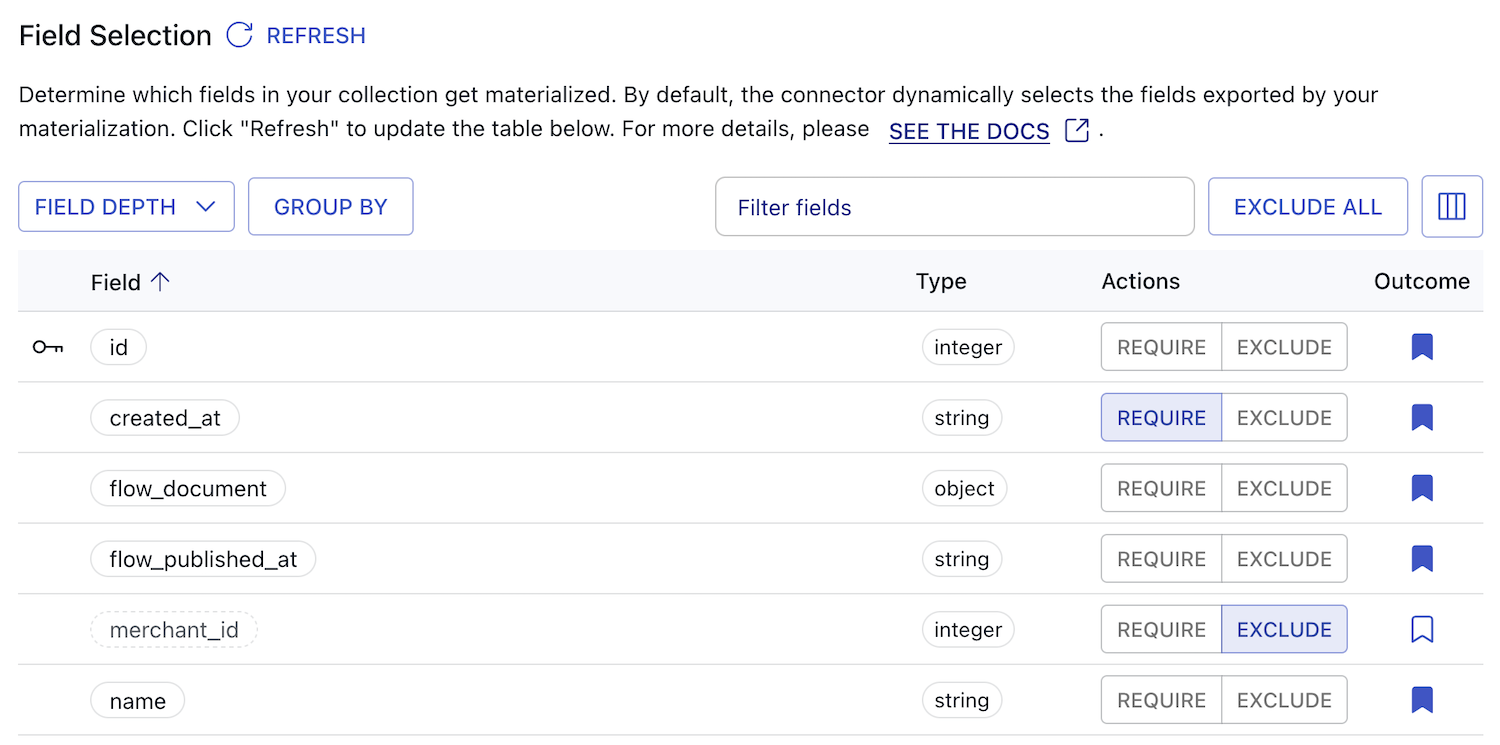
In the Config tab, scroll down to the Field Selection table.
-
Review the listed fields in the field selection table.
Estuary checks each field against a number of selection and rejection criteria to inform the default materialized fields. You can customize this behavior further with modes and individual field overrides.
The field selection table will provide an Outcome for each field:
- Field included: The field will be included in the materialization. Symbolized by a filled bookmark.
- Field excluded: The field will not be included in the materialization. Symbolized by an empty bookmark.
- Conflict: The field matches criteria for both selection and rejection. Symbolized by a warning sign. The outcome tooltip provides detailed information on the conflict.
-
Choose whether to start with one of Estuary's field selection modes. You can customize individual fields later. Modes include and exclude fields based on field depth:
- Required Only: Selects only required fields
- Depth One: Selects all top-level fields
- Depth Two: Selects fields at one and two levels of nesting
- Unlimited Depth: Selects all fields
Selecting a depth limit can help prevent over-materializing complex document structures. If you don't select a mode, Estuary will default to Depth One.
-
You can modify individual fields by choosing to require or exclude them.
-
Repeat steps 2 through 5 with other collections, if necessary.
-
Click Save and Publish.
The named, included fields will be reflected in the endpoint system.
Required Fields
Regardless of user selections, the connector will always require certain basic fields. These fields can include:
- Group-by keys
- Core metadata fields, such as
_meta/op - The current document (when using standard updates, unless the "No Flow Document" option is enabled)
The dashboard will provide a full list of fields that will be materialized, including required fields, along with their selection reasons.
Group-By Keys
In addition to selecting fields to materialize, you can also specify which of those fields should be used as group-by keys. This lets you choose keys independent of the collection key structure.
To set custom group-by keys for your materialized bindings:
-
View the Field Selection table for a binding.
-
At the top of the table, click the Group By button.
This will open a modal where you can configure your keys.
-
Select fields that you would like to use as keys from the dropdown list of available options.
You can select multiple fields to specify an ordered array of primary keys. Selected fields will be displayed as distinct chips, which you can click and drag to reorder.
tipYou can only select fields with a defined scalar type. Objects and other complex data types are not viable keys.
-
Click Apply.
Key fields will be pinned to the top of the Field Selection table with a key icon.
If you are editing group-by keys for an existing materialization, changes may result in affected bindings being backfilled.
Usage in Specifications
You can define selected fields and group-by keys directly in your materialization's specification file rather than through the UI.
If you are configuring your connector using the Advanced Specification Editor or through local flow.yaml files, you will need to update the fields stanza for your binding.
Field selection and group-by stanzas are used as follows:
bindings:
  - source: acmeCo/example/collection
    resource: { table: example_table }

    # Modify the binding's 'fields' stanza
    fields:
      # Add a 'groupBy' array to define custom collection keys
      groupBy:
        - id
        - secondKey

      # Recommends fields for selection up to a specified depth (in this case, 2)
      recommended: 2

      # Require individual fields that may not otherwise be automatically selected
      require:
        _meta/field: {}
        deeplyNestedField: {}

      # Exclude individual fields that may be selected by default
      exclude:
        - sensitiveData
        - pii
Delta Updates and flow_document
When using delta updates in a materialization, Estuary's default field selection behavior changes for the special flow_document field.
Default Behavior
With delta updates enabled, the flow_document field is excluded by default from the materialization.
This is because delta updates don't require Estuary to perform reductions, making the full document technically unnecessary.
Including flow_document with Delta Updates
If you need to include the flow_document field when using delta updates, manually require it:
Through the UI: After adding a binding, explicitly require flow_document in the Field Selection table by clicking its Require button.
In the specification file: Add flow_document to the require section:
bindings:
  - source: acmeCo/example/collection
    resource:
      table: example_table
      delta_updates: true
    fields:
      recommended: 1  # Can be any depth level
      require:
        flow_document: {}
Manually requiring flow_document works regardless of the recommended depth setting. The field will be included in addition to whatever other fields are selected by your field selection configuration.
Materializing Both Top-Level Fields and flow_document
If you want to materialize both top-level fields and the flow_document field with delta updates enabled:
- Set an appropriate
recommendeddepth (e.g.,recommended: 1for top-level fields) - Manually require
flow_documentin the Field Selection table or specification:
bindings:
  - source: acmeCo/example/collection
    resource:
      table: example_table
      delta_updates: true
    fields:
      recommended: 1
      require:
        flow_document: {}
Pruned fields
Estuary's schema inference tracks unique field locations. To prevent excessively large schemas, there's a complexity limit:
| Source Type | Default Limit |
|---|---|
| Most sources (MongoDB, HTTP, etc.) | 1,000 fields |
| SQL databases (PostgreSQL, MySQL, etc.) | 10,000 fields |
When the limit is reached, additional fields are pruned from the inferred schema. The data still exists in documents, but the fields aren't available in field selection.
How to re-add pruned fields
Add pruned fields to the collection's readSchema alongside the inferred schema reference. This survives inference updates.
Using the web app:
- Go to Materializations and click Edit on your materialization
- Select the collection binding
- Click Collection Schema → Edit
- Add your pruned fields as a third
allOfentry (see schema structure below) - Click Save and Publish
Using flowctl:
-
Pull the collection spec:
flowctl catalog pull-specs --name <tenant>/<collection> -
Find the readSchema file (e.g.,
<collection>.read.schema.yaml). Typical structure:allOf:
- $ref: flow://relaxed-write-schema
- $ref: flow://inferred-schema -
Add a third
allOfentry with your pruned fields:allOf:
- $ref: flow://relaxed-write-schema
- $ref: flow://inferred-schema
# Add pruned fields here - survives inference updates
- type: object
properties:
your_pruned_field:
type: string -
Publish:
flowctl catalog publish --source flow.yaml
Add fields to the third allOf entry, not the inferred schema itself. The inferred schema is regenerated periodically and will overwrite manual changes.
Nested fields example
For deeply nested fields (e.g., Jira custom fields):
allOf:
  - $ref: flow://relaxed-write-schema
  - $ref: flow://inferred-schema
- type: object
properties:
fields:
type: object
properties:
project:
type: object
properties:
id:
type: string
Finding the field path
To discover the JSON path of a pruned field, read documents from the collection:
flowctl collections read --collection <name> --uncommitted | head -5
Examine the document structure to identify the path using / separators (e.g., /fields/project/id).