Real-time CDC with MongoDB
A step-by-step guide to setting up Change Data Capture (CDC) from MongoDB with Estuary Flow.
MongoDB is still one of the most popular document stores powering web applications today. Due to its flexible schema handling and tight integration with JSON-based libraries developers love working with it. It’s easy to set up, painless to maintain, and works at scale.
Because it’s the centerpiece of so many applications, it’s a common data engineering challenge to extract data out of MongoDB in order to power a data warehouse or enable other downstream use cases, like AI or operational analytics.
This tutorial will guide you through using Estuary Flow to capture data from MongoDB using change data capture (CDC), requiring minimal configuration. By following these steps, you can empower your organization to leverage its application data in just a few minutes.
What is CDC?
CDC, or Change Data Capture, is a method used to track and capture changes made to data in a database. It enables the real-time capture of insertions, updates, and deletions, providing a continuous stream of changes.
This stream of data is invaluable for keeping downstream systems synchronized and up-to-date with the source database, facilitating real-time analytics, replication, and data integration. In essence, CDC allows organizations to capture and react to data changes as they occur, ensuring data accuracy and timeliness across their systems.
Optionally, if you are interested in the intricacies of change data capture, head over to this article, where we explain the theory behind it - this is not a requirement for this tutorial, so if you want to dive in head first, keep on reading!
Understanding Change Events in MongoDB
Change events in MongoDB are notifications triggered by modifications to the database's data, configuration, or structure through a mechanism called change streams.
Change Streams in MongoDB are a convenient way for CDC, enabling real-time monitoring of data changes without having to directly interact with the underlying oplog. CDC processes leverage Change Streams to subscribe to data changes, capturing detailed events promptly as insertions, updates, or deletions occur.
This approach ensures efficient data propagation to downstream systems, scalability for high-throughput environments, and robust error handling for operations.
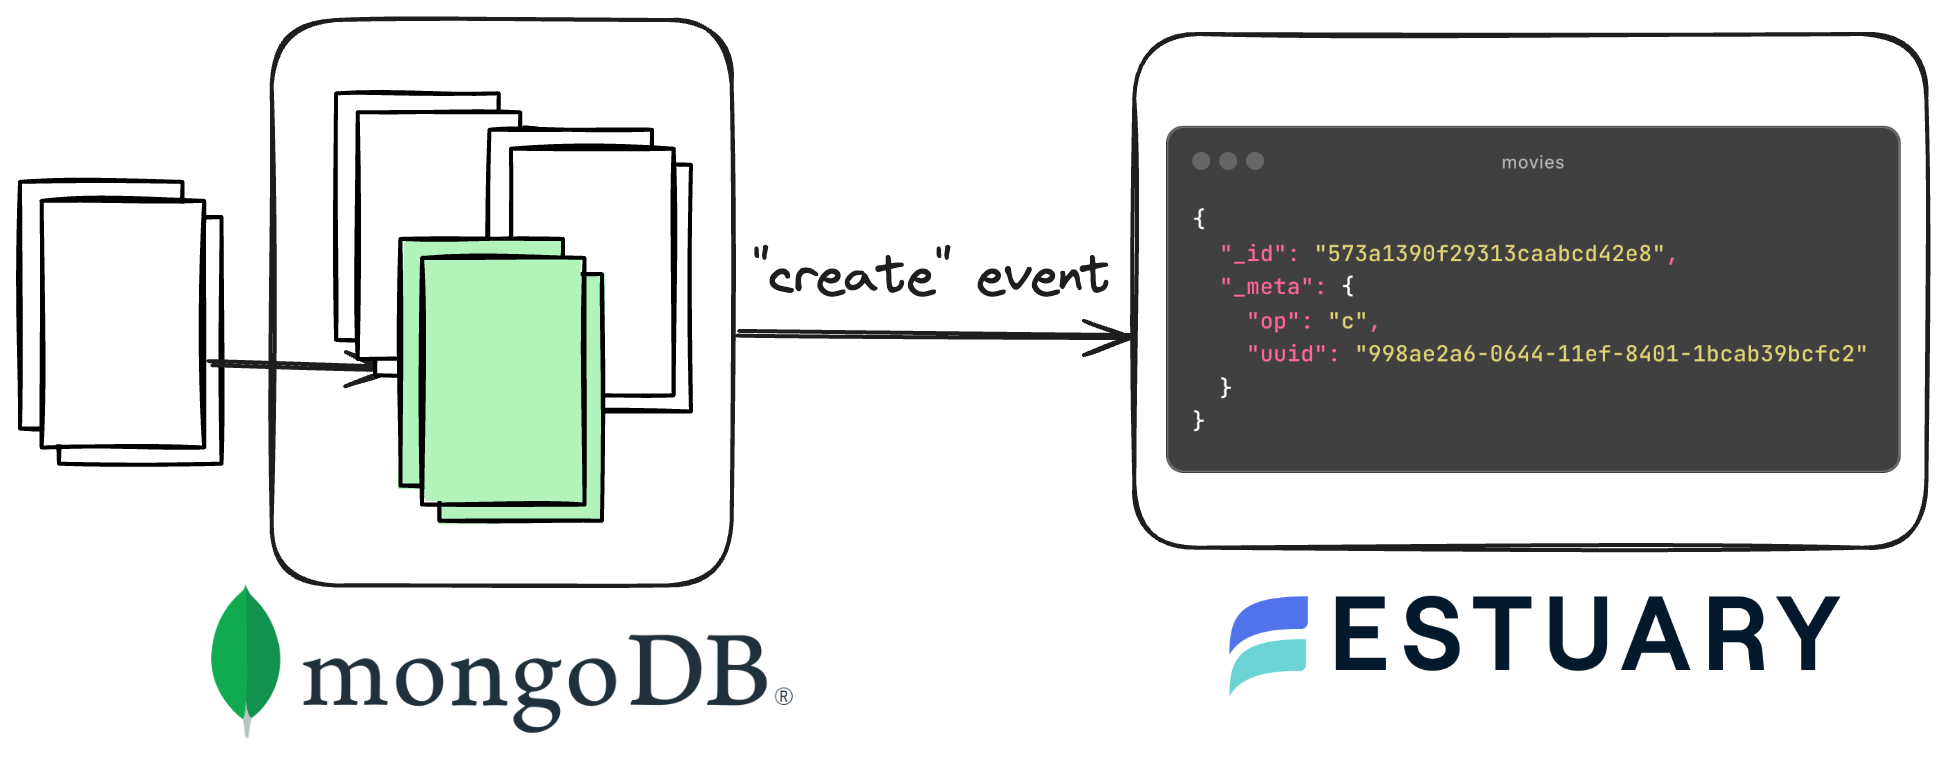
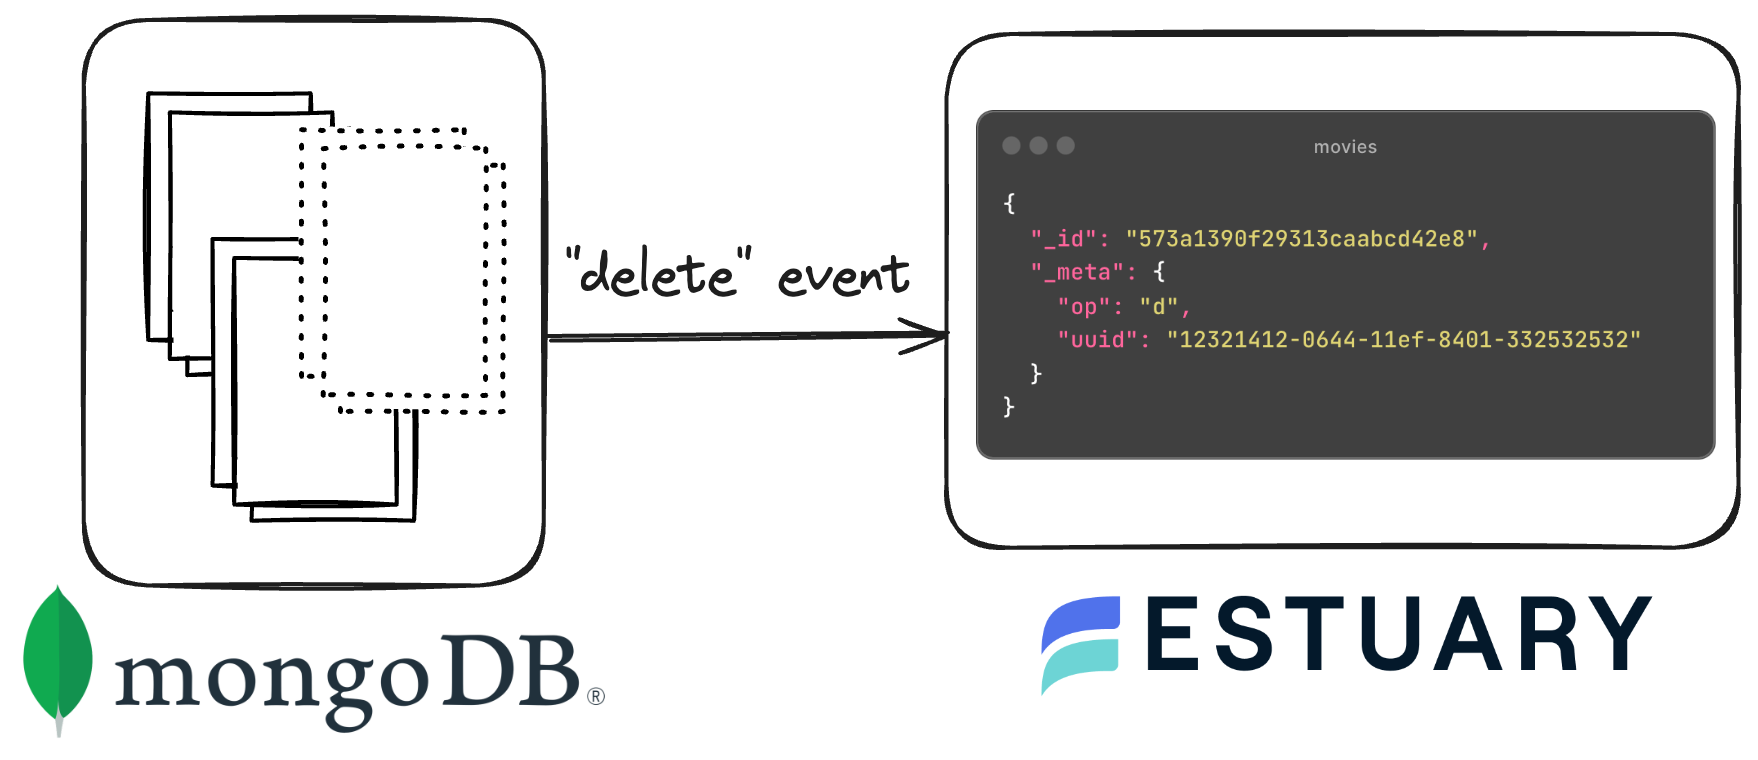
MongoDB supports various types of change events, each catering to different aspects of database operations. For data synchronization, the following three events are the only ones that matter:
- Insert Events: Triggered when new documents are inserted into a collection.
- Update Events: Fired upon modifications to existing documents, including field updates and replacements.

- Delete Events: Signaled when documents are removed from a collection.
Introduction to Estuary Flow
Estuary is the best tool for integrating CDC streams from MongoDB. Here are a few reasons why:
-
Unlike ELT vendors, Estuary does streaming CDC and incremental snapshots, not full snapshots or batch change data extraction. This puts less of a load on the source database and lowers latency.
-
Estuary also extracts exactly-and-only-once. As it streams snapshots and changes data it also stores it as a collection for later reuse, such as for backfilling or stream replay. ELT vendors require you to re-extract every time to want to resend the data or restart a change data stream.
-
Estuary supports both real-time and batch. Its streaming latency is within 100ms, and it always extracts in real-time. But it supports any latency from real-time to hours or days for destinations.
-
Estuary guarantees change data is delivered exactly once.
-
Estuary can also maintain type I and type II slowly changing dimensions directly into a target.
-
Estuary streaming has 50MB/sec per connection per table throughput rates, which is 5-10x any other benchmarks for CDC. It also scales horizontally to increase throughput.
Time to build a real-time CDC pipeline!
Prerequisites
To follow along with the tutorial, you’ll need the following:
-
An Estuary Flow account. If you haven’t yet, sign up for free here. A fully-managed MongoDB Capture connector is ready for you to get started.
-
A MongoDB Atlas cluster: This tutorial uses Atlas as the source database, but Estuary supports other types of MongoDB deployments as well.
Setting up MongoDB
To prepare MongoDB for Estuary Flow, you need to ensure the following prerequisites are met:
Credentials
Obtain the necessary credentials for connecting to your MongoDB instance and database. This includes credentials for authentication purposes, typically a username and password.
Read Access
Ensure that you have read access to the MongoDB database(s) from which you intend to capture data. MongoDB utilizes Role-Based Access Control (RBAC), so make sure your user account has the appropriate permissions to read data.
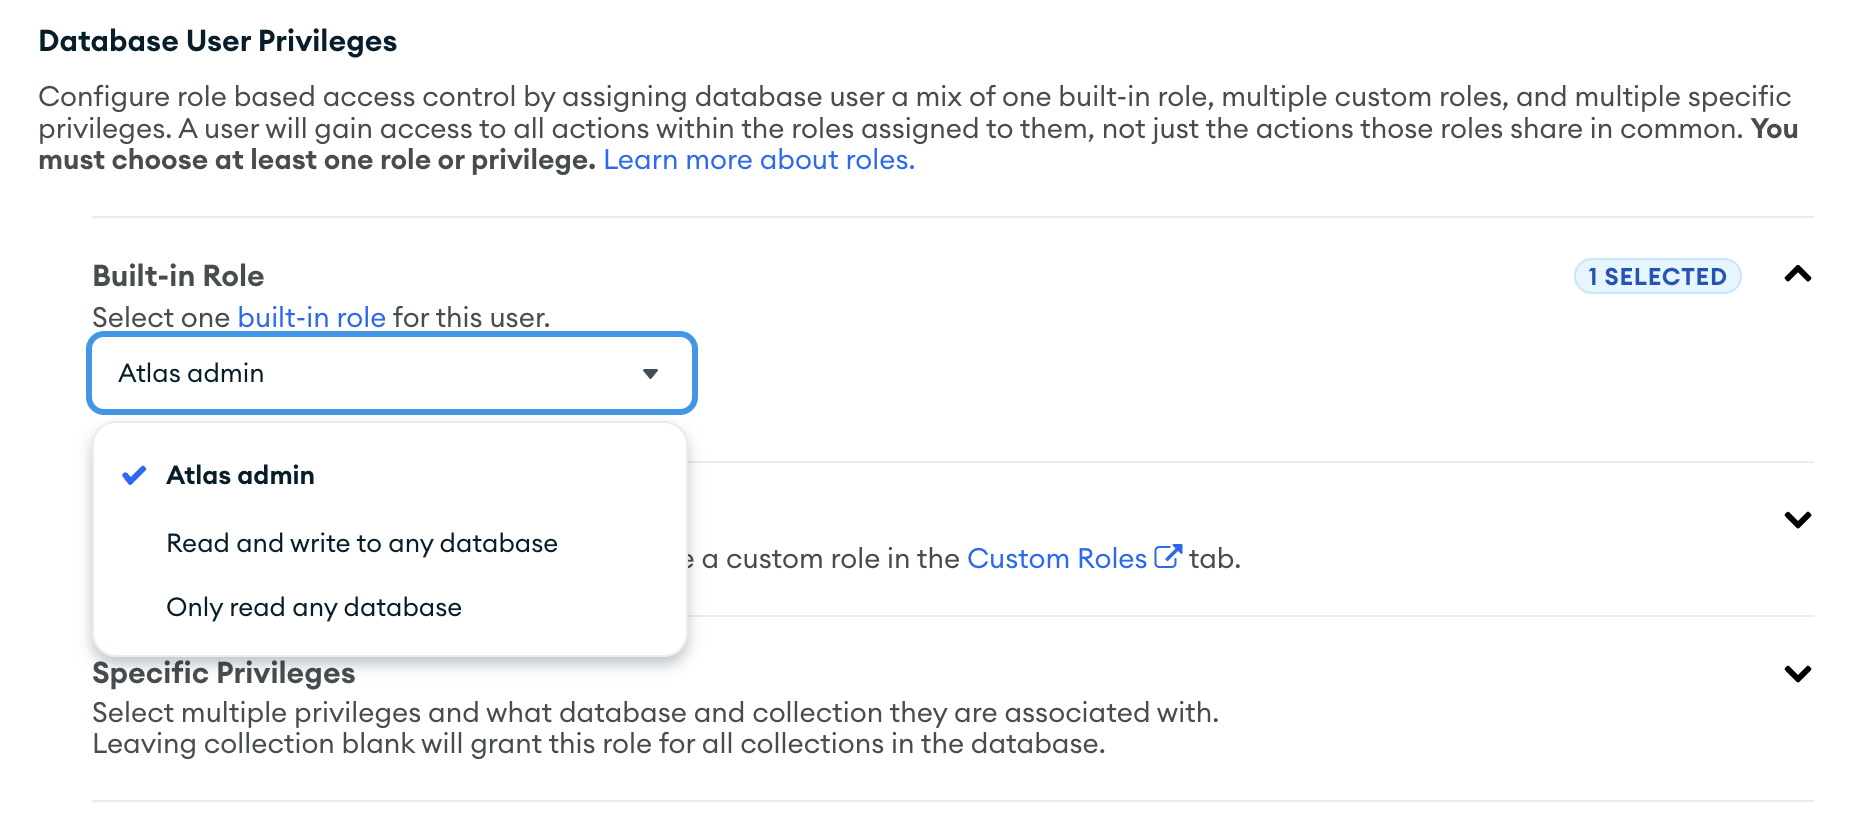
In MongoDB Atlas, any of the built-in Roles will work for the tutorial, but Flow needs at least read permissions over the data you wish to capture if you wish to set up more granular, restricted permissions.
Configuration Considerations
-
If you haven't already, make sure you deploy a Replica Set-type MongoDB cluster. Change streams require a replica set in order to work. A replica set is a group of MongoDB deployments that maintain the same data set. If you are working following along with a fresh MongoDB Atlas project, you shouldn’t need to configure anything manually for this, as the default free-tier instance is a cluster of 3 replicas. To learn more about replica sets, see the Replication Introduction in the MongoDB manual.
-
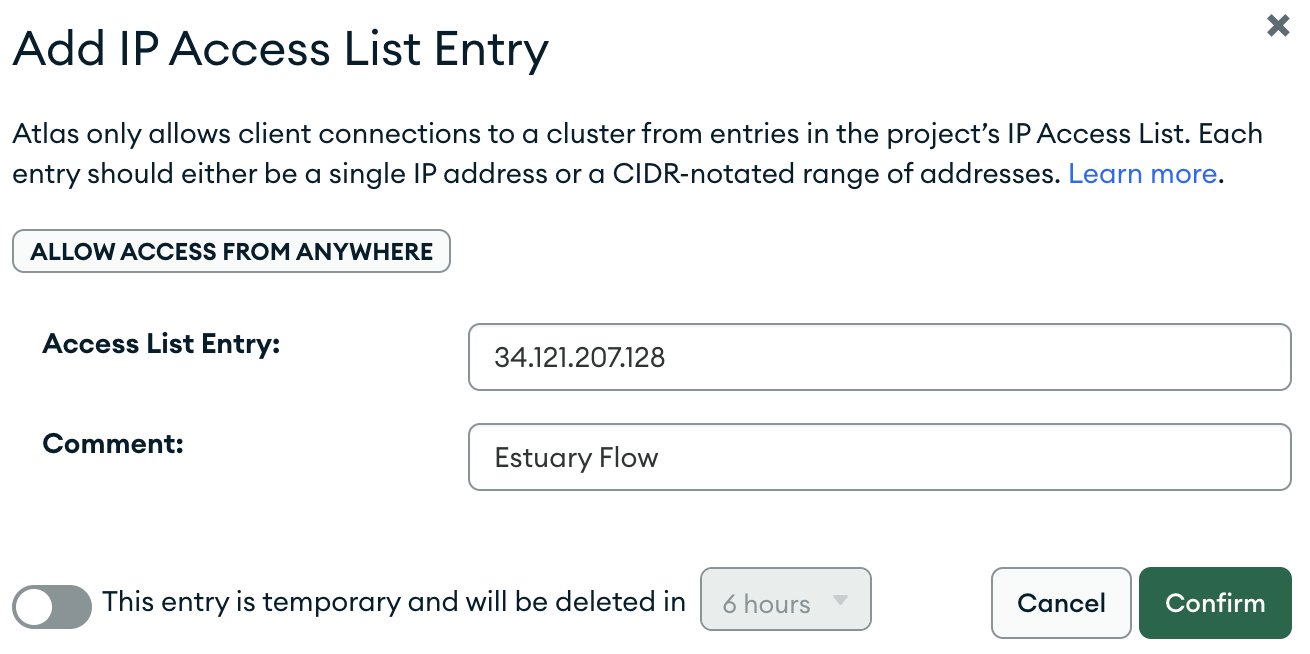
Ensure that Estuary's IP (
34.121.207.128) is whitelisted to allow access. We’ll show you how to do this in the next section.
Configure MongoDB
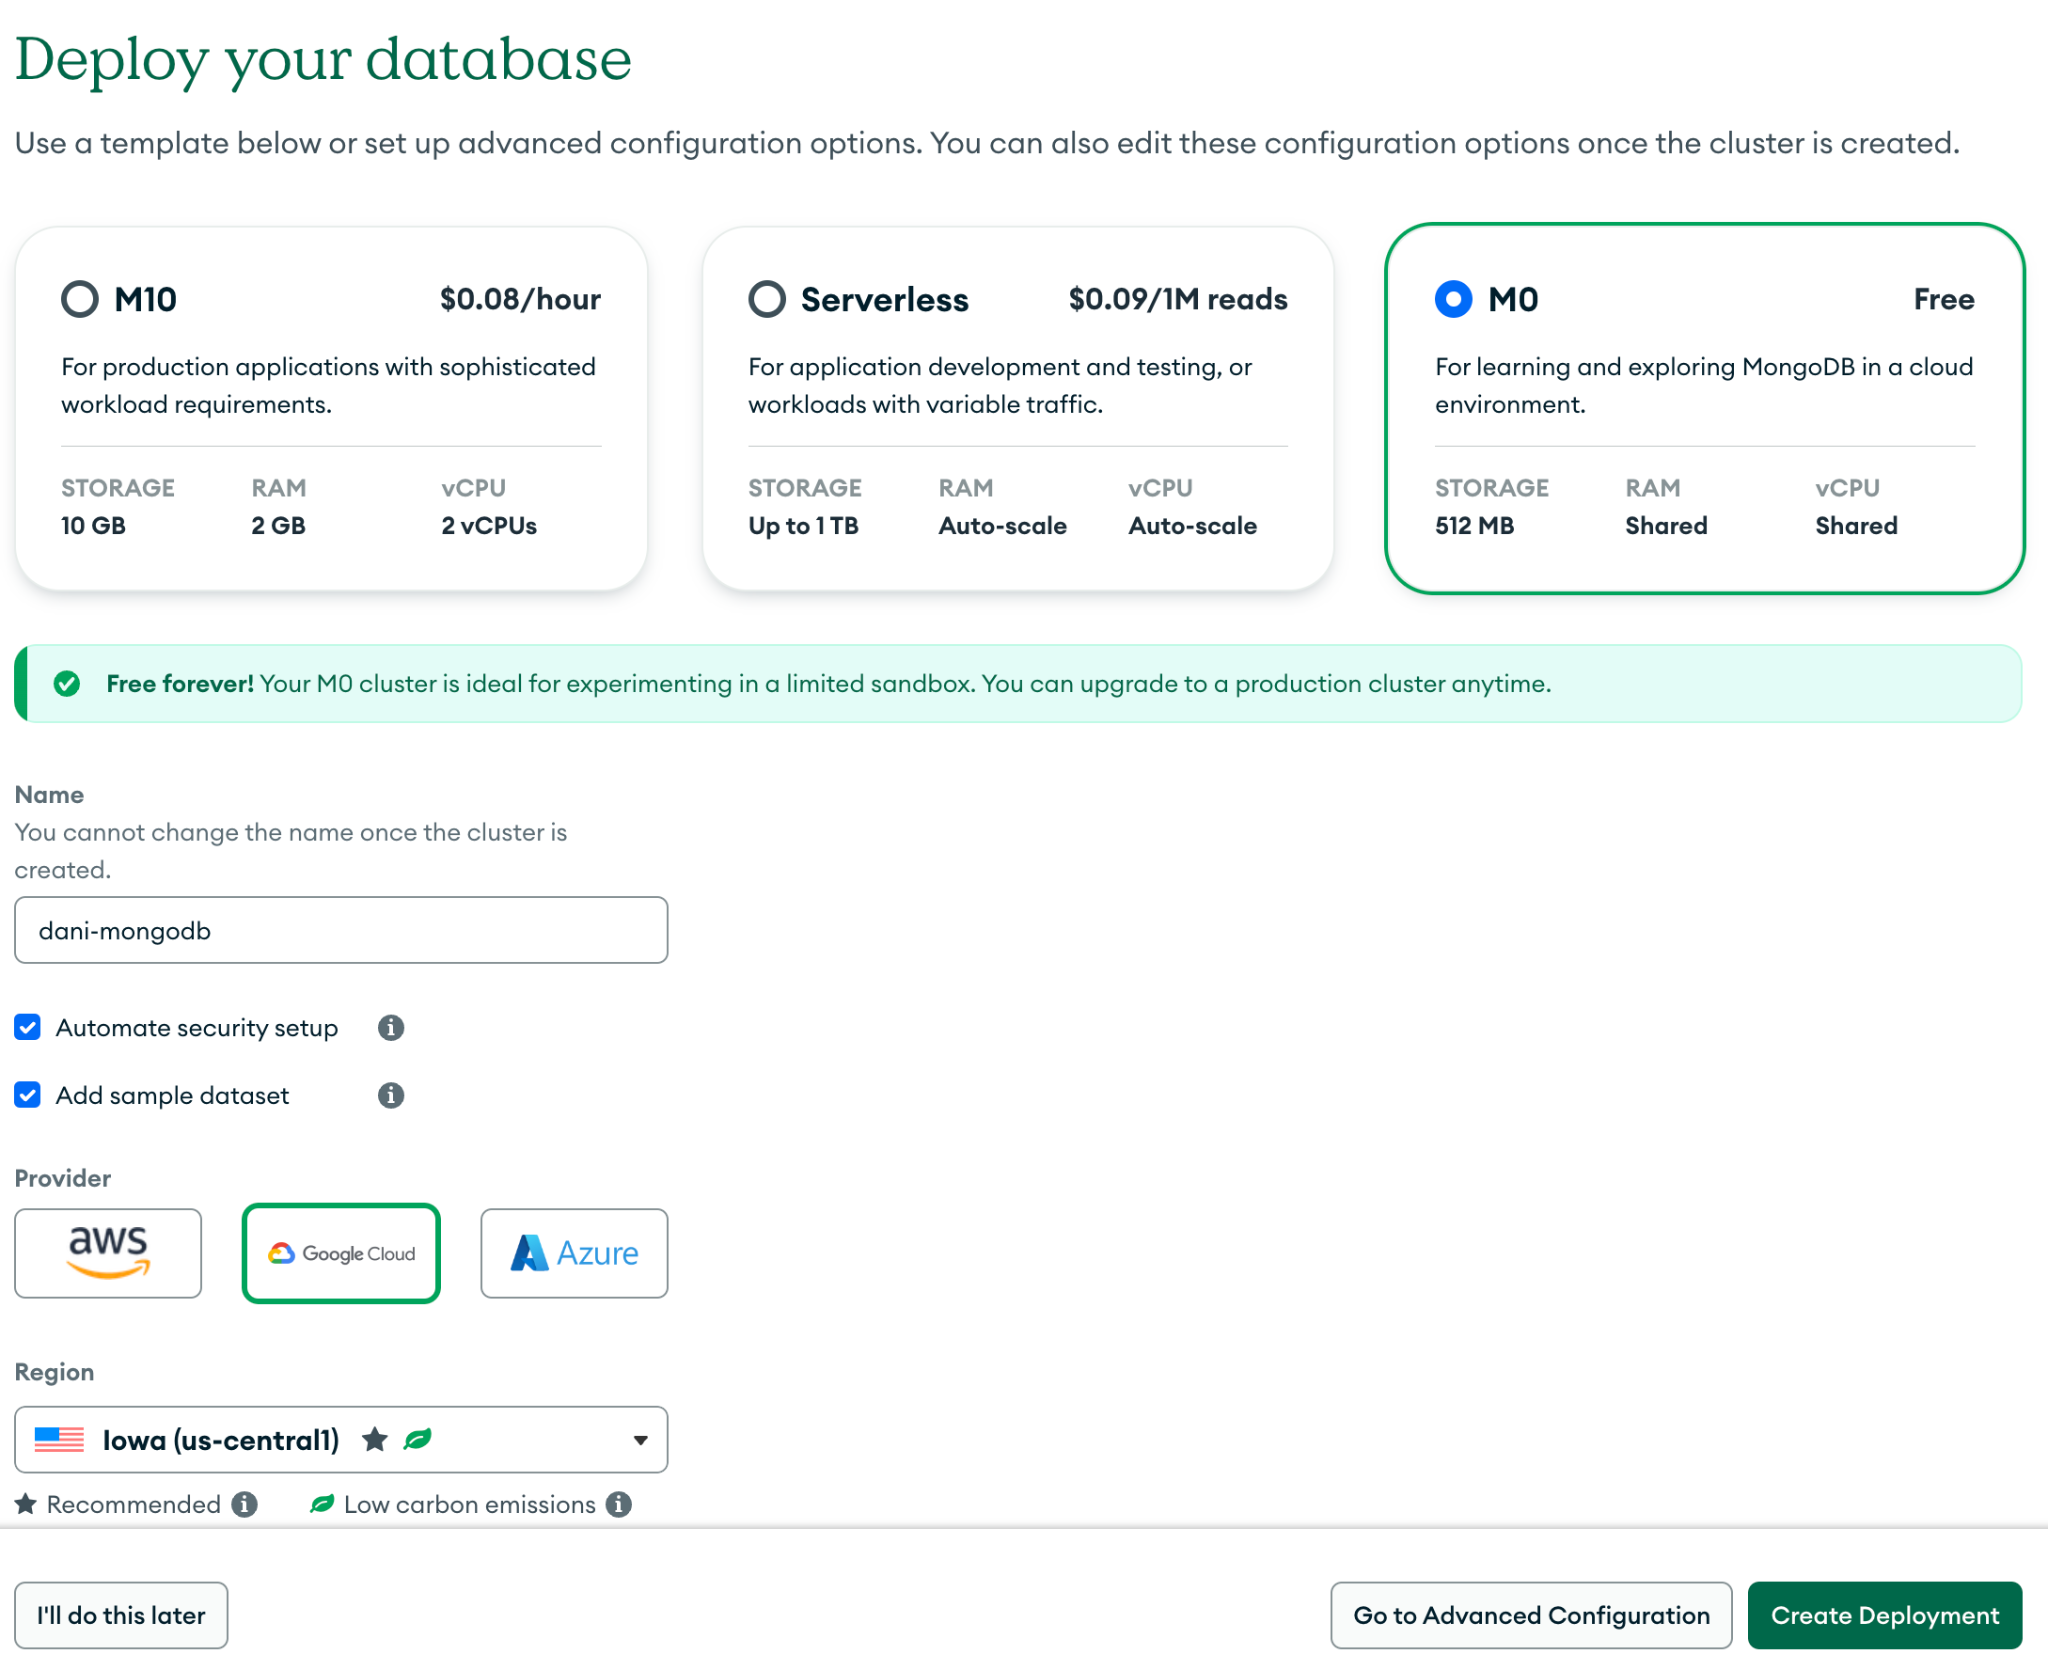
Let’s start by provisioning our database. As you can see, for this tutorial, you can just deploy an M0-category cluster, which is free to use.
After the cluster has finished provisioning, we’ll need to make sure that Estuary Flow is able to connect to the database. For this, the only requirement with MongoDB Atlas is allowlisting the public IP used by Flow, 34.121.207.128.
Navigate to the “Network Access” page using the left hand sidebar, and using the “Add new IP address” button, create the list entry which enables the communication between the two services.
Next, find your connection string by navigating to the mongosh setup page by clicking the “Connect” button on the database overview section, then choosing the “Shell” option.
mongosh for this tutorial, but this is the easiest way to get ahold of the connection string we’ll be using.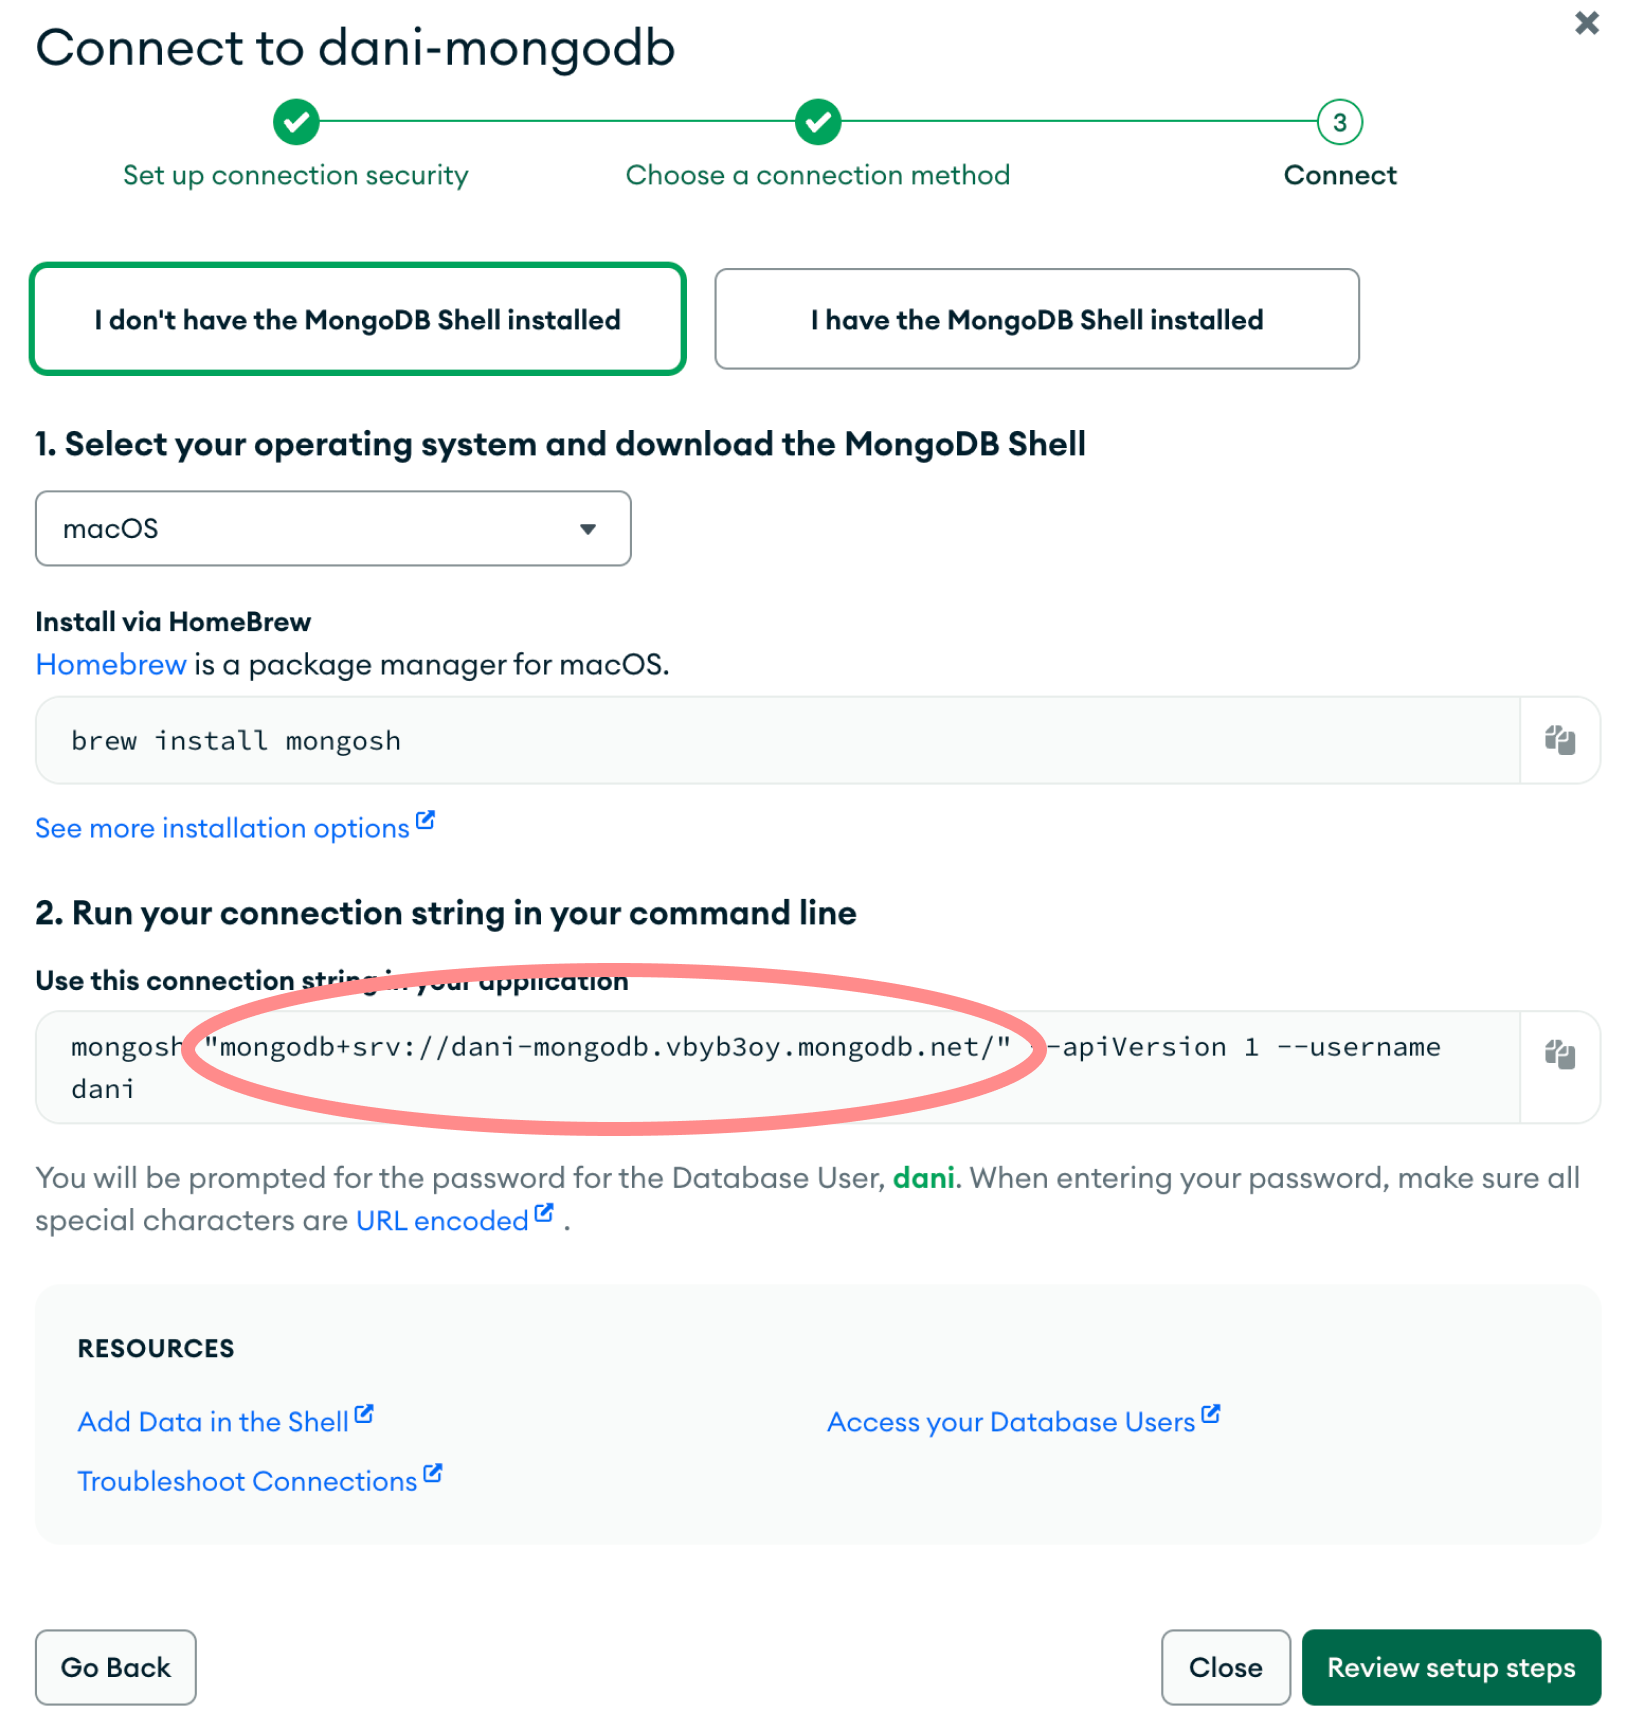
Copy the connection string and head over to your Estuary Flow dashboard to continue the tutorial.
Setting up Estuary Flow
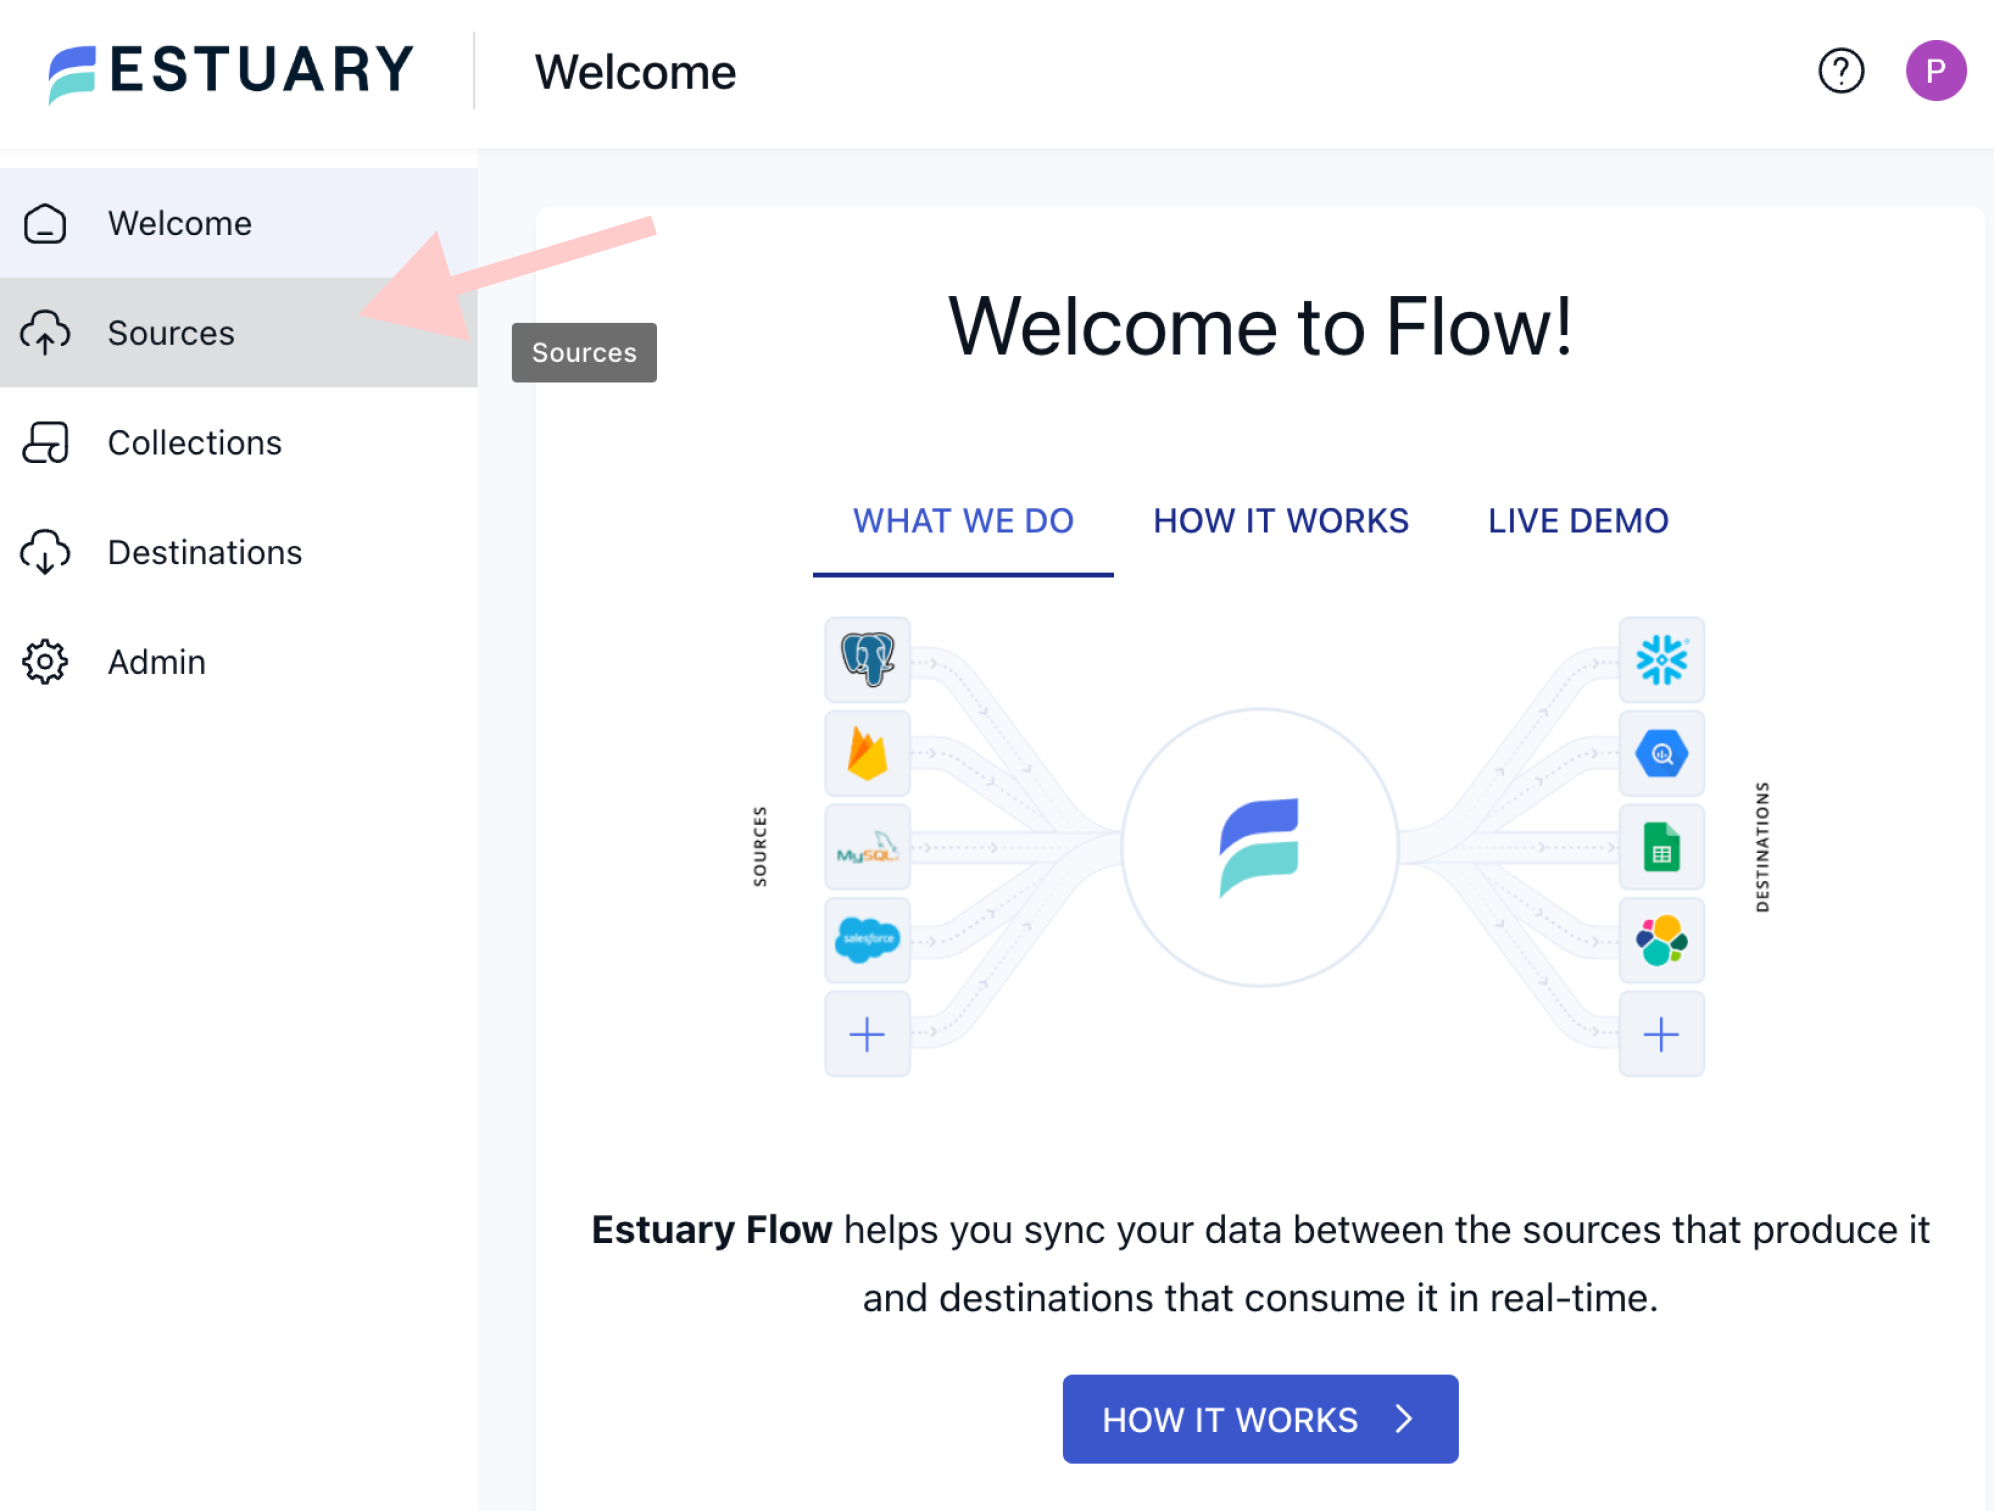
On the dashboard, create a new capture by navigating to the “Sources” menu using the sidebar, then pressing the “New Capture” button. In the list of available connectors, search for “MongoDB”, then press “Capture”.
Pressing this button will bring you to the connector configuration page, where you’ll be able to provision your fully managed real-time Data Flow.
MongoDB Capture Configuration
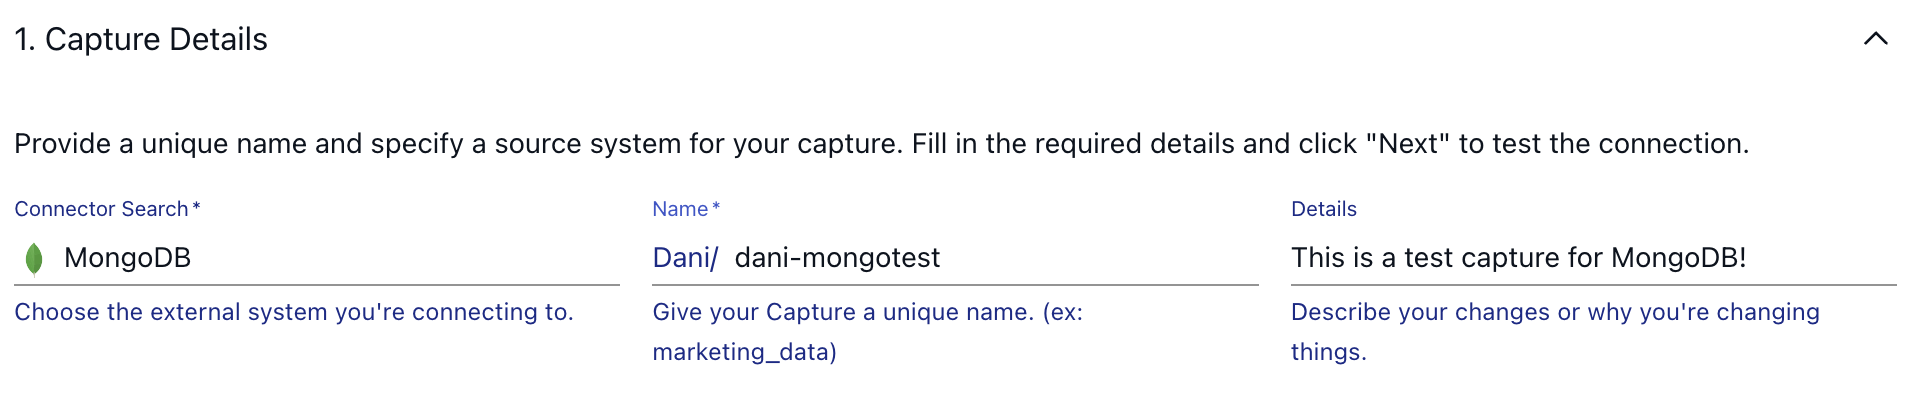
As a first step, in the Capture Details section, name your capture and optionally add a description for it.
Once you are finished, step down to the second configuration section, called “Endpoint Config”. Here you have to use the address for the database you took a note of in the MongoDB setup section, along with your username and password which you configured when setting up MongoDB Atlas.
If your user has access to all databases, ensure that in your MongoDB address, you specify the ?authSource=admin parameter in the connection address. In this case, authentication is performed through your admin database.
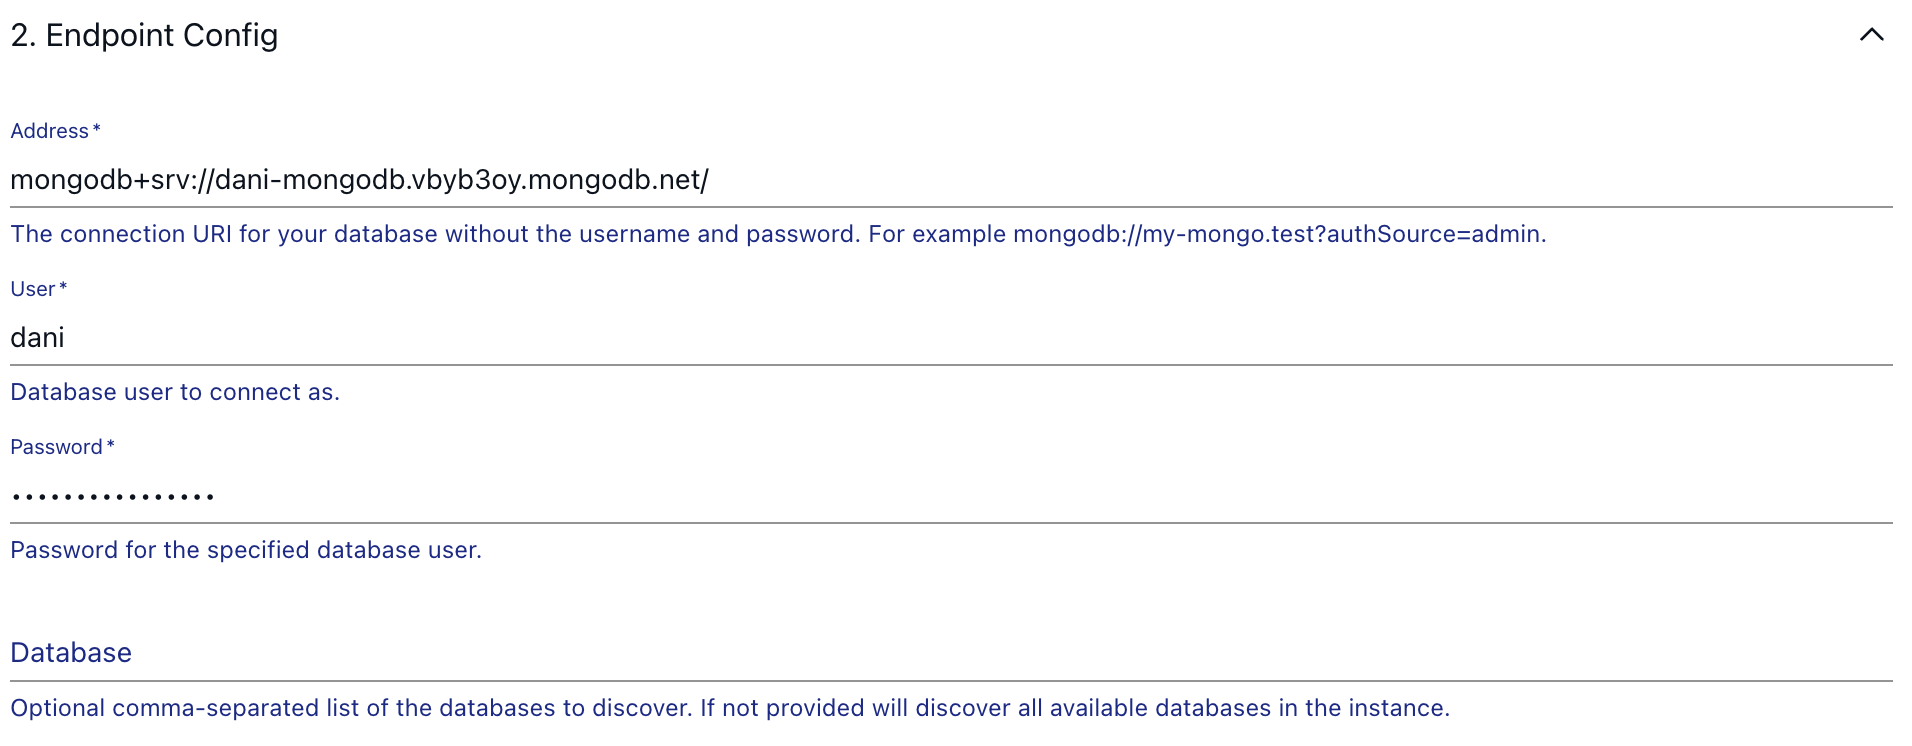
As for the "Database" option, feel free to leave it empty, that way the automated discovery process of Flow will make sure every available database is ready for data extraction.
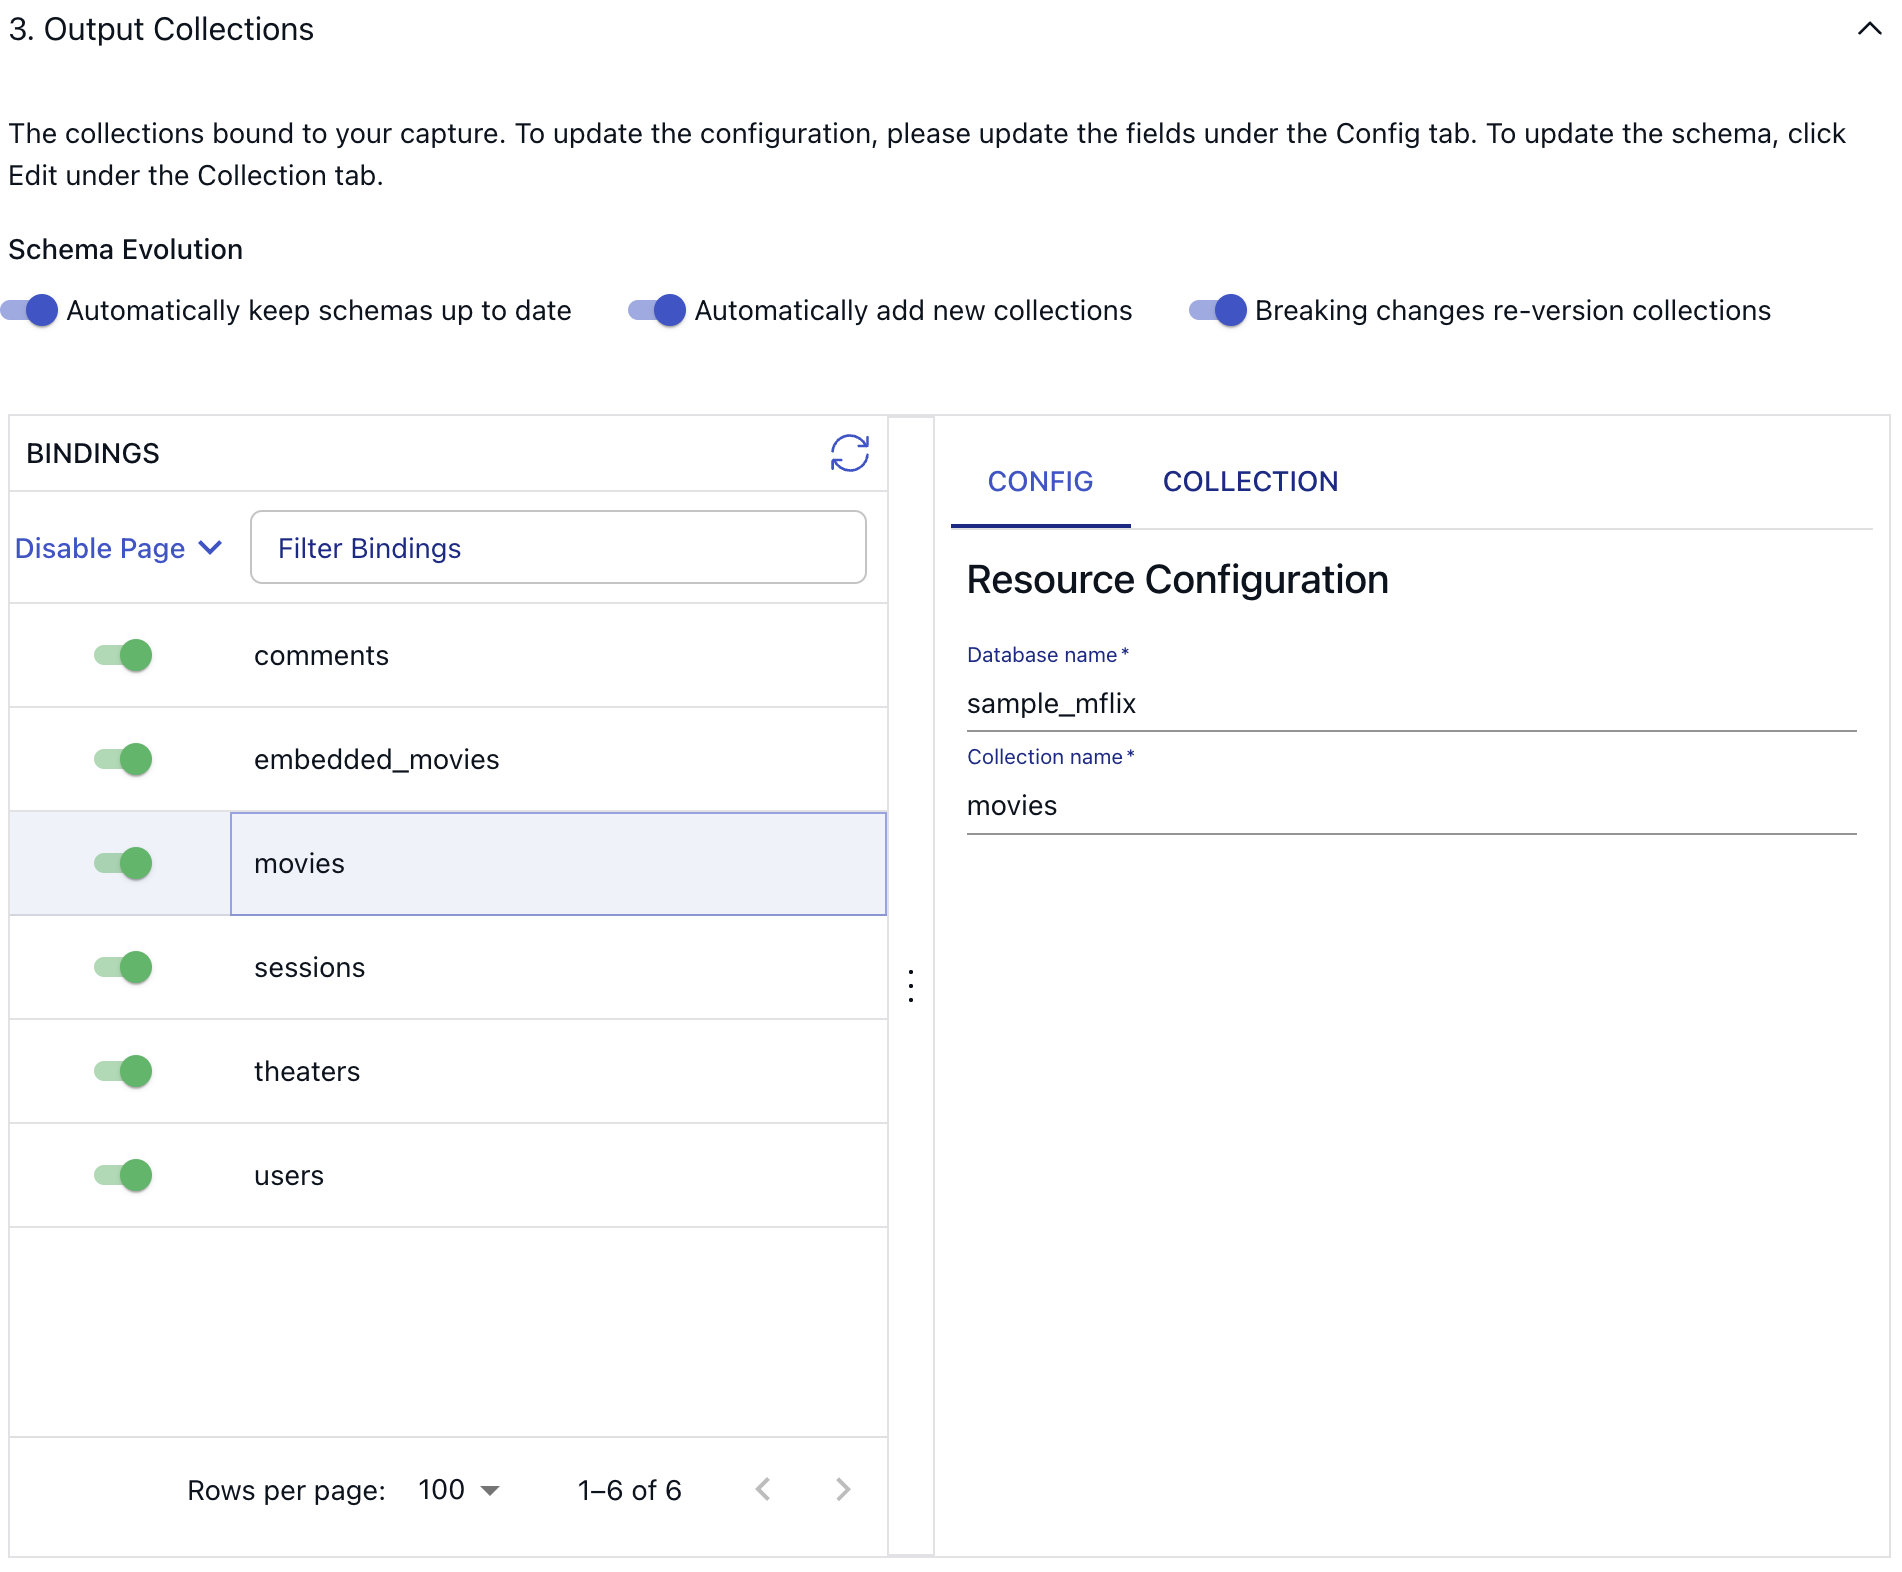
After you press the blue “Next” button in the top right corner, Flow will automatically crawl through the connection to discover available resources. Next up, you’ll see the third, and final configuration section, where you are able to view and choose from all the databases and collections which are discovered by Flow.
Documents and Collections
Before we initialize the connector, let’s talk a little bit about how incoming data is represented in Flow.
The documents of your flows are stored in collections: real-time data lakes of JSON documents in cloud storage.
Collections being stored in an object storage mean that once you start capturing data, you won’t have to worry about it not being available to replay – object stores such as S3 can be configured to cheaply store data forever. See docs page for more information about documents.
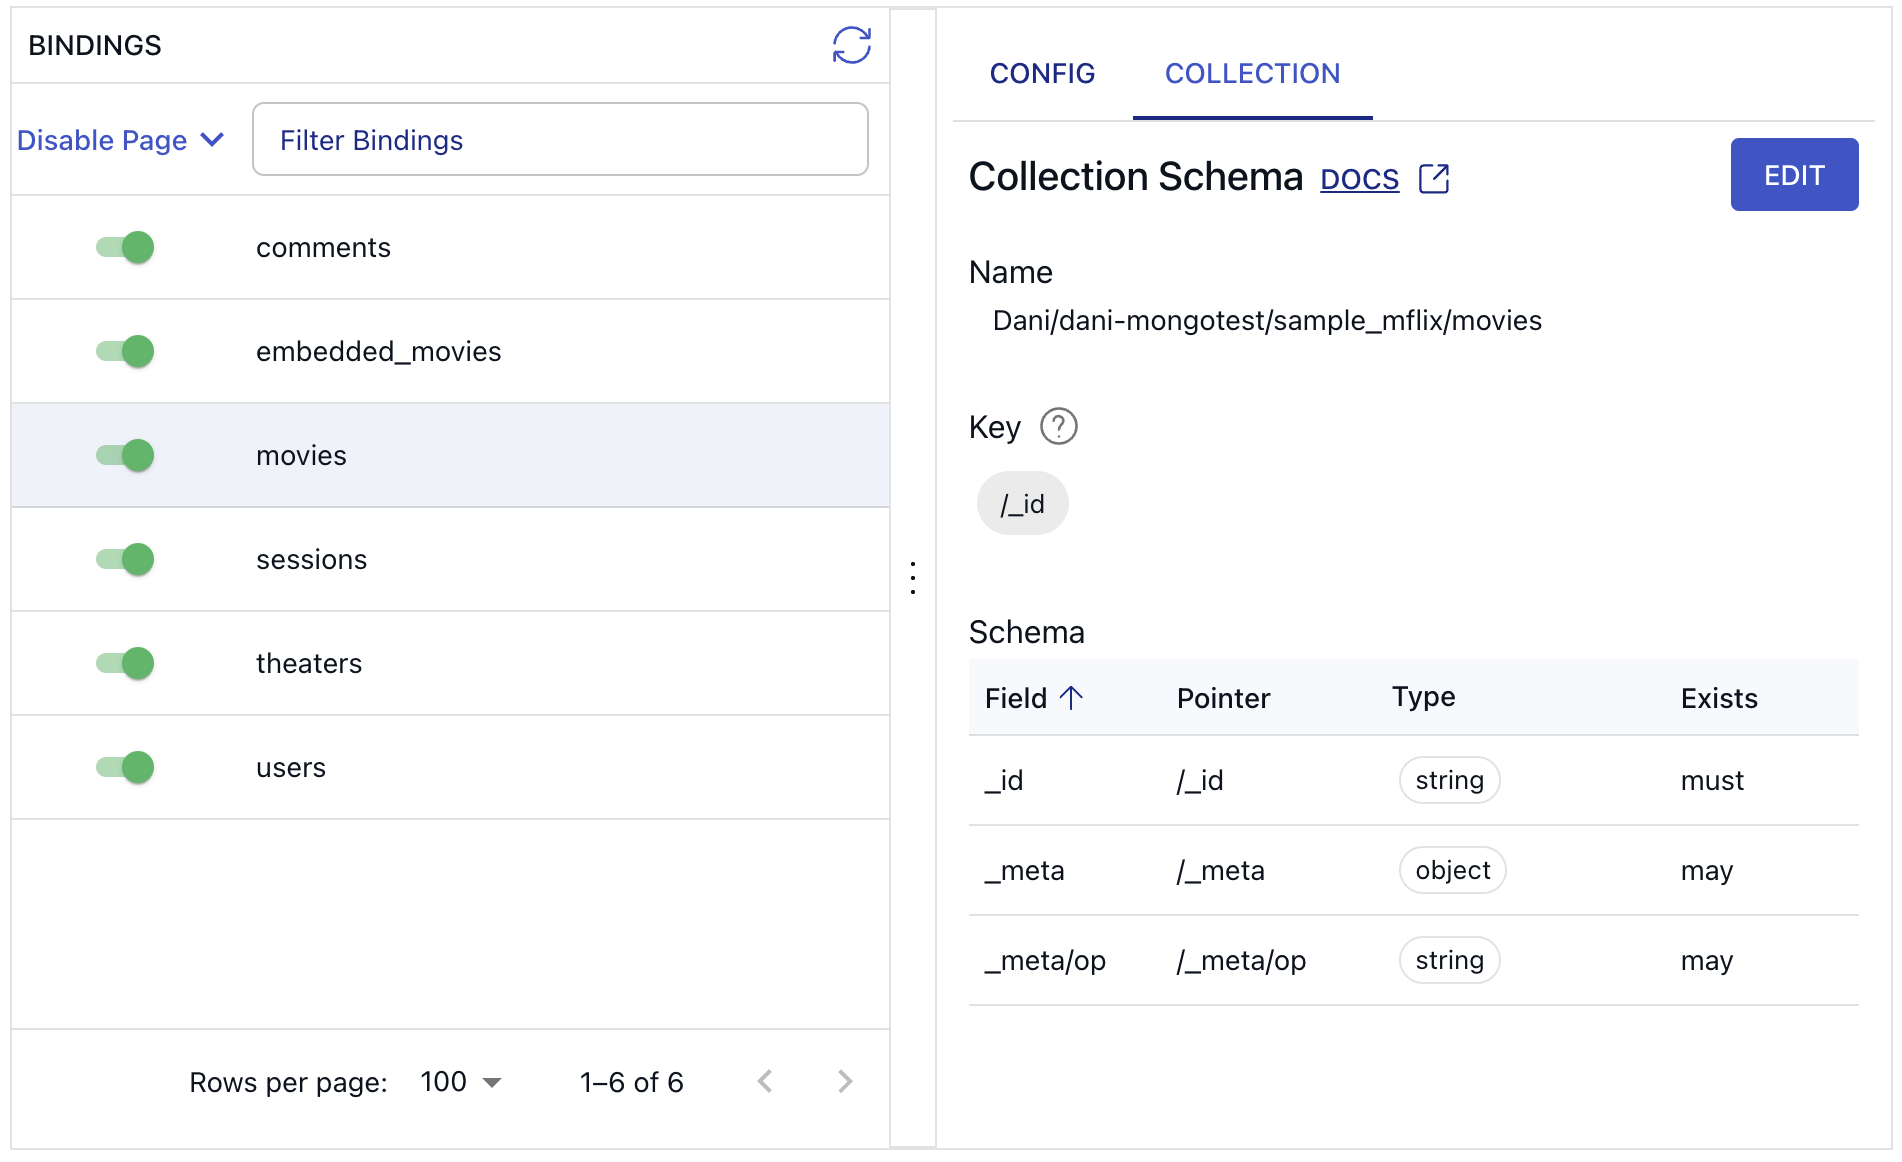
To see how Flow parsed the incoming records, click on the “Collection” tab on the UI.
When you set up a capture from MongoDB using the Flow web app, the underlying collection specifications will look something like this:
key: [ /_id ]
writeSchema:
  type: object
  properties:
    _id: { type: string }
  required: [ _id ]
readSchema:
  allOf:
    - $ref: flow://write-schema
    - $ref: flow://inferred-schema
This specification uses separate read and write schemas. The writeSchema is extremely permissive, and only requires an _id property with a string value. The readSchema references flow://inferred-schema, which expands to the current inferred schema when the collection is published.
MongoDB documents have a mandatory _id field that is used as the key of the collection. But that is essentially the only requirement. You can't know what other fields may exist on MongoDB documents until you've read them. On the UI, for this reason, only three fields are visible initially in the collection schema tab.
Automating schema evolution
In addition to selecting the collections for capture, this interface provides access to three settings that govern schema evolution. In a NoSQL database environment like MongoDB, schema alterations are frequent occurrences. Manually synchronizing source and destination schemas can end up being a lot of maintenance. To help with this, Estuary introduces a more sophisticated schema evolution strategy.
With Estuary Flow, teams can opt to suspend the Data Flow using data contracts, automate the update of the target schema with the new MongoDB schema, or create a new table in the destination to maintain separation between old and new schemas. Details can be found in our schema evolution docs.
Schema evolutions serve to prevent errors stemming from discrepancies between specifications in a number of ways:
-
Materializations will automatically apply backward-compatible schema changes, like adding a new column. This doesn't require re-backfilling the target tables or re-creating the Flow collection.
-
For more complex scenarios, the evolution adjusts the affected materialization bindings to increment their backfill counter, prompting the materialization process to reconstruct the resource (such as a database table) and backfill it from the offset.
-
In instances where necessary, such as when the collection key or logical partitioning undergoes changes, the evolution generates a completely new collection with a numerical suffix (e.g.,
_v2). This new collection initializes as empty and undergoes backfilling from the source. Moreover, the evolution updates all captures and materializations referencing the old collection to point to the new collection, incrementing their backfill counters accordingly. This method is more intricate and is only invoked when essential alterations are identified.
In these scenarios, the names of destination resources remain unaltered. For instance, a materialization to Postgres would drop and re-establish the affected tables with their original names.
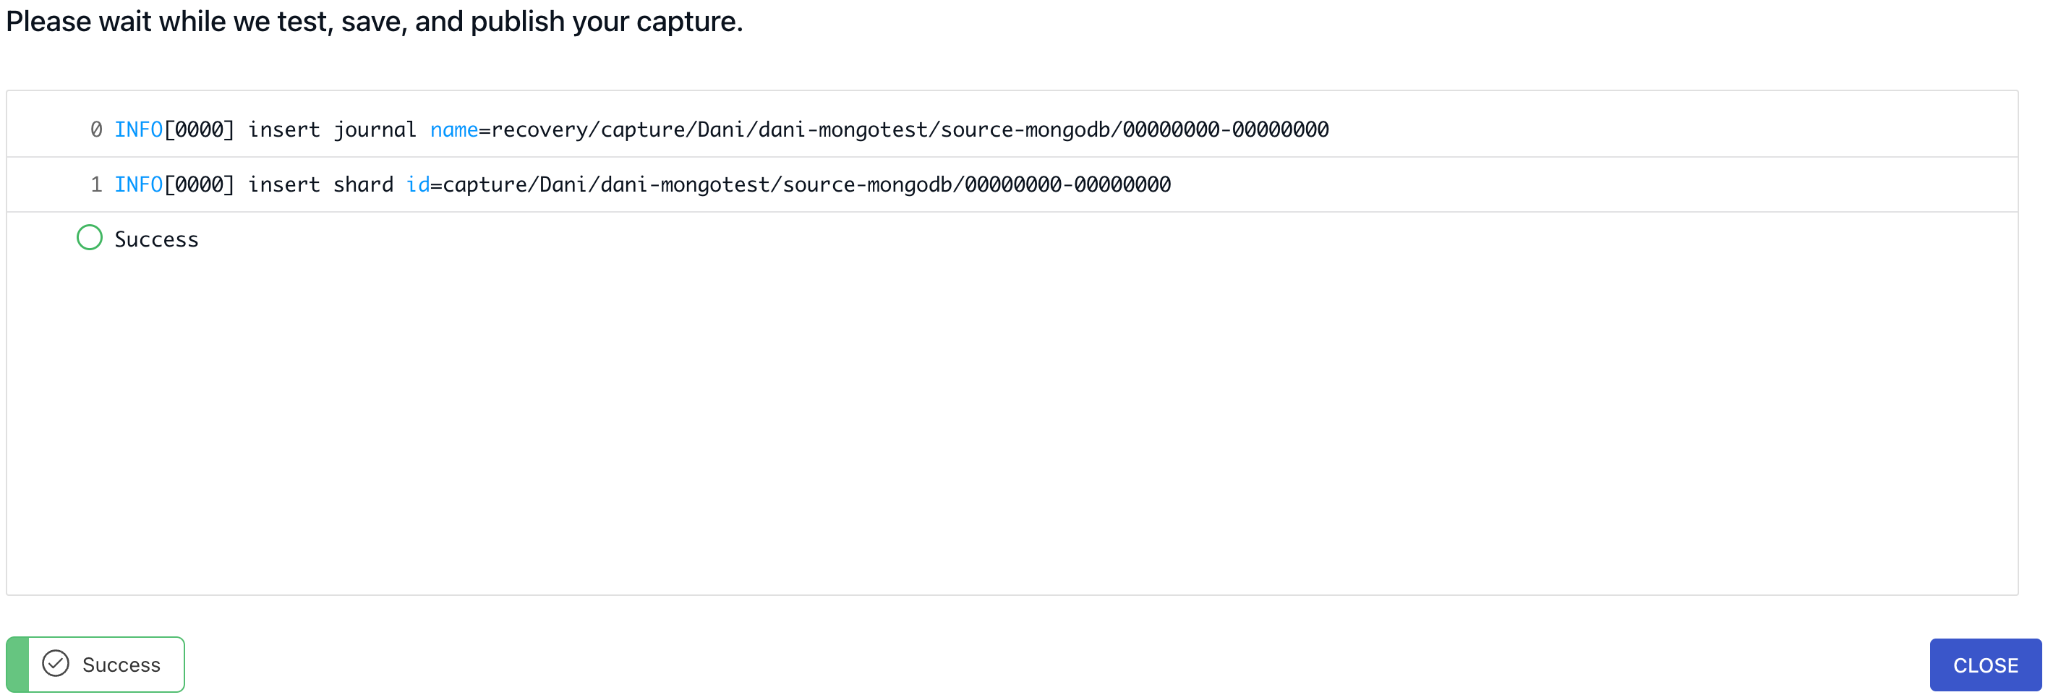
Publishing the Capture
To finalize the connector configuration and kick it off, press the “Save and Publish” button. Flow will test, save and publish your capture. You’ll see a similar screen if everything went well or if there were any issues setting up the connector, you’ll see detailed error messages instead.
During the initial database snapshot – which is triggered automatically – the connector seamlessly captures change events by continuously monitoring change streams while concurrently executing collection scans to backfill pre-existing documents. Following the initial snapshot, the connector perpetually monitors change streams to capture all subsequent changes in real-time.
Incremental backfills in the MongoDB connector follow a straightforward approach to ensure comprehensive data capture with minimal latency. Initially, all tracked change streams are synchronized to maintain data integrity. Then, a targeted backfilling effort occurs across MongoDB collections until all are up to date. Continuous monitoring via change streams ensures ongoing data capture and means there is no need to pause replication during an ongoing backfill.
In the event of a pause in the connector's process, it resumes capturing change events from the point of interruption. However, the connector's ability to accomplish this depends on the size of the replica set oplog. In certain scenarios where the pause duration is significant enough for the oplog to purge old change events, the connector may necessitate redoing the backfill to maintain data consistency.
Real-time CDC
Let’s head over to the collections page to see our arriving documents.
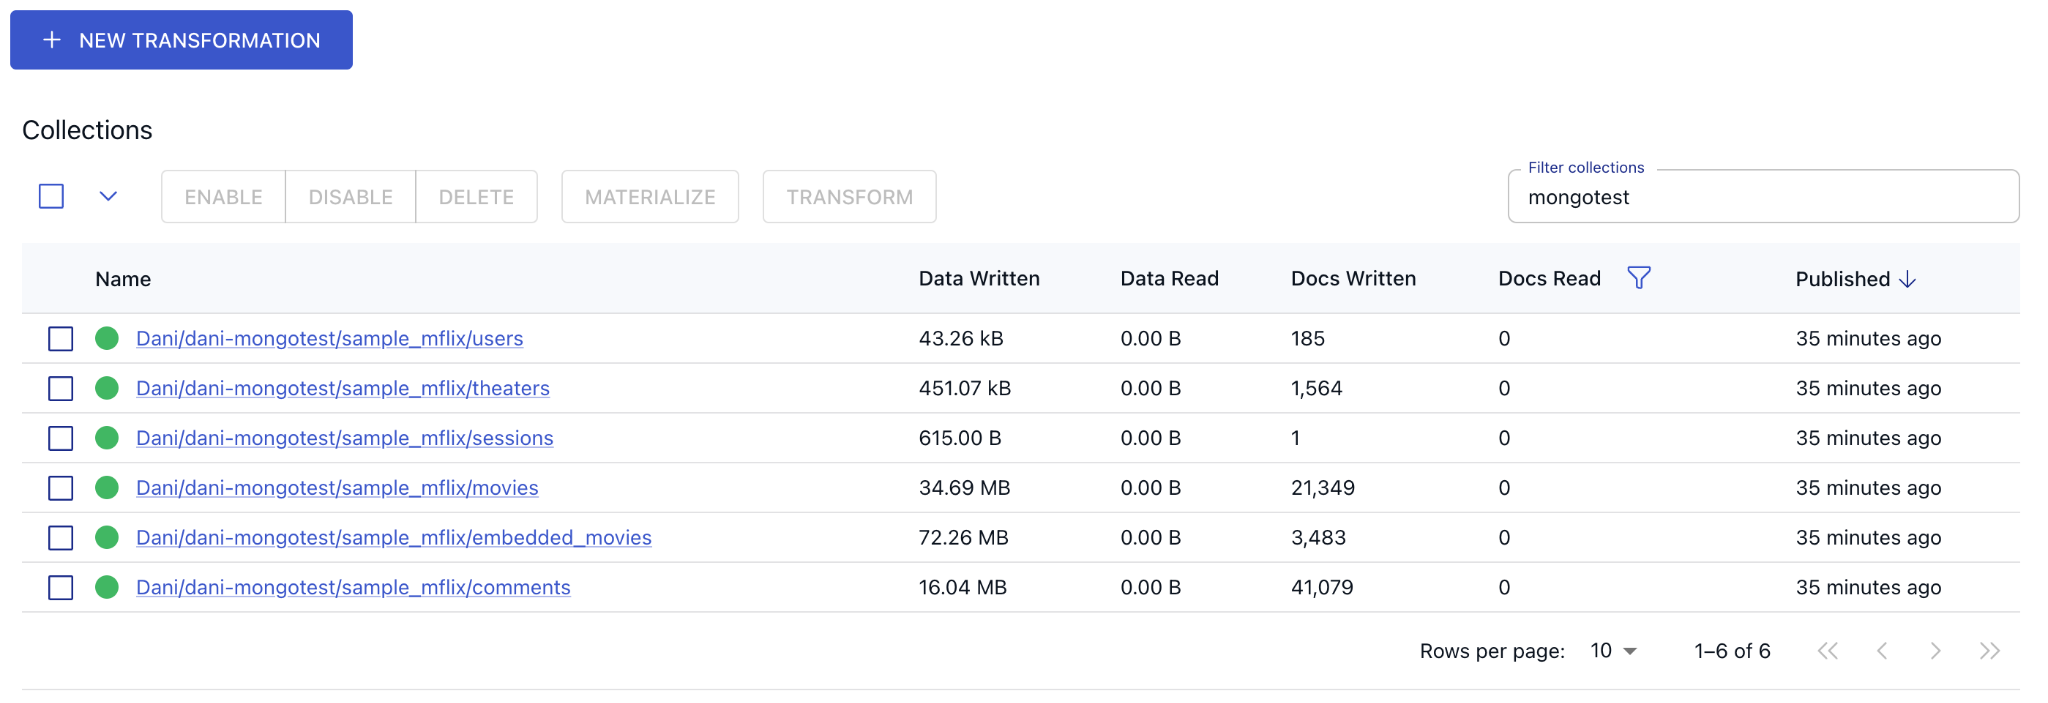
Looks like all of the selected MongoDB collections have been fully replicated into Flow by the initial backfill.
Let’s take a look at the movies collection to see what details Flow can tell us about the documents. You can see some statistics about the integration throughput and you can also take a look at the actual documents in a preview window.
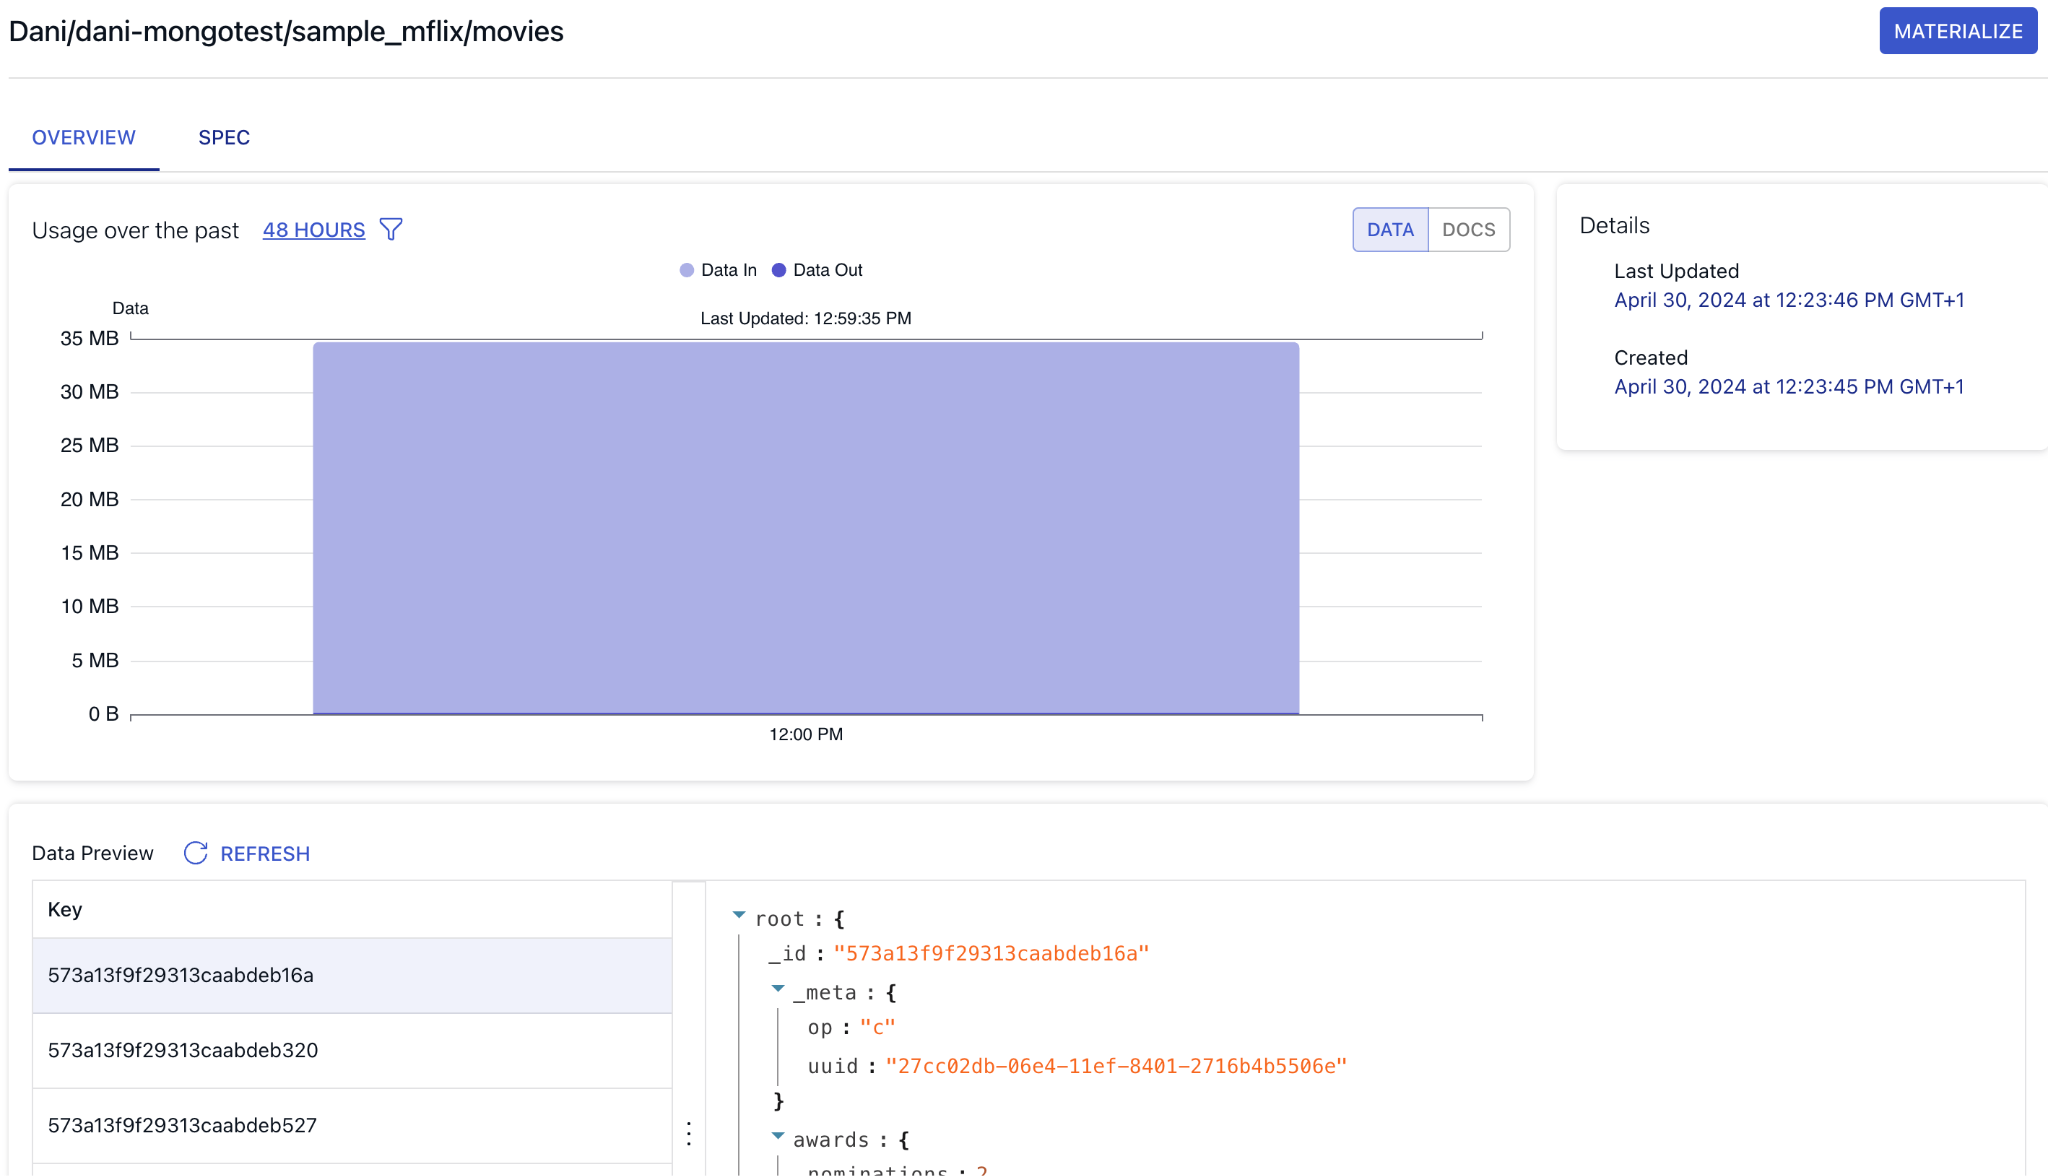
You can also check out the generated specification, which is the Flow’s behind-the-scenes declarative way of representing the Collection resource.
For the movies collection, this is what it looks like:
{
 "writeSchema": {
   "type": "object",
   "required": [
     "_id"
   ],
   "properties": {
     "_id": {
       "type": "string"
     },
     "_meta": {
       "$schema": "http://json-schema.org/draft/2020-12/schema",
       "properties": {
         "op": {
           "type": "string",
           "enum": [
             "c",
             "u",
             "d"
           ],
           "title": "Change Operation",
           "description": "Change operation type: 'c' Create/Insert 'u' Update 'd' Delete."
         }
       },
       "type": "object"
     }
   },
   "x-infer-schema": true
 },
 "readSchema": {
   "allOf": [
     {
       "$ref": "flow://write-schema"
     },
     {
       "$ref": "flow://inferred-schema"
     }
   ]
 },
 "key": [
   "/_id"
 ]
}
You can see the flexible readSchema configuration in action we mentioned above.
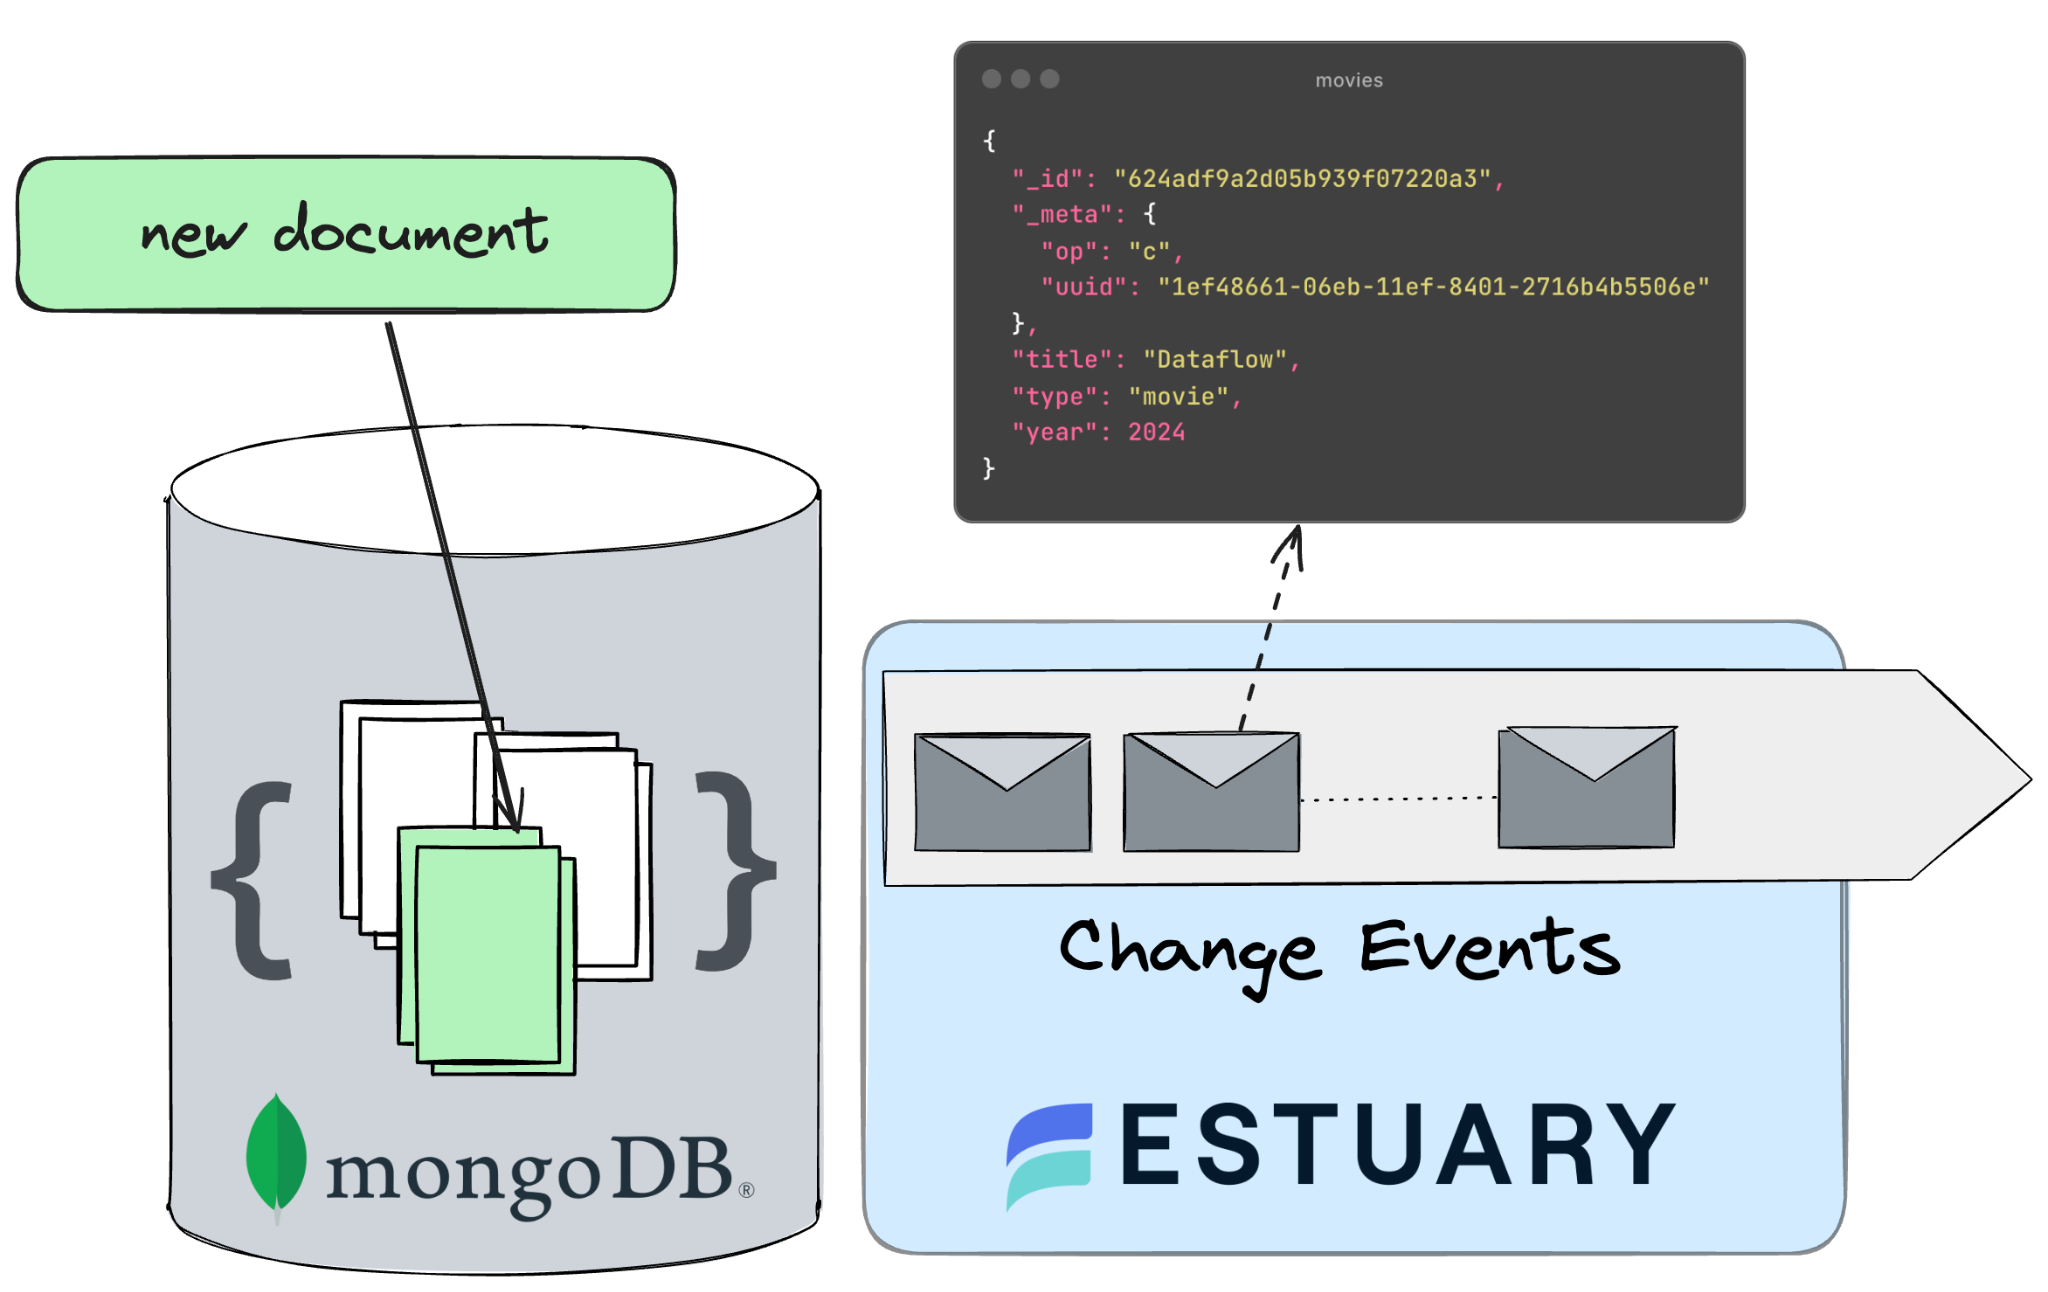
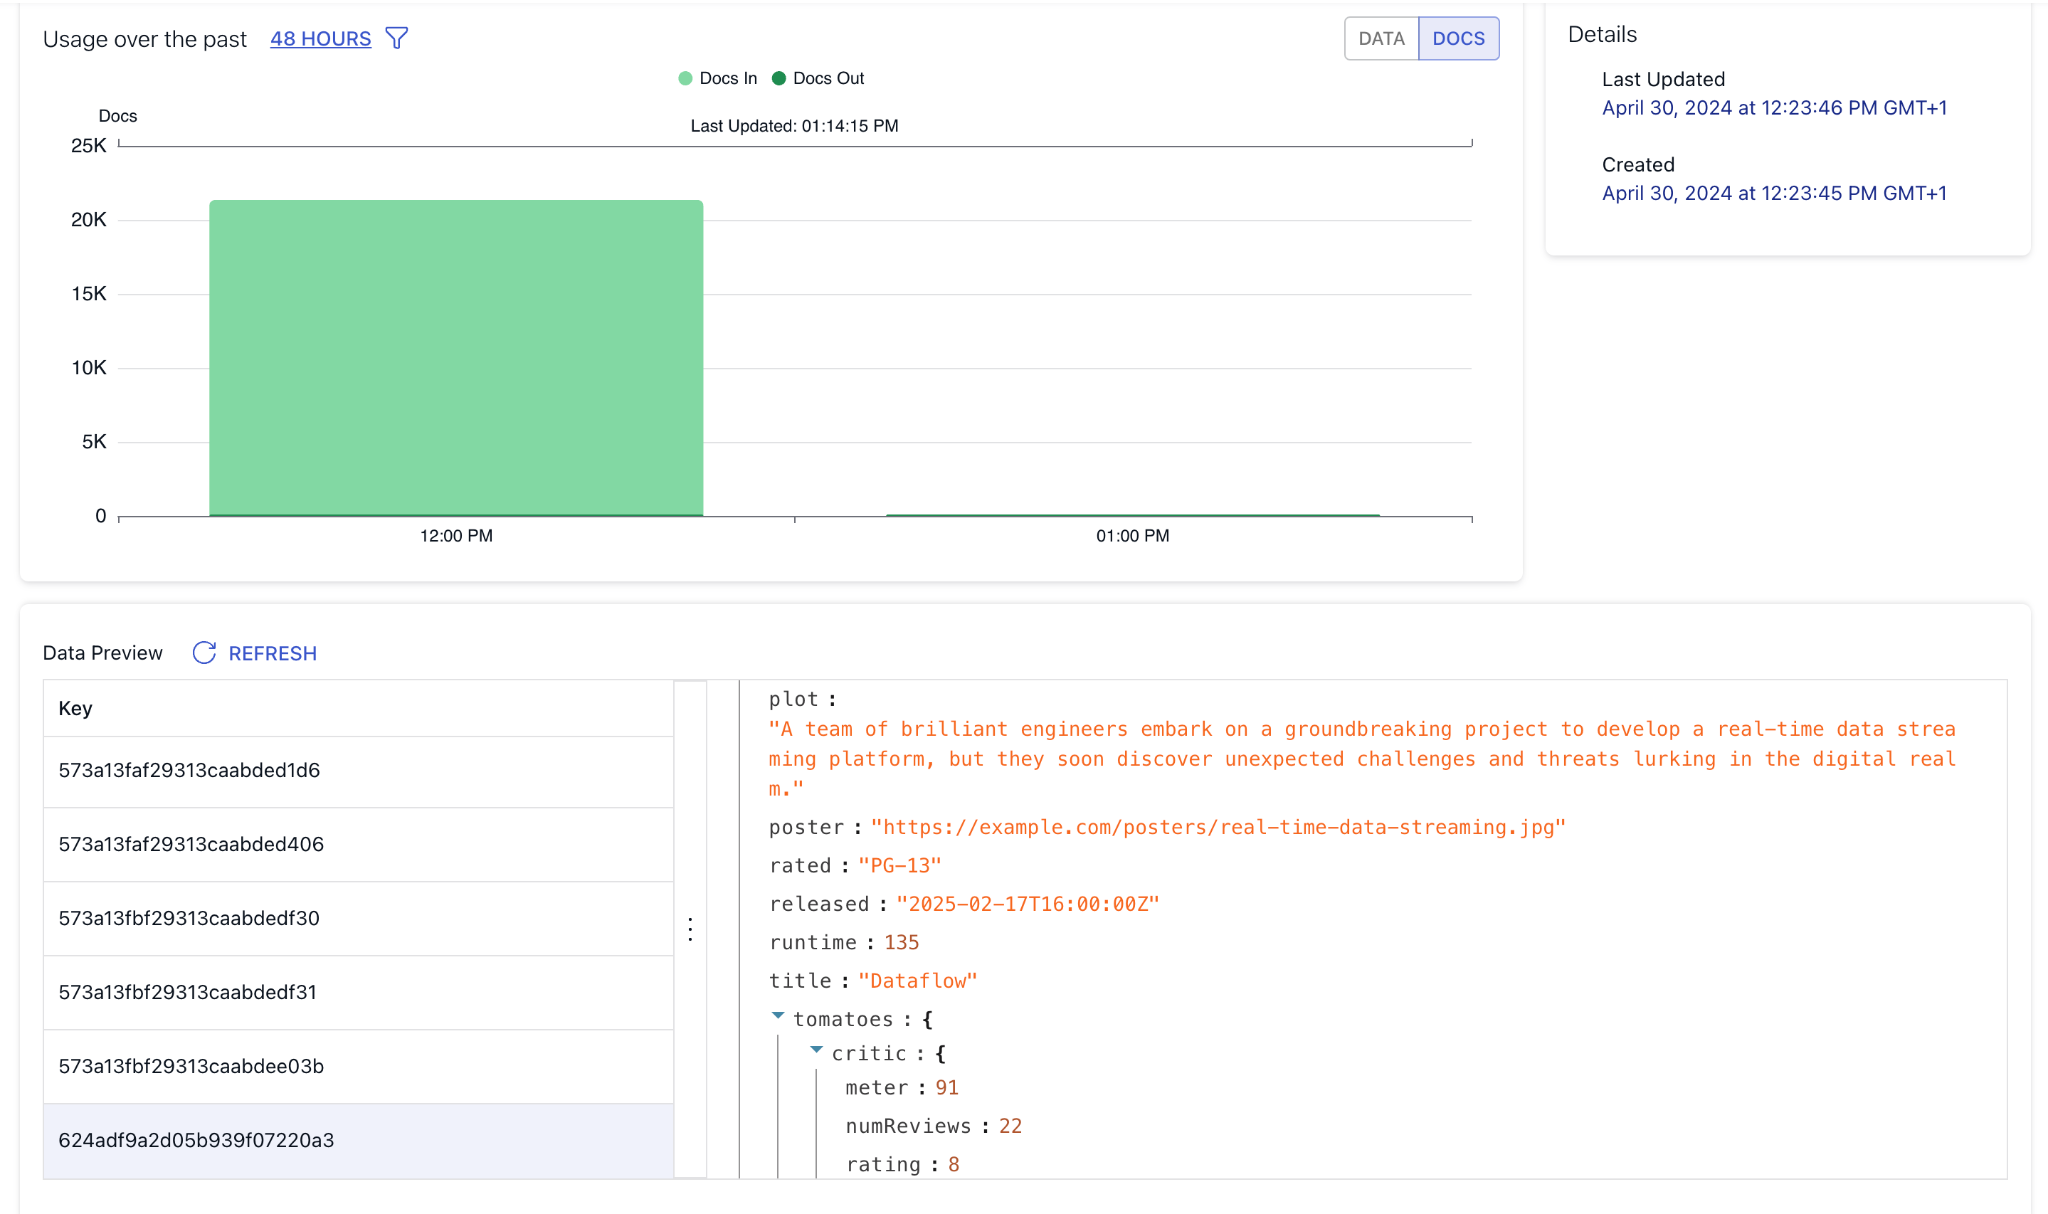
You can use the preview window on the collections “Overview” page to quickly test how change events propagate from MongoDB. Head over to the MongoDB Atlas UI and insert a new document into the movies collection.
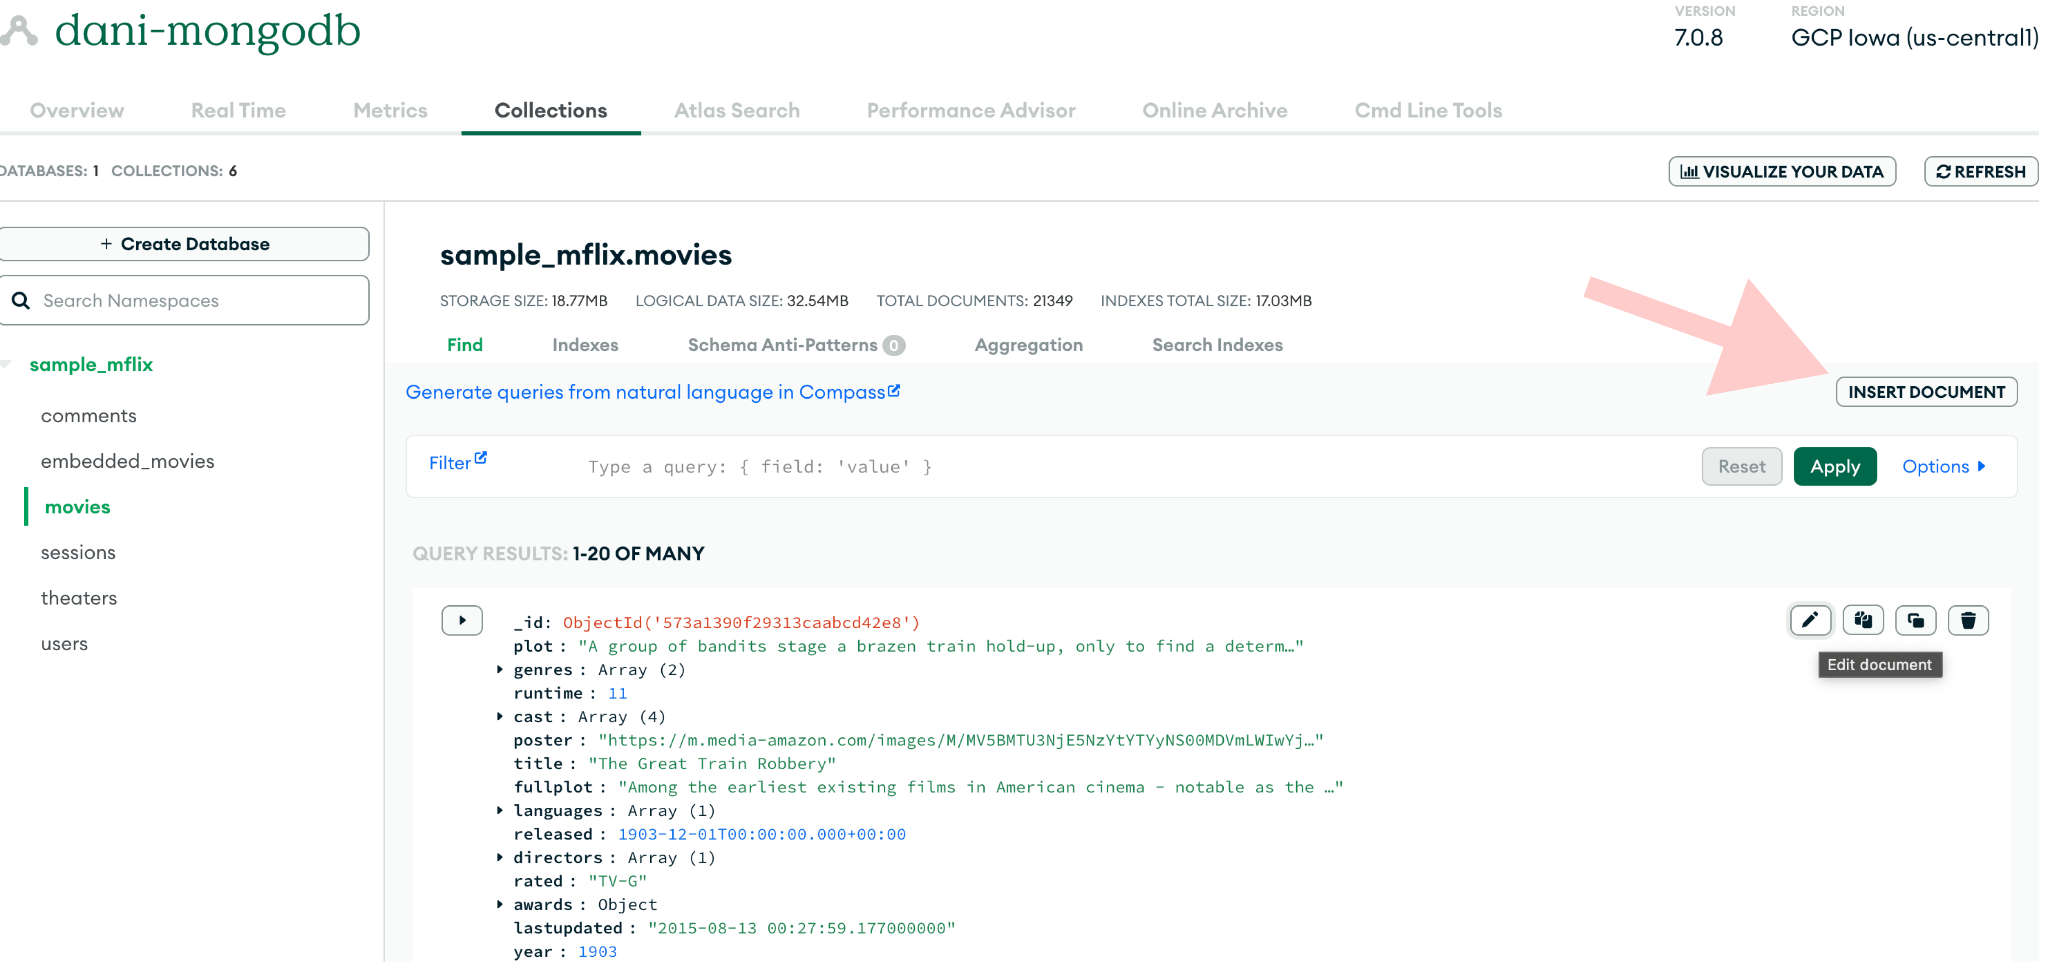
Here’s a sample JSON (describing non-existent but very intriguing movie) you can copy paste into the pop-up modal to spare you the trouble.
{
   "title":"Dataflow",
   "fullplot":"In a near-future world driven by data, a team of maverick engineers and programmers set out to revolutionize the way information is processed and transmitted. As they delve deeper into the complexities of real-time data streaming, they uncover dark secrets and face moral dilemmas that threaten to unravel their ambitious project.",   "plot":"A team of brilliant engineers embark on a groundbreaking project to develop a real-time data streaming platform, but they soon discover unexpected challenges and threats lurking in the digital realm.",
   "genres":[
      "Drama",
      "Sci-Fi",
      "Thriller"
   ],
   "runtime":135,
   "cast":[
      "Emily Blunt",
      "Michael B. Jordan",
      "Idris Elba",
      "Zendaya",
      "Oscar Isaac"
   ],
   "poster":"https://example.com/posters/real-time-data-streaming.jpg",
   "languages":[
      "English"
   ],
   "released":1739808000000,
   "directors":[
      "Christopher Nolan"
   ],
   "rated":"PG-13",
   "awards":{
      "wins":3,
      "nominations":8,
      "text":"3 wins, 8 nominations"
   },
   "lastupdated":"2024-04-30 10:15:00.000000",
   "year":2024,
   "imdb":{
      "rating":8.5,
      "votes":15234,
      "id":1001
   },
   "countries":[
      "USA",
      "United Kingdom"
   ],
   "type":"movie",
   "tomatoes":{
      "viewer":{
         "rating":4.2,
         "numReviews":3856,
         "meter":82
      },
      "fresh":34,
      "critic":{
         "rating":8.0,
         "numReviews":22,
         "meter":91
      },
      "rotten":2,
      "lastUpdated":1739894400000
   },
   "num_mflix_comments":120
}
After you insert the document, check out the collection preview on the Flow UI to verify it has indeed arrived. The process for updating and deleting collections in MongoDB works similarly.
Wrapping up
In this tutorial, you set up a MongoDB Change Data Capture (CDC) integration using Estuary Flow. Throughout the process, you learned about the technical nuances of capturing and synchronizing data changes from MongoDB collections in real-time.
Key takeaways from this tutorial:
-
MongoDB's document-based approach and schema flexibility present unique challenges and opportunities for Change Data Capture workflows.
-
You explored the prerequisites and configuration settings required to establish a seamless connection between MongoDB and Estuary, ensuring efficient data capture and synchronization.
-
Estuary's schema evolution capabilities enable data teams to manage schema changes effectively, ensuring data consistency and integrity across source and destination systems.
-
You learned how Flow continuously monitors MongoDB change streams and executes backfilling processes to capture changes accurately, even in the event of interruptions or schema alterations.
Next Steps
That’s it! You should have everything you need to know to create your own data pipeline for capturing change events from MongoDB!
Now try it out on your own CloudSQL database or other sources.
If you want to learn more, make sure you read through the Estuary documentation.
You’ll find instructions on how to use other connectors here. There are more tutorials here.
Also, don’t forget to join the Estuary Slack Community!