PostgreSQL CDC streaming to Snowflake
Introduction
In this tutorial, we'll set up a streaming CDC pipeline from PostgreSQL to Snowflake using Estuary Flow. By the end, you’ll have learned everything you need to know about building a pipeline on your own.
You'll use Flow's PostgreSQL capture connector and Snowflake materialization connector to set up an end-to-end CDC pipeline in three steps:
-
First, you’ll ingest change event data from a PostgreSQL database, using a table filled with generated realistic product data.
-
Then, you’ll learn how to configure Flow to persist data as collections while maintaining data integrity.
-
And finally, you will see how you can materialize these collections in Snowflake to make them ready for analytics!
By the end of this tutorial, you'll have established a robust and efficient data pipeline with near real-time replication of data from PostgreSQL to Snowflake.
Before you get started, make sure you do two things.
-
Sign up for Estuary Flow here. It’s simple, fast and free.
-
Make sure you also join the Estuary Slack Community. Don’t struggle. Just ask a question.
What is CDC?
CDC, or Change Data Capture, is a method used to track and capture changes made to data in a database. It enables the real-time capture of insertions, updates, and deletions, providing a continuous stream of changes.
This stream of change data is invaluable for keeping downstream systems synchronized and up-to-date with the source database, facilitating real-time analytics, replication, and data integration. In essence, CDC allows organizations to capture and react to data changes as they occur, ensuring data accuracy and timeliness across their systems. CDC provides a lower-latency, lower-load way to extract data. It’s also often the only way to capture every change as well as deletes, which are harder to track with batch-based extraction.
If you are interested in the intricacies of change data capture, head over to this article, where we explain the theory behind it - this is not a requirement for this tutorial, so if you want to dive in head first, keep on reading!
Prerequisites
This tutorial will assume you have access to the following things:
-
Docker: for convenience, we are providing a docker compose definition which will allow you to spin up a database and a fake data generator service in about 5 seconds!
-
ngrok: Flow is a fully managed service. Because the database used in this tutorial will be running on your machine, you’ll need something to expose it to the internet. ngrok is a lightweight tool that does just that.
-
Snowflake account: The target data warehouse for our flow is Snowflake. In order to follow along with the tutorial, a trial account is perfectly fine.
Step 1. Set up source database
PostgreSQL setup
As this tutorial is focused on CDC replication from PostgreSQL, we’ll need a database. We recommend you create this database first, so you can learn Flow more easily. Then try these steps on your own database. Let’s take a look at what we are working with!
Save the below yaml snippet as a file called docker-compose.yml. This docker-compose.yml file contains the service definitions for the PostgreSQL database and the mock data generator service.
services:
  postgres:
    image: postgres:latest
    container_name: postgres_cdc
    hostname: postgres_cdc
    restart: unless-stopped
    user: postgres
    environment:
      POSTGRES_USER: postgres
      POSTGRES_DB: postgres
      POSTGRES_PASSWORD: postgres
    command:
      - "postgres"
      - "-c"
      - "wal_level=logical"
    healthcheck:
      test: ["CMD-SHELL", "sh -c 'pg_isready -U flow_capture -d postgres'"]
      interval: 5s
      timeout: 10s
      retries: 120
    volumes:
      - ./init.sql:/docker-entrypoint-initdb.d/init.sql
    ports:
      - "5432:5432"

  datagen:
    image: materialize/datagen
    container_name: datagen
    restart: unless-stopped
    environment:
      POSTGRES_HOST: postgres_cdc
      POSTGRES_PORT: 5432
      POSTGRES_DB: postgres
      POSTGRES_USER: postgres
      POSTGRES_PASSWORD: postgres
    entrypoint:
      "datagen -s /app/schemas/products.sql -n 10000 -f postgres -w 1000"
    depends_on:
      postgres:
        condition: service_healthy

    volumes:
          - ./schemas/products.sql:/app/schemas/products.sql
Don’t be alarmed by all these Docker configurations, they are made to be reproducible on any machine, so you don’t have to worry about modifying anything in them! Before you spin up the database, let’s take a quick look at what exactly you can expect to happen.
Next up, create a folder called schemas and paste the below SQL DDL into a file called products.sql. This file contains the schema of the demo data.
init.sql file, this is just a quirk of the Datagen data generator tool.CREATE TABLE "public"."products" (
"id" int PRIMARY KEY,
"name" varchar COMMENT 'faker.internet.userName()',
"merchant_id" int NOT NULL COMMENT 'faker.datatype.number()',
"price" int COMMENT 'faker.datatype.number()',
"status" varchar COMMENT 'faker.datatype.boolean()',
"created_at" timestamp DEFAULT (now())
);
If you take a closer look at the schema definition, you can see that in the COMMENT attribute we define Python snippets which actually tell Datagen how to generate fake data for those fields!
Finally, create the init.sql file, which contains the database-level requirements to enable Flow to stream CDC data.
CREATE USER flow_capture WITH PASSWORD 'secret' REPLICATION;

GRANT pg_read_all_data TO flow_capture;

CREATE TABLE products (
  "id" int PRIMARY KEY,
  "name" varchar COMMENT 'faker.internet.userName()',
  "merchant_id" int NOT NULL COMMENT 'faker.datatype.number()',
  "price" int COMMENT 'faker.datatype.number()',
  "status" varchar COMMENT 'faker.datatype.boolean()',
  "created_at" timestamp DEFAULT (now())
);

CREATE TABLE IF NOT EXISTS public.flow_watermarks (slot TEXT PRIMARY KEY, watermark TEXT);
GRANT ALL PRIVILEGES ON TABLE public.flow_watermarks TO flow_capture;
CREATE PUBLICATION flow_publication;
ALTER PUBLICATION flow_publication SET (publish_via_partition_root = true);
ALTER PUBLICATION flow_publication ADD TABLE public.flow_watermarks, public.products;
In the init.sql file, you create the products table and all the database objects Flow requires for real-time CDC streaming.
Configuring PostgreSQL for CDC
To enable CDC replication in PostgreSQL, several database objects need to be created and configured. These objects facilitate the capture and propagation of data changes to downstream systems. Let's examine each object and its significance in the context of CDC replication:
CREATE USER flow_capture WITH PASSWORD 'secret' REPLICATION;
This user is dedicated to the CDC replication process. It is granted the necessary permissions to read all data from the database, allowing it to capture changes across tables efficiently. In a production environment, make sure you use a more secure password than what is in the example.
GRANT pg_read_all_data TO flow_capture;
Granting the pg_read_all_data privilege to the flow_capture user ensures that it can access and read data from all tables in the database, essential for capturing changes.
pg_read_all_data is used for convenience, but is not a hard requirement, since it is possible to grant a more granular set of permissions. For more details check out the connector docs.CREATE TABLE products (...)
The source tables, such as the products table in this example, contain the data whose changes we want to capture and replicate. It is recommended for tables to have a primary key defined, although not a hard requirement for CDC.
CREATE TABLE IF NOT EXISTS public.flow_watermarks (...)
The flow_watermarks table is a small “scratch space” to which the connector occasionally writes a small amount of data to ensure accuracy when backfilling preexisting table contents.
GRANT ALL PRIVILEGES ON TABLE public.flow_watermarks TO flow_capture;
The flow_capture user needs full privileges on the flow_watermarks table to insert, update, and query metadata related to the replication process.
CREATE PUBLICATION flow_publication;
ALTER PUBLICATION flow_publication SET (publish_via_partition_root = true);
ALTER PUBLICATION flow_publication ADD TABLE public.flow_watermarks, public.products;
A publication defines a set of tables whose changes will be replicated. In this case, the flow_publication publication includes the public.flow_watermarks and public.products tables.
These commands configure the flow_publication publication to publish changes via partition root and add the specified tables to the publication. By setting publish_via_partition_root to true, the publication ensures that updates to partitioned tables are correctly captured and replicated.
publish_via_partition_root when creating a publication.These objects form the backbone of a robust CDC replication setup, ensuring data consistency and integrity across systems. After the initial setup, you will not have to touch these objects in the future, unless you wish to start ingesting change events from a new table.
With that out of the way, you’re ready to start the source database. In order to initialize Postgres and the fake data generator service, all you have to do is execute the following (to free up your current terminal, use the -d flag so the containers run in a daemonized background process):
docker compose up
After a few seconds, you should see that both services are up and running. The postgres_cdc service should print the following on the terminal:
postgres_cdc | LOG: database system is ready to accept connections
While the datagen service will be a little bit more spammy, as it prints every record it generates, but don’t be alarmed, this is enough for us to verify that both are up and running. Let’s see how we can expose the database so Flow can connect to it.
Expose the database to the internet via ngrok
As mentioned above, the next step is to make the database available for other services. To do this in one quick command, we can use ngrok, a free CLI tool that enables tunneling of services. In our case we only want to expose the port 5432 and only the tcp protocol.
ngrok tcp 5432
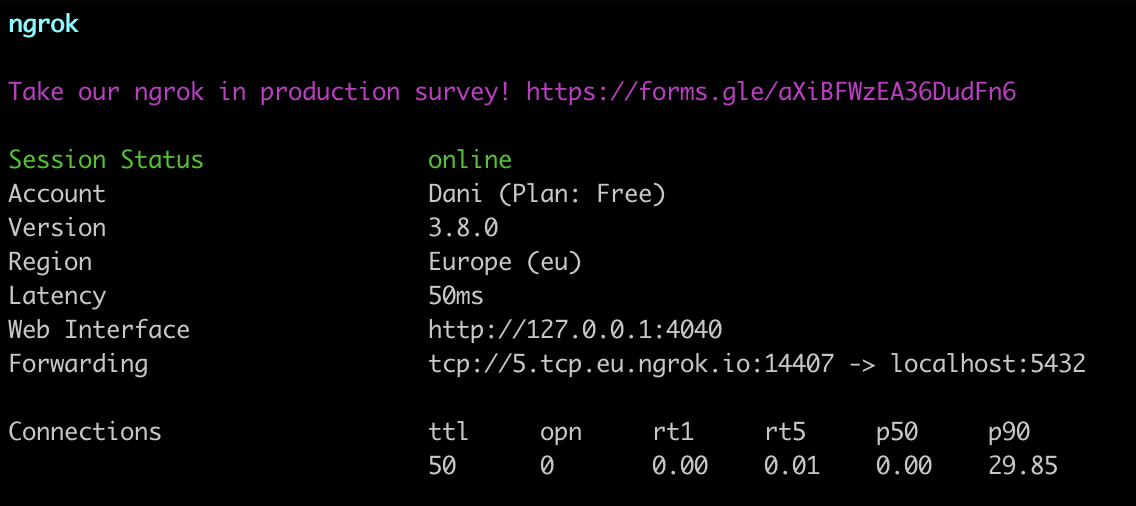
You should immediately be greeted with a screen that contains the public URL for the tunnel we just started! In the example above, the public URL 5.tcp.eu.ngrok.io:14407 is mapped to localhost:5432, which is the address of the Postgres database.
Before we jump into setting up the replication, you can quickly verify the data being properly generated by connecting to the database and peeking into the products table, as shown below:
~ psql -h 5.tcp.eu.ngrok.io -p 14407 -U postgres -d postgres
Password for user postgres:
psql (16.2)
Type "help" for help.

postgres=# \d
              List of relations
 Schema |      Name       | Type  |  Owner
--------+-----------------+-------+----------
 public | flow_watermarks | table | postgres
 public | products        | table | postgres
(2 rows)

postgres=# select count(*) from products;
 count
-------
  2637
(1 row)

postgres=# select count(*) from products;
 count
-------
  2642
(1 row)
By executing a count(*) statement a few seconds apart you are able to verify that data is in fact being written into the table.
Step 2. Set up a Capture
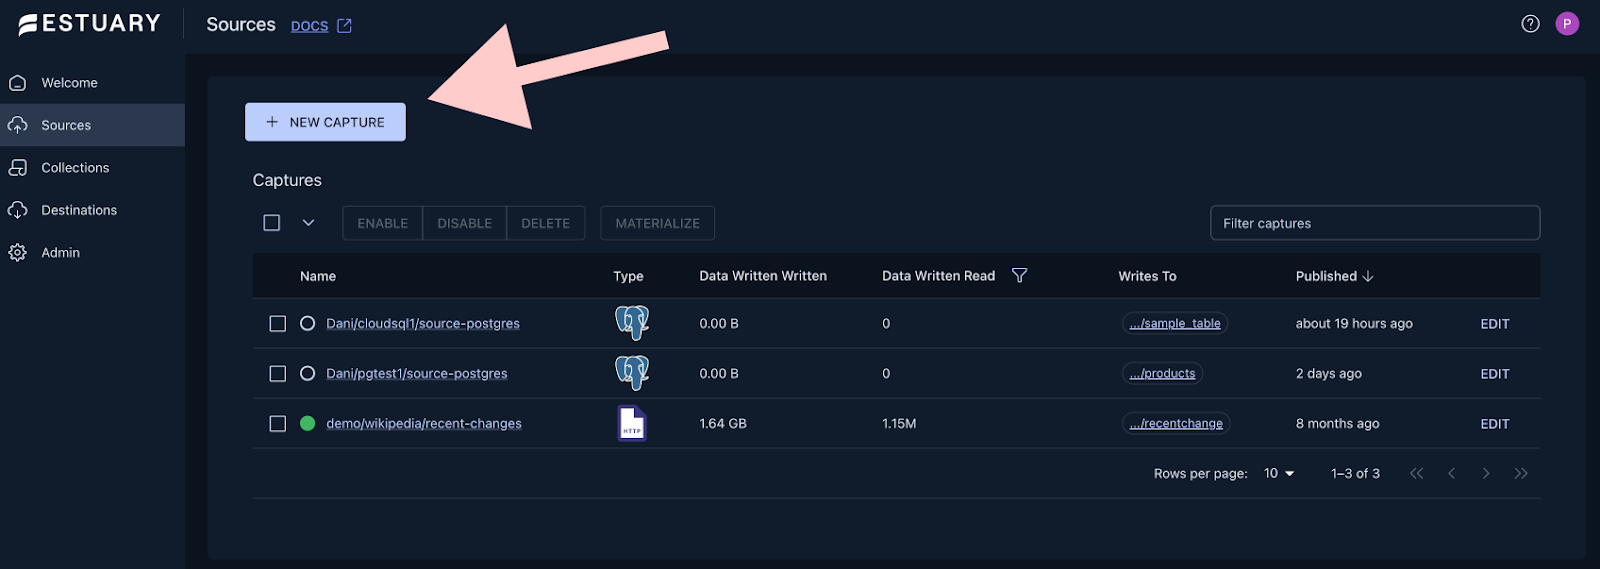
Good news, the hard part is over! Smooth sailing from here on out. Head over to your Flow dashboard (if you haven’t registered yet, you can do so here.) and create a new Capture. A capture is how Flow ingests data from an external source. Every Data Flow starts with a Capture.
Go to the sources page by clicking on the Sources on the left hand side of your screen, then click on + New Capture
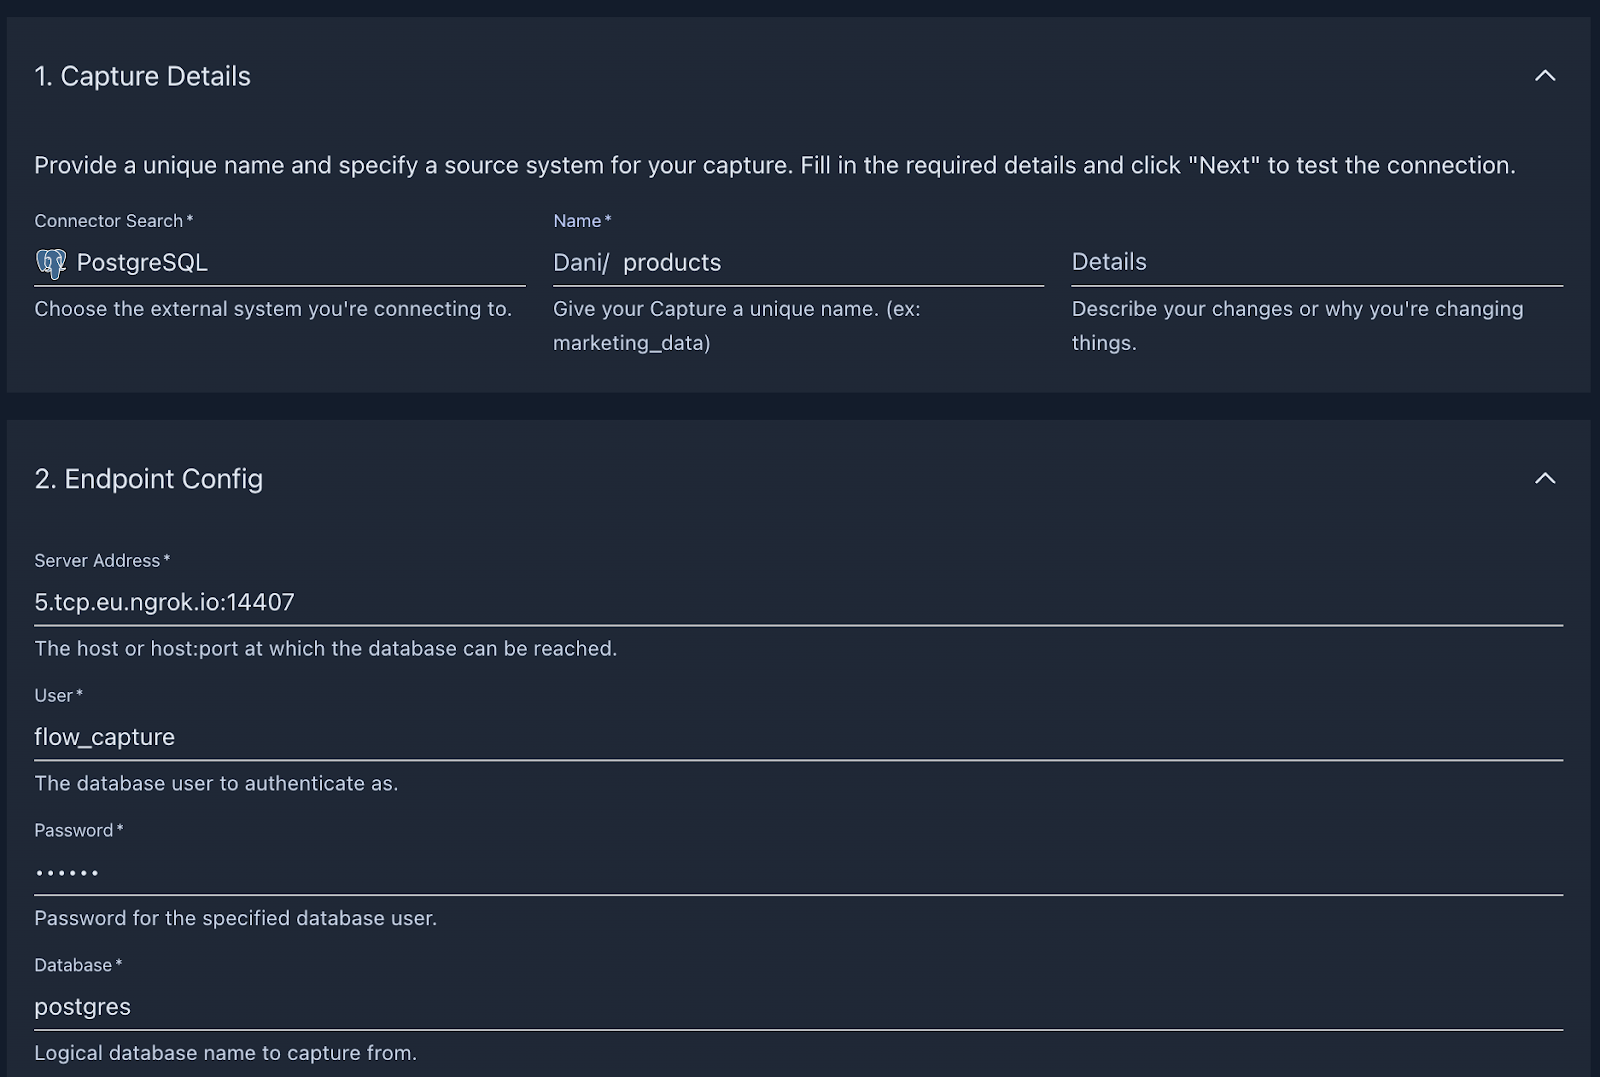
Configure the connection to the database based on the information we gathered in the previous step and press Next.
On the following page, we can configure how our incoming data should be represented in Flow as collections. As a quick refresher, let’s recap how Flow represents data on a high level.
Documents
The documents of your flows are stored in collections: real-time data lakes of JSON documents in cloud storage. Documents being backed by an object storage mean that once you start capturing data, you won’t have to worry about it not being available to replay – object stores such as S3 can be configured to cheaply store data forever. See docs page for more information.
Schemas
Flow documents and collections always have an associated schema that defines the structure, representation, and constraints of your documents. In most cases, Flow generates a functioning schema on your behalf during the discovery phase of capture, which has already automatically happened - that’s why you’re able to take a peek into the structure of the incoming data!
To see how Flow parsed the incoming records, click on the Collection tab and verify the inferred schema looks correct.
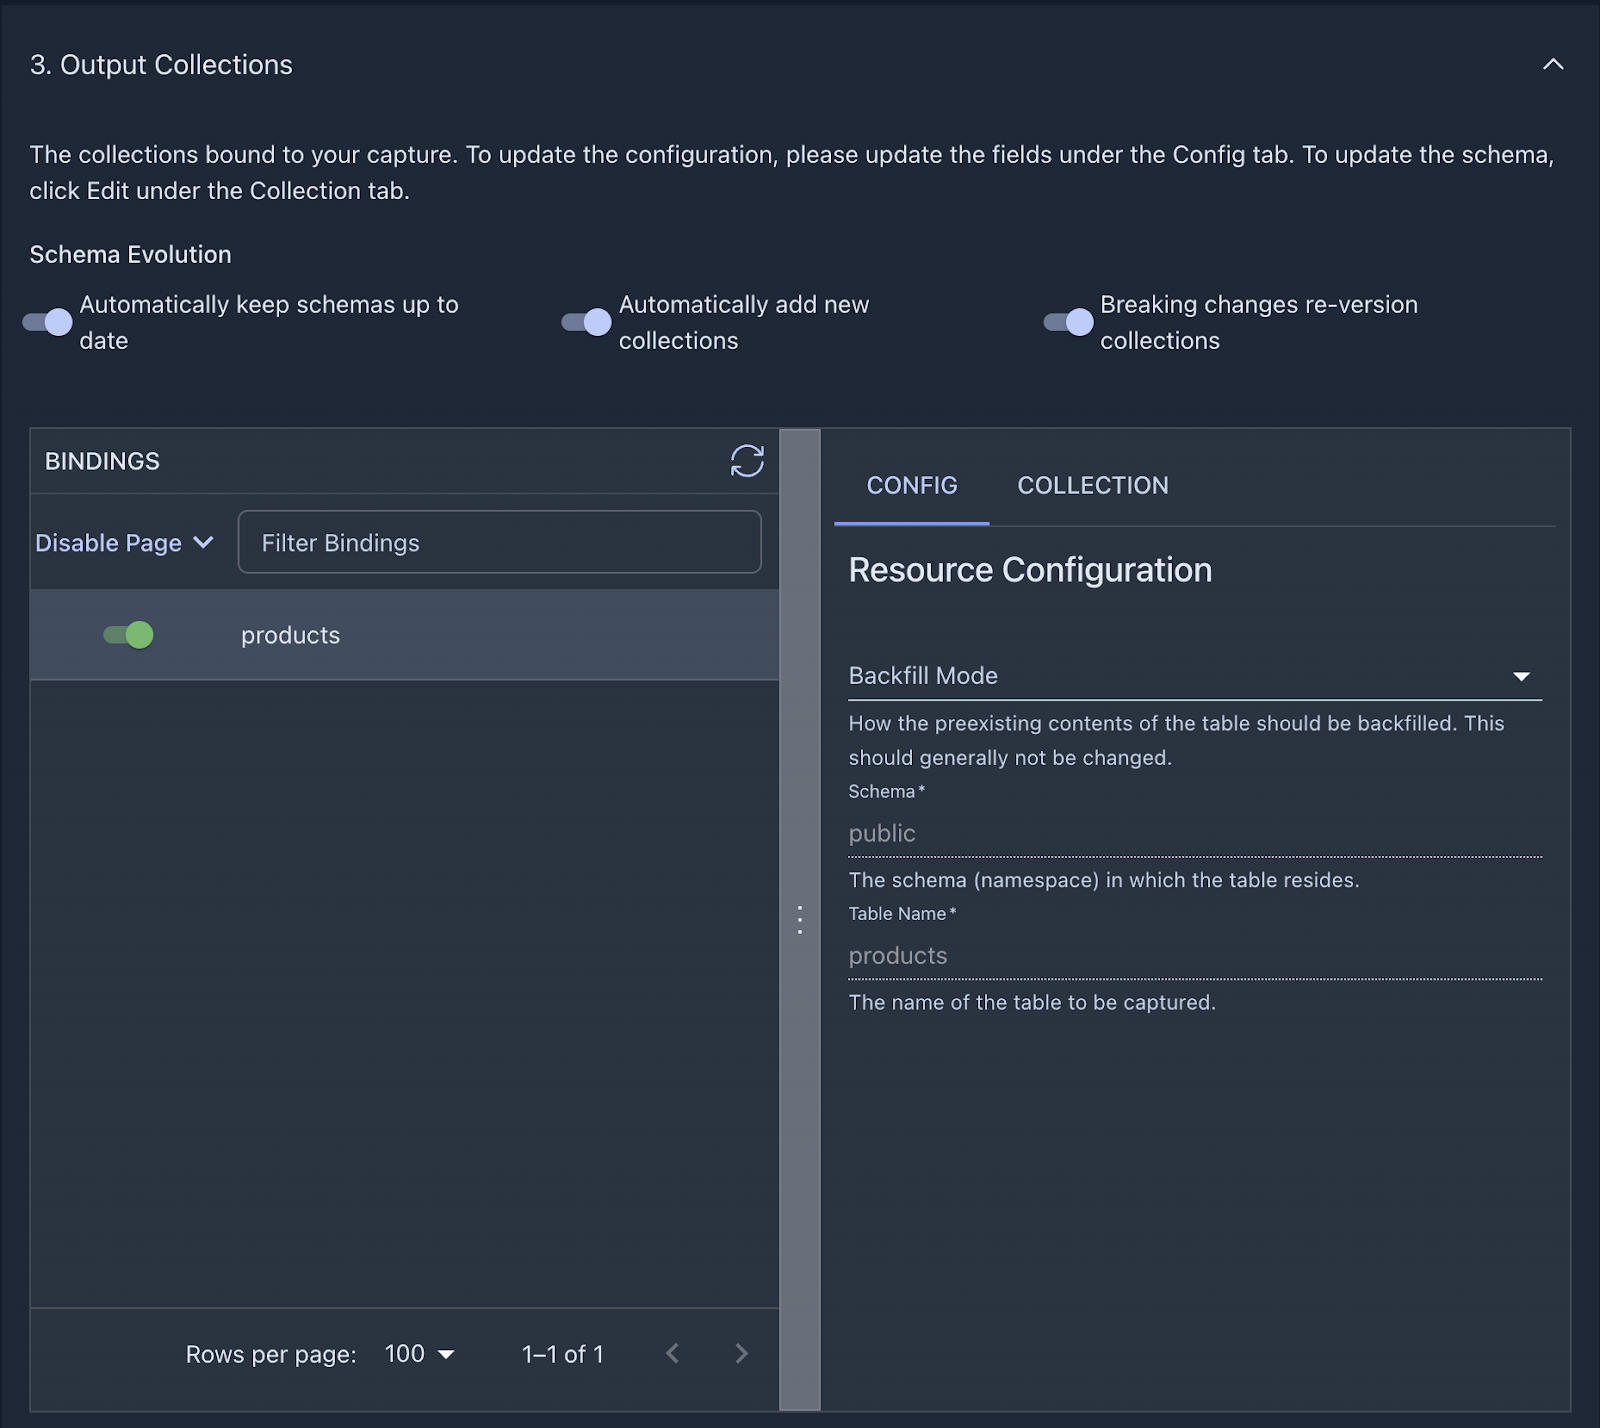
Before you advance to the next step, let’s take a look at the other configuration options we have here. You’ll see three toggles, all turned on by default:
-
Automatically keep schemas up to date
-
Automatically add new source collections
-
Breaking changes re-version collections
All of these settings relate to how Flow handles schema evolution, so let’s take a quick detour to explain them from a high-level perspective.
Estuary Flow's schema evolution feature seamlessly handles updates to dataset structures within a Data Flow, ensuring uninterrupted operation. Collection specifications define each dataset, including key, schema, and partitions. When specs change, schema evolution automatically updates associated components to maintain compatibility.
It addresses breaking changes by updating materializations or recreating collections with new names, preventing disruptions. Common causes of breaking changes include modifications to collection schemas, which require updates to materializations.
Overall, schema evolution streamlines adaptation to structural changes, maintaining smooth data flow within the system.
For more information, check out the dedicated documentation page for schema evolution.
For the sake of this tutorial, feel free to leave everything at its default setting and press Next again, then Save and Publish to deploy the connector and kick off a backfill.
Step 3. Set up a Materialization
Similarly to the source side, we’ll need to set up some initial configuration in Snowflake to allow Flow to materialize collections into a table.
Preparing Snowflake for use with Estuary Flow involves the following steps:
1. Keep the Flow web app open and open a new tab or window to access your Snowflake console.
3. Create a new SQL worksheet. This provides a platform to execute queries.
4. Paste the provided script into the SQL console, adjusting the value for estuary_password to a strong password.
set database_name = 'ESTUARY_DB';
set warehouse_name = 'ESTUARY_WH';
set estuary_role = 'ESTUARY_ROLE';
set estuary_user = 'ESTUARY_USER';
set estuary_password = 'secret';
set estuary_schema = 'ESTUARY_SCHEMA';
-- create role and schema for Estuary
create role if not exists identifier($estuary_role);
grant role identifier($estuary_role) to role SYSADMIN;
-- Create snowflake DB
create database if not exists identifier($database_name);
use database identifier($database_name);
create schema if not exists identifier($estuary_schema);
-- create a user for Estuary
create user if not exists identifier($estuary_user)
password = $estuary_password
default_role = $estuary_role
default_warehouse = $warehouse_name;
grant role identifier($estuary_role) to user identifier($estuary_user);
grant all on schema identifier($estuary_schema) to identifier($estuary_role);
-- create a warehouse for estuary
create warehouse if not exists identifier($warehouse_name)
warehouse_size = xsmall
warehouse_type = standard
auto_suspend = 60
auto_resume = true
initially_suspended = true;
-- grant Estuary role access to warehouse
grant USAGE
on warehouse identifier($warehouse_name)
to role identifier($estuary_role);
-- grant Estuary access to database
grant CREATE SCHEMA, MONITOR, USAGE on database identifier($database_name) to role identifier($estuary_role);
-- change role to ACCOUNTADMIN for STORAGE INTEGRATION support to Estuary (only needed for Snowflake on GCP)
use role ACCOUNTADMIN;
grant CREATE INTEGRATION on account to role identifier($estuary_role);
use role sysadmin;
COMMIT;
5. Execute all the queries by clicking the drop-down arrow next to the Run button and selecting "Run All."
6. Snowflake will process the queries, setting up the necessary roles, databases, schemas, users, and warehouses for Estuary Flow.
7. Once the setup is complete, return to the Flow web application to continue with the integration process.
Back in Flow, head over to the Destinations page, where you can create a new Materialization.
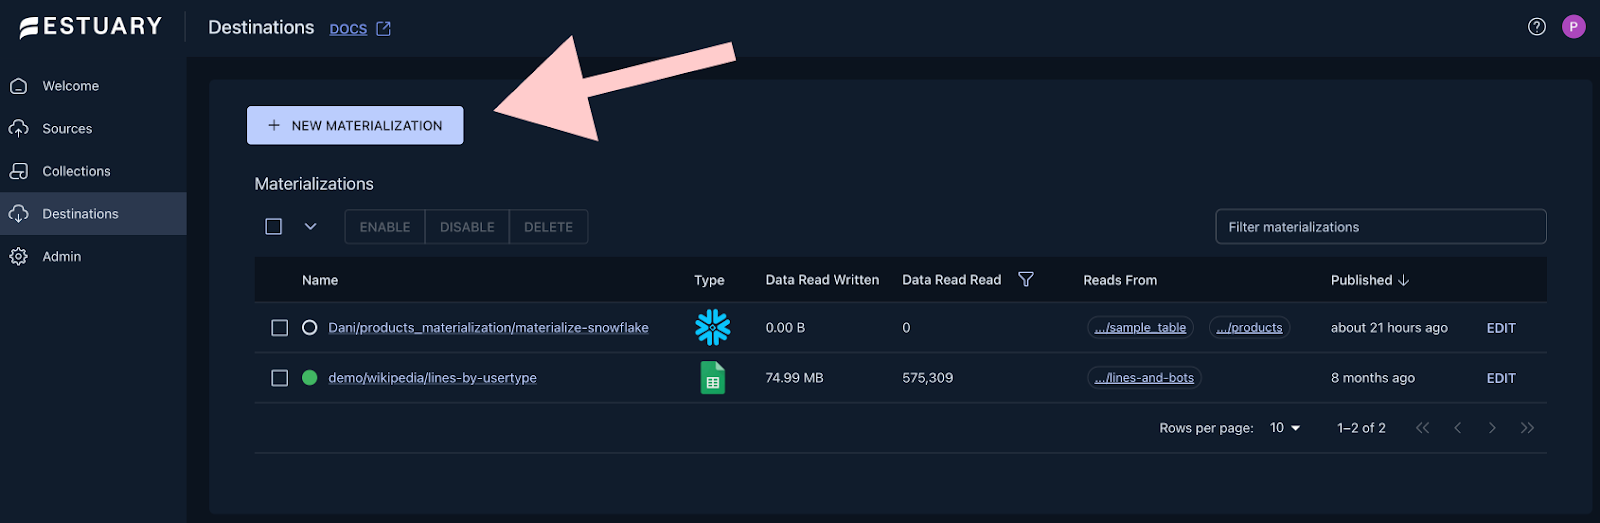
Choose Snowflake and start filling out the connection details based on the values inside the script you executed in the previous step. If you haven’t changed anything, this is how the connector configuration should look like:
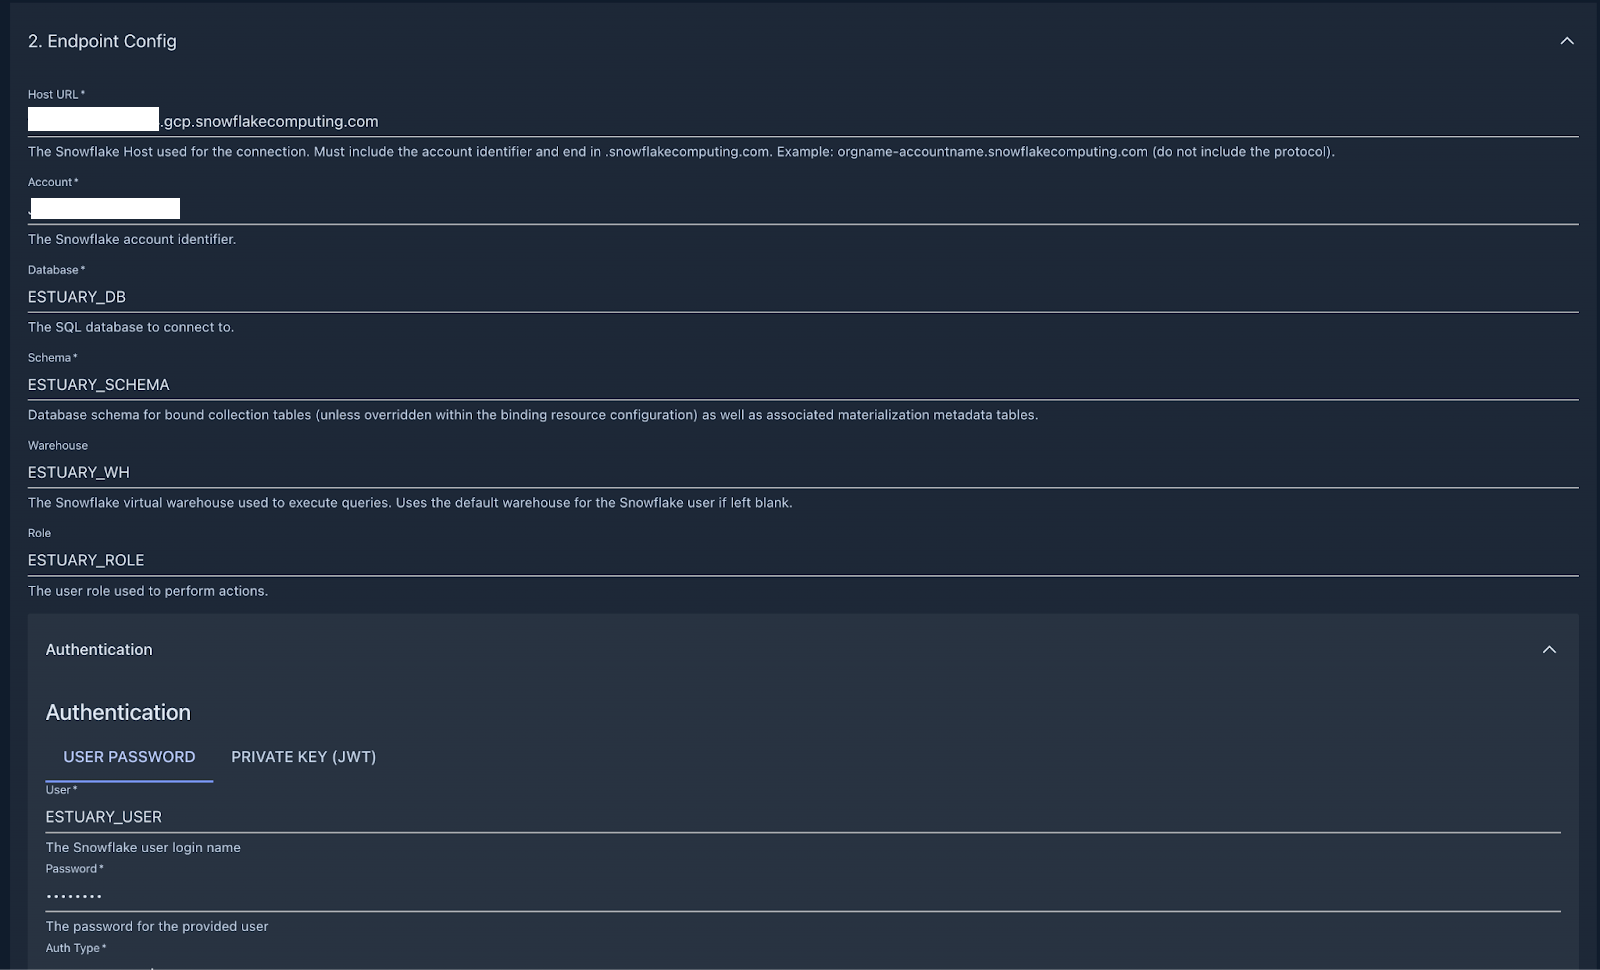
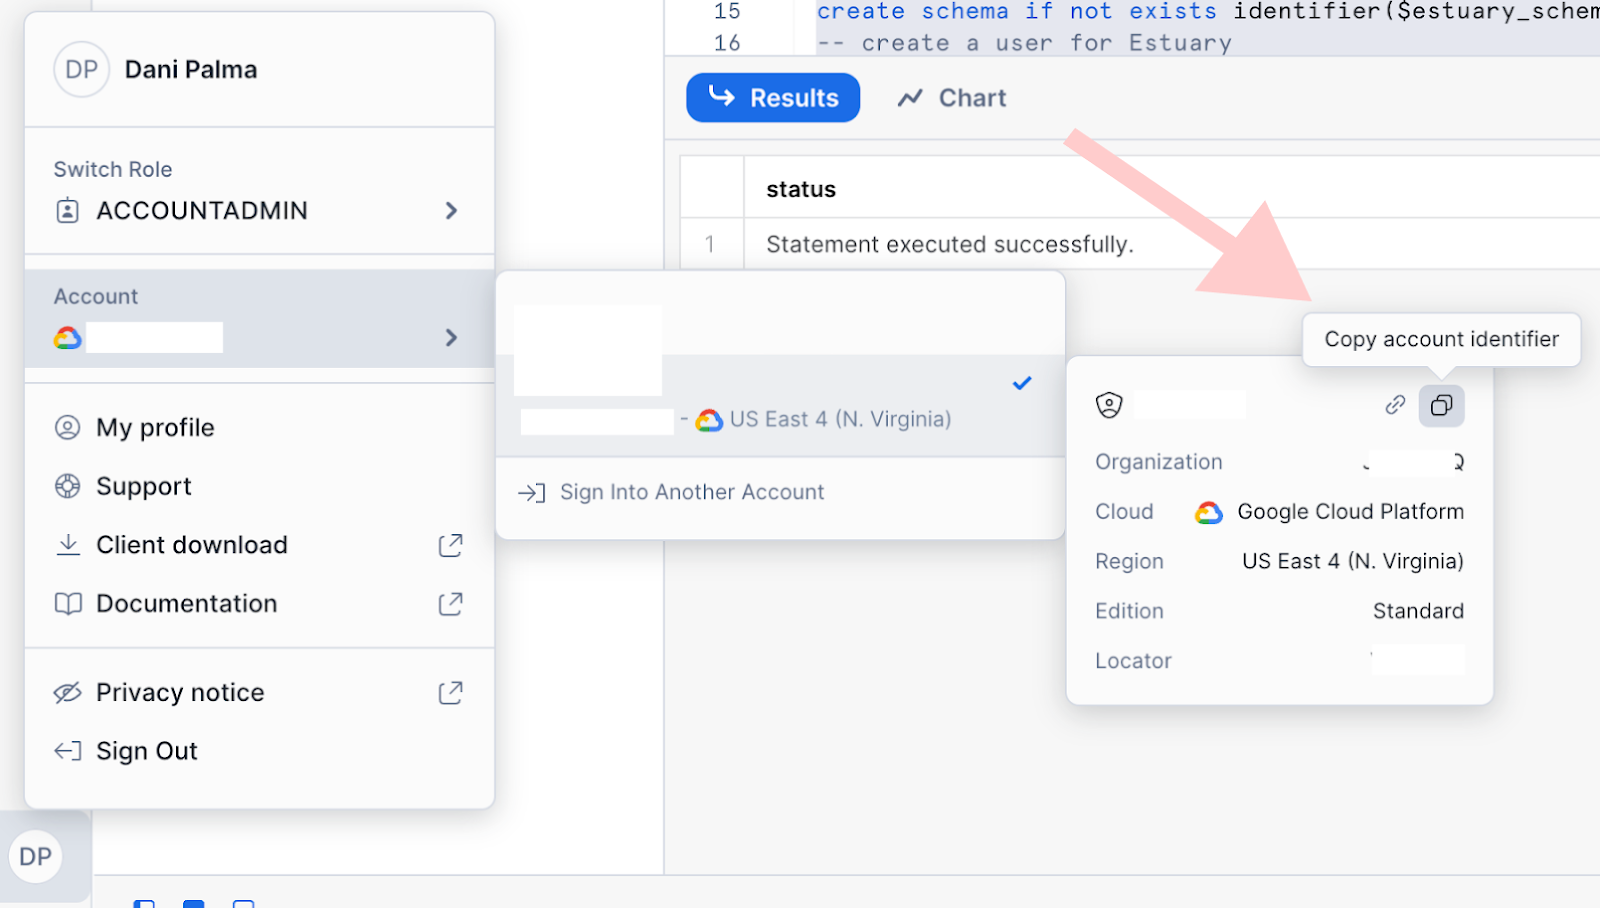
You can grab your Snowflake host URL and account identifier by navigating to these two little buttons on the Snowflake UI.
If you scroll down to the Advanced Options section, you will be able to configure the "Update Delay" parameter. If you leave this parameter unset, the default value of 30 minutes will be used.

The Update Delay parameter in Estuary materializations offers a flexible approach to data ingestion scheduling. It represents the amount of time the system will wait before it begins materializing the latest data.
For example, if an update delay is set to 2 hours, the materialization task will pause for 2 hours before processing the latest available data. This delay ensures that data is not pulled in immediately after it becomes available, allowing your Snowflake warehouse to go idle and be suspended in between updates, which can significantly reduce the number of credits consumed.
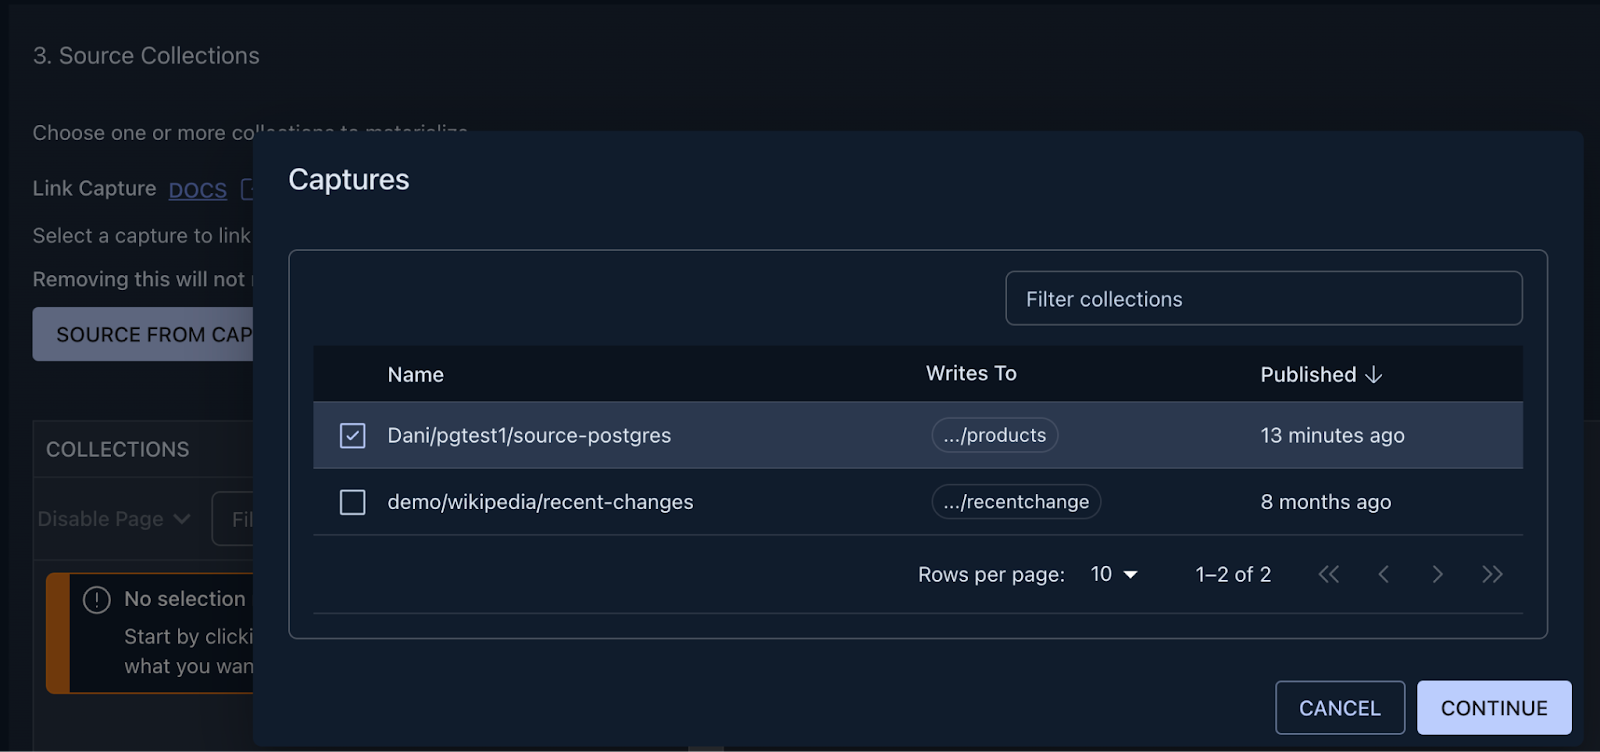
After the connection details are in place, the next step is to link the capture we just created to Flow is able to see collections we are loading data into from Postgres.
You can achieve this by clicking on the “Source from Capture” button, and selecting the name of the capture from the table.
After pressing continue, you are met with a few configuration options, but for now, feel free to press Next, then Save and Publish in the top right corner, the defaults will work perfectly fine for this tutorial.
A successful deployment will look something like this:
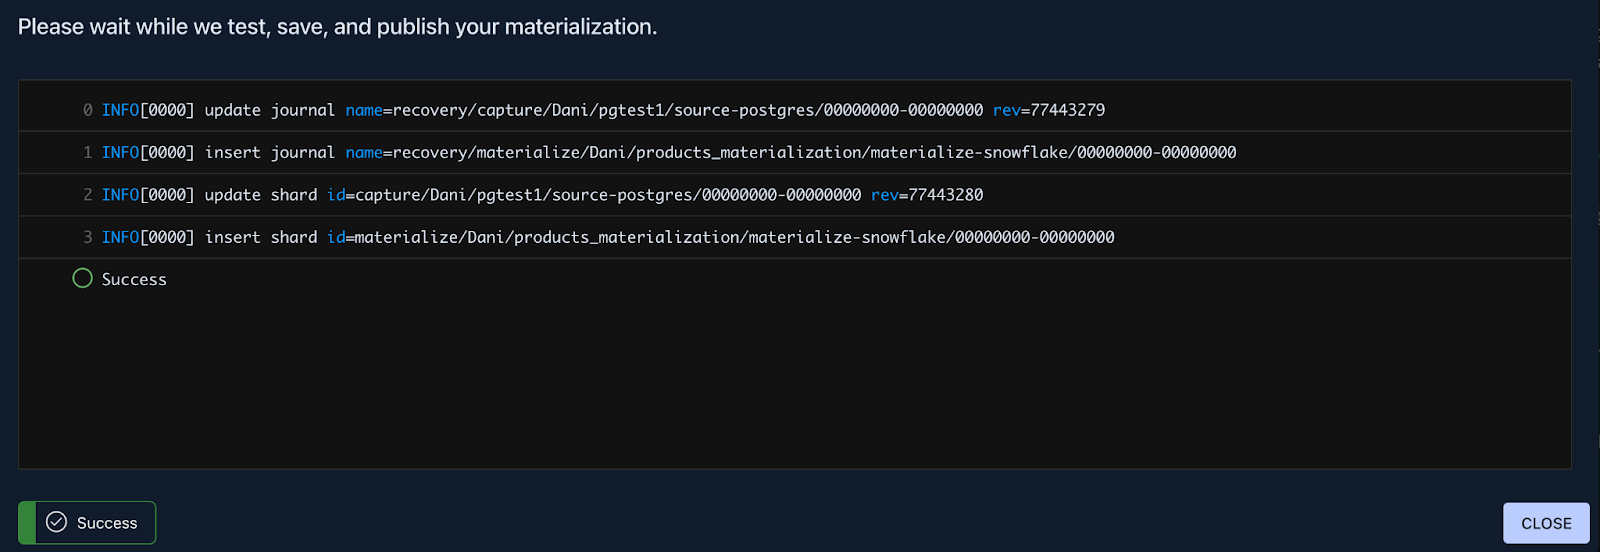
And that’s pretty much it, you’ve successfully published a real-time CDC pipeline. Let’s check out Snowflake to see how the data looks.
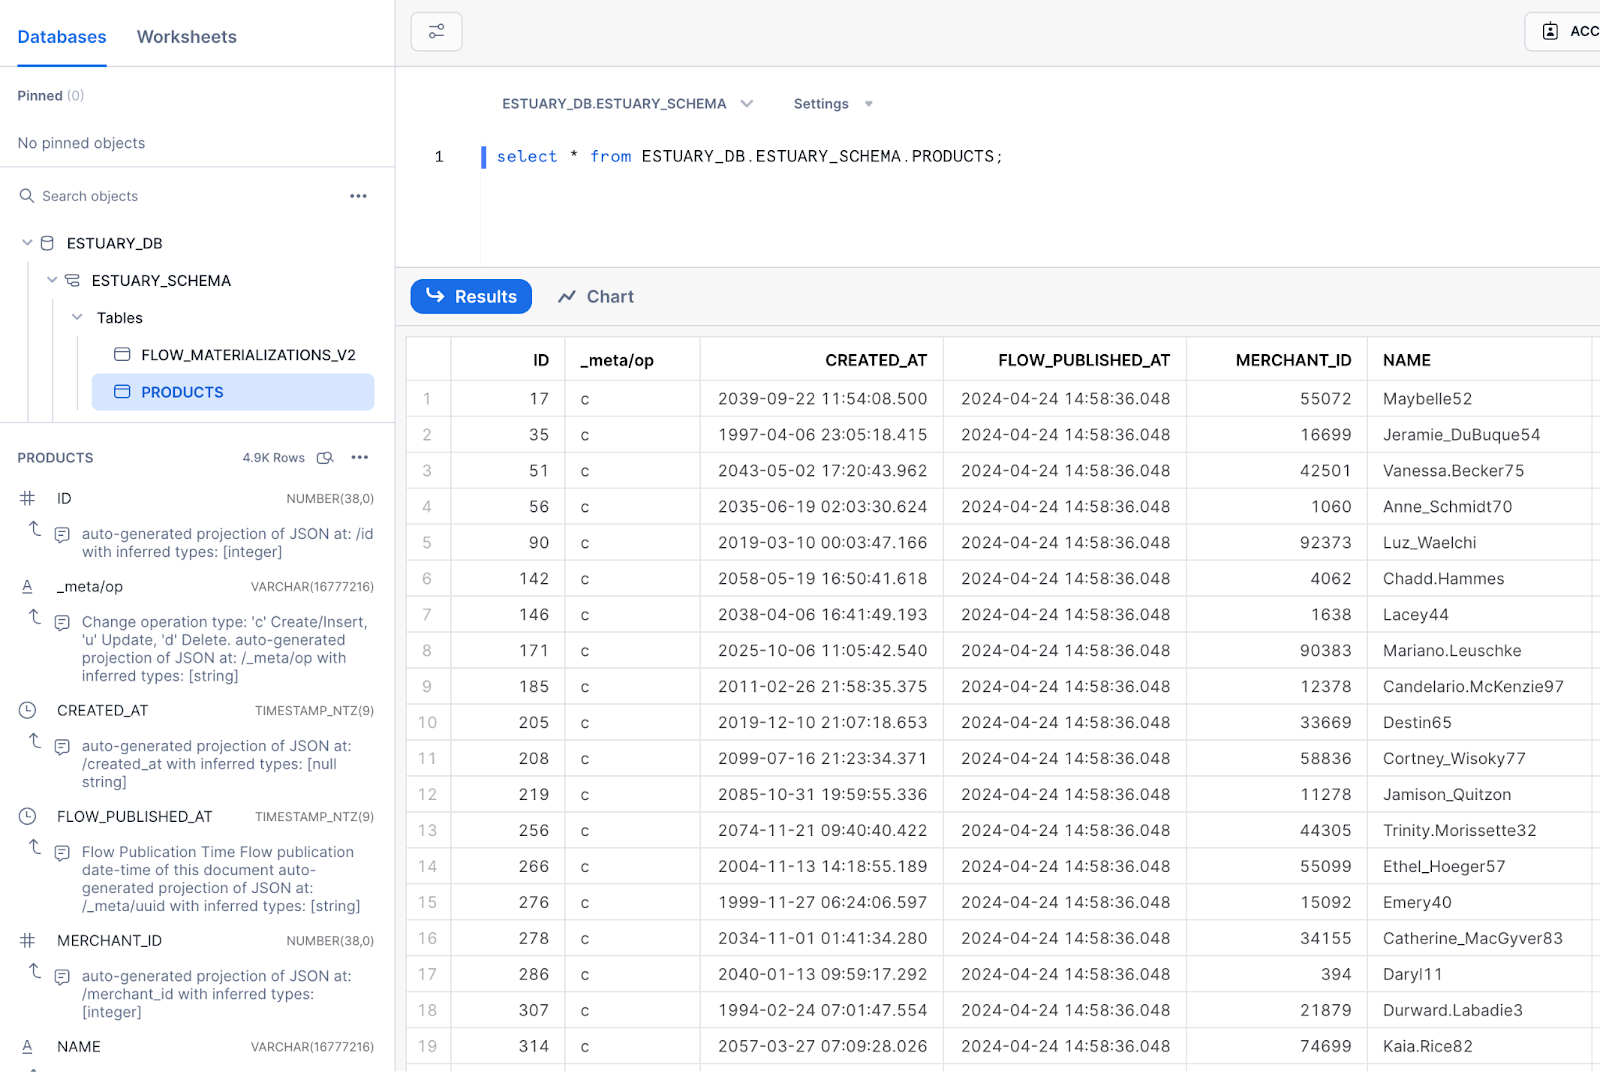
Looks like the data is arriving as expected, and the schema of the table is properly configured by the connector based on the types of the original table in Postgres.
To get a feel for how the data flow works; head over to the collection details page on the Flow web UI to see your changes immediately. On the Snowflake end, they will be materialized after the next update.
Party time!
Congratulations! 🎉 You've successfully set up a CDC pipeline from PostgreSQL to Snowflake using Estuary Flow. In just a few minutes, you've learned how to configure log-based CDC replication, handle schema evolution, and deploy a robust data integration solution.
Take a moment to celebrate your achievement! You've not only gained valuable technical knowledge but also demonstrated the agility and efficiency of modern data engineering practices. With your newfound skills, you're well-equipped to tackle complex data challenges and drive innovation in your organization.
Clean up
After every party, it’s customary to clean up after ourselves. After you are done exploring the flow, make sure to remove any resources which you won’t use anymore!
Postgres
Simply stop the Docker containers & terminate the ngrok process. This will terminate both the database process and the tunnel which exposed it to the internet.
Snowflake
To clean up resources in Snowflake use the following SQL script.
-- Revoke all privileges from Estuary role
revoke all privileges on schema ESTUARY_SCHEMA from role ESTUARY_ROLE;
revoke all privileges on database ESTUARY_DB from role ESTUARY_ROLE;

-- Drop the warehouse
drop warehouse if exists ESTUARY_WH;

-- Drop the role and user
drop user if exists ESTUARY_USER;
drop role if exists ESTUARY_ROLE;

-- Drop the schema and database
drop schema if exists ESTUARY_SCHEMA;
drop database if exists ESTUARY_DB;
Flow
In the UI, disable or delete any resources you don’t wish to keep.
Next Steps
That’s it! You should have everything you need to know to create your own data pipeline for loading data into Snowflake!
Now try it out on your own PostgreSQL database or other sources.
If you want to learn more, make sure you read through the Estuary documentation.
You’ll find instructions on how to use other connectors here. There are more tutorials here.
Also, don’t forget to join the Estuary Slack Community!